
Frequently Asked Questions
Google Calendar
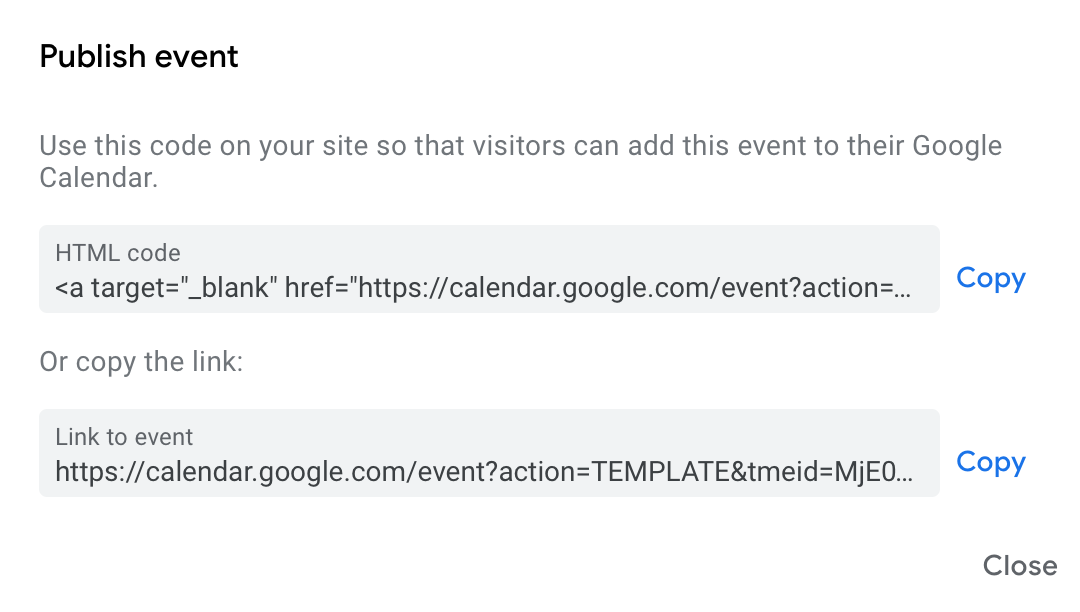
If you've created a Google Calendar event which you want to share with your email subscribers, you will need to create an event link to include in your email. Here's how:- Set up your event in your Google Calendar.
- Click on "Options" > "Publish Event"
- Copy the event link to include in your email template. Important: Make sure your calendar is set to public to ensure all recipients will be able to view the event.
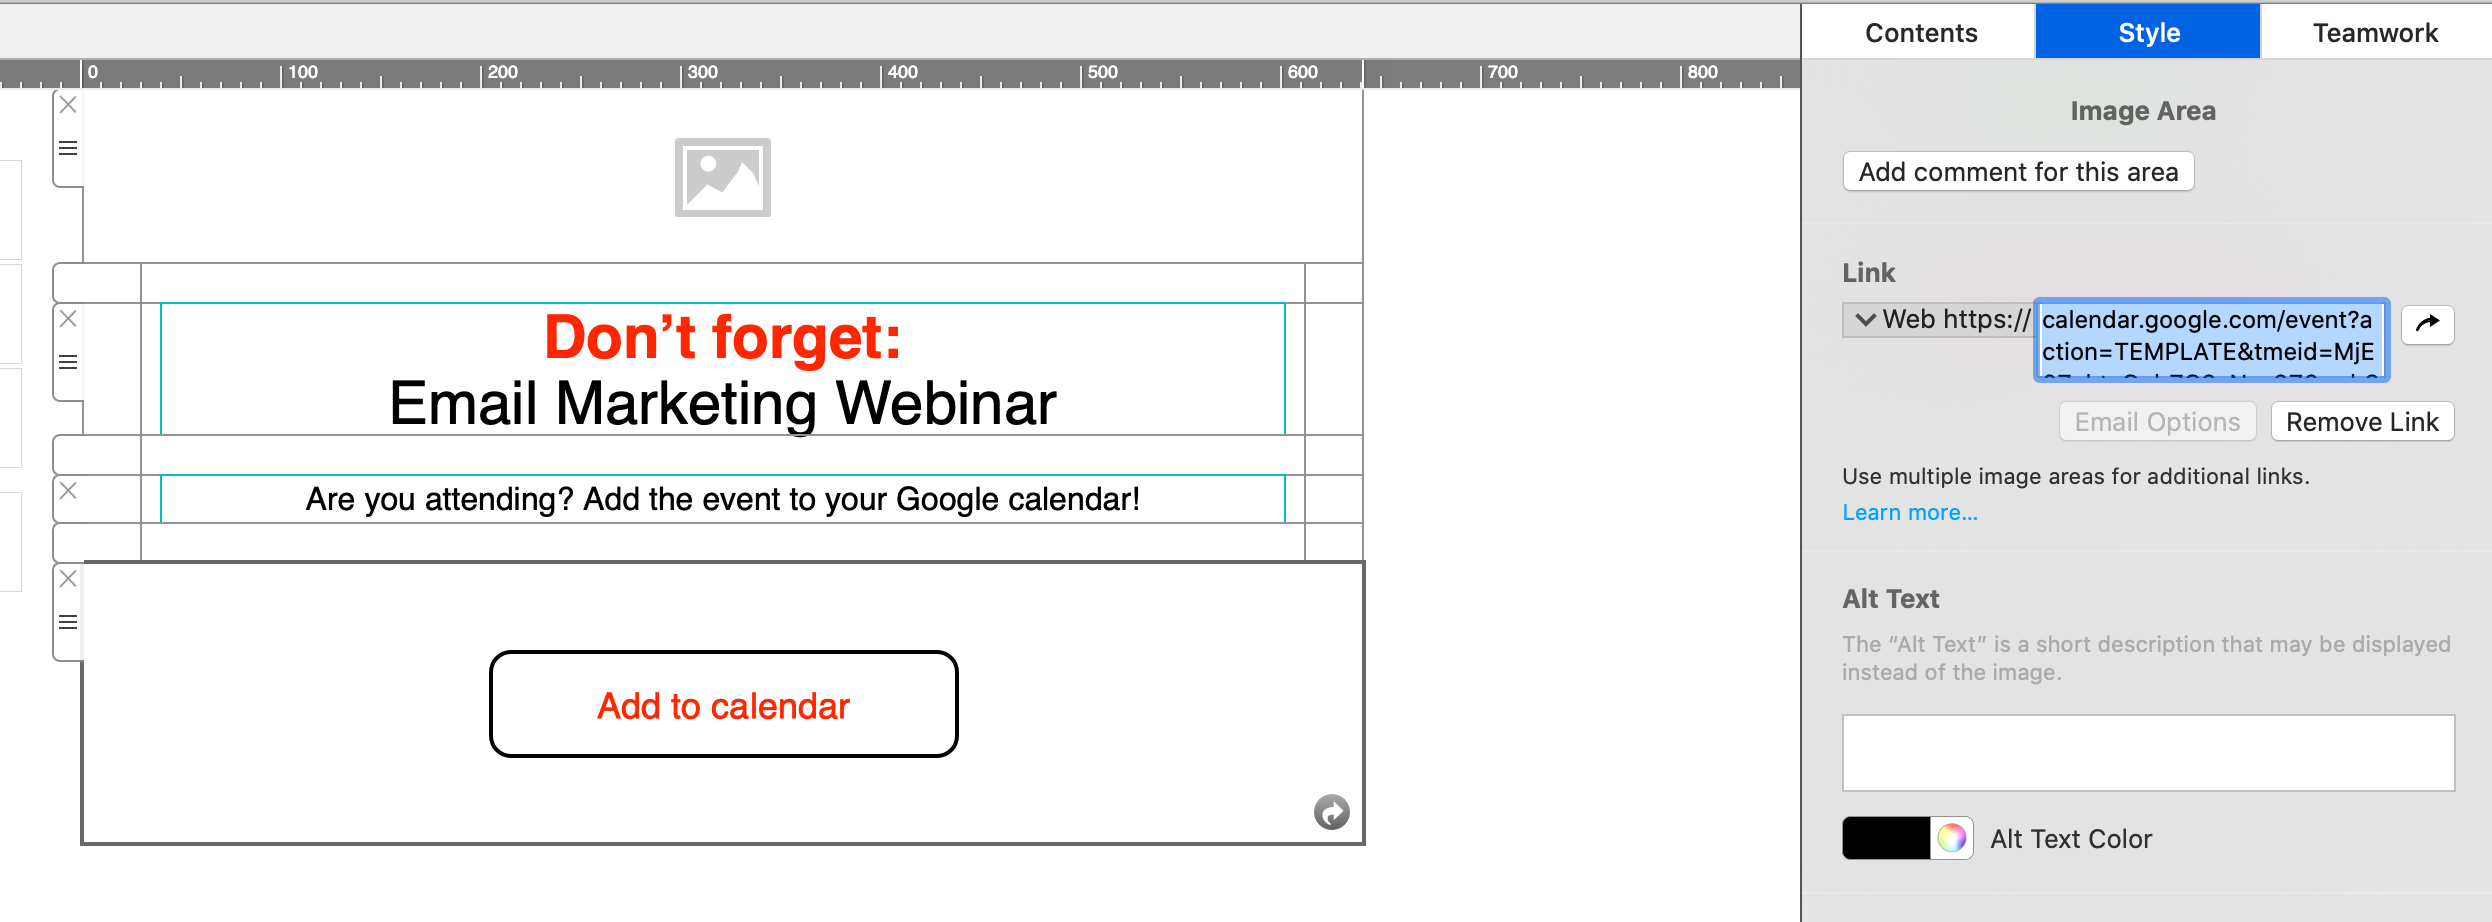
 Now you can insert the link into your Mail Designer 365 template; either as a text link, or attached to a call to action button:
Apple and Outlook Calendar
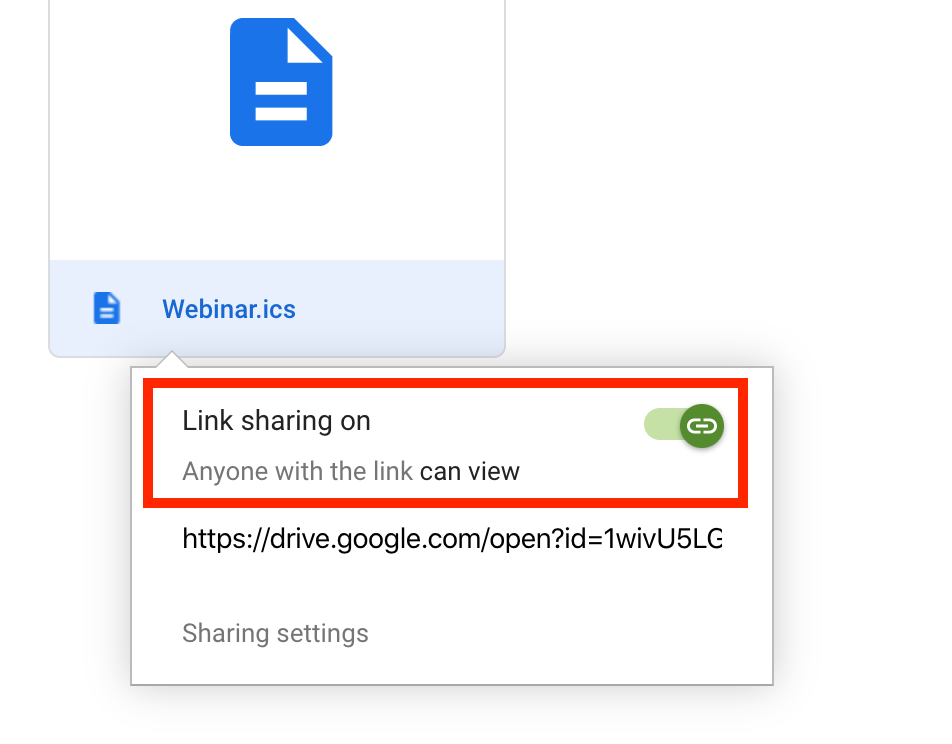
For Apple and Outlook calendars, you will need to create an .ics file for the calendar event. Simply set up your event in the calendar, then drag it on to your desktop to create the file: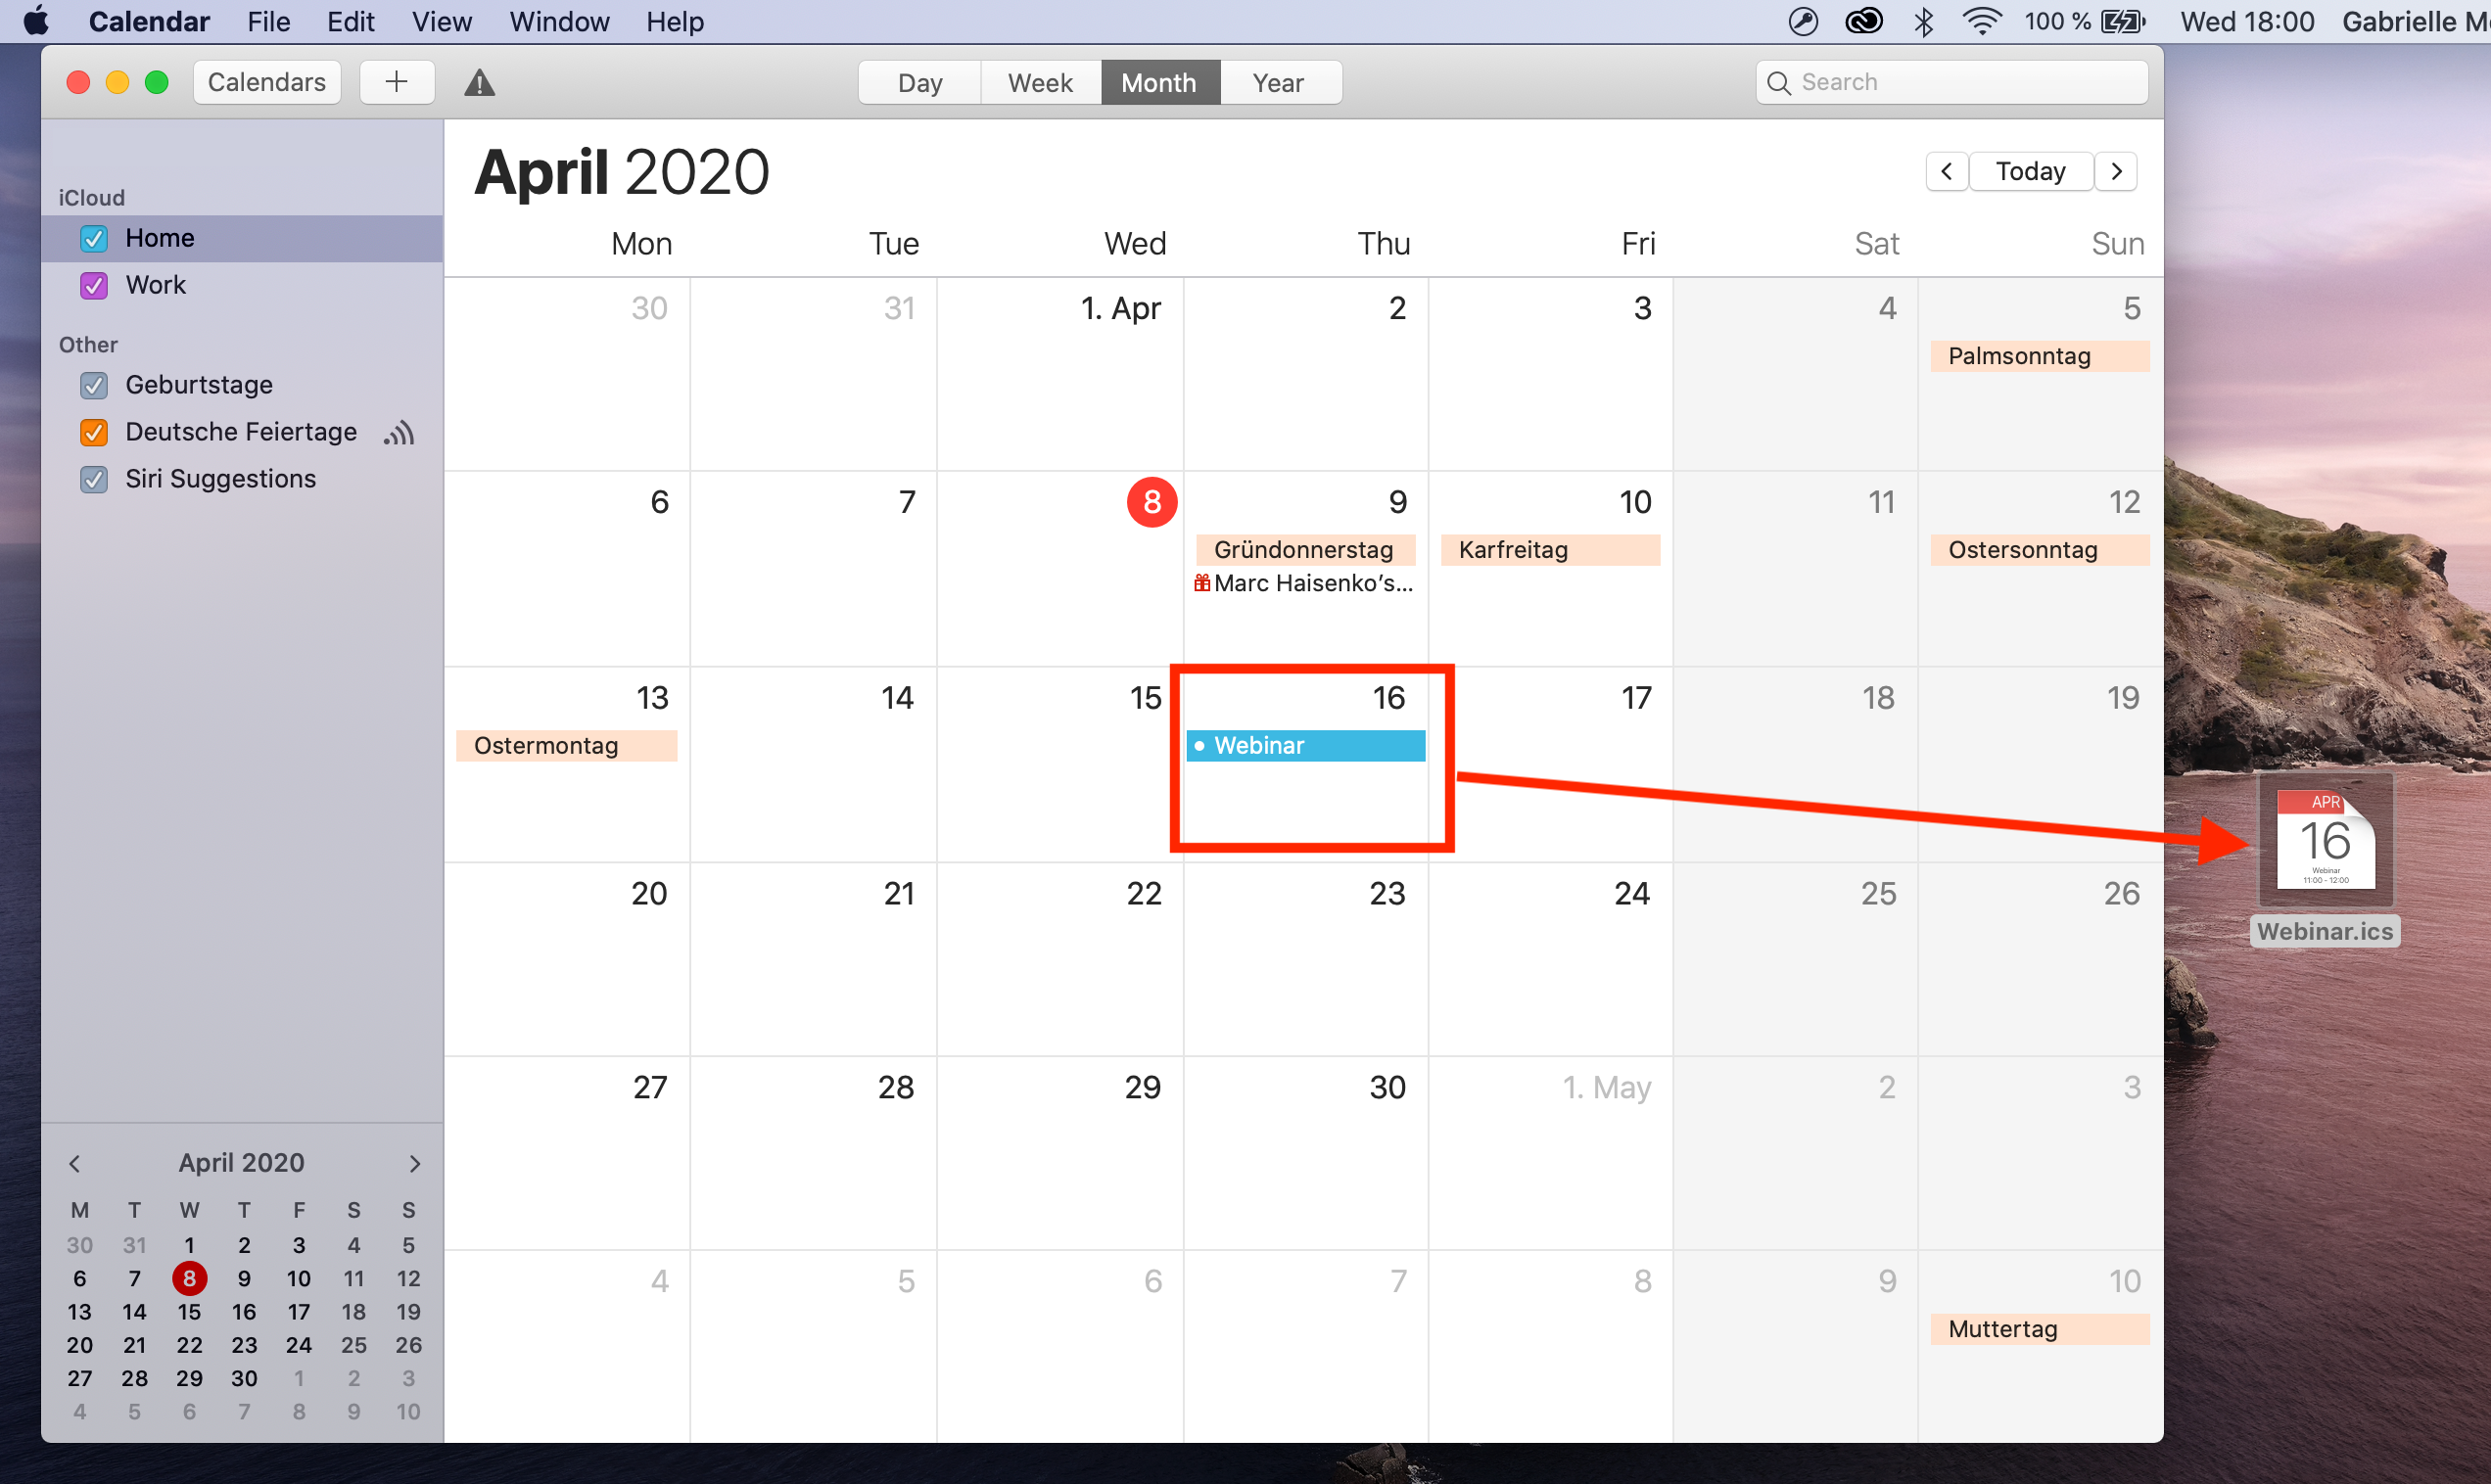 Now, upload the file to an online file hosting service (in this example, we will use Google Drive.) Right click the file to create a shareable link which you can insert into your email design:
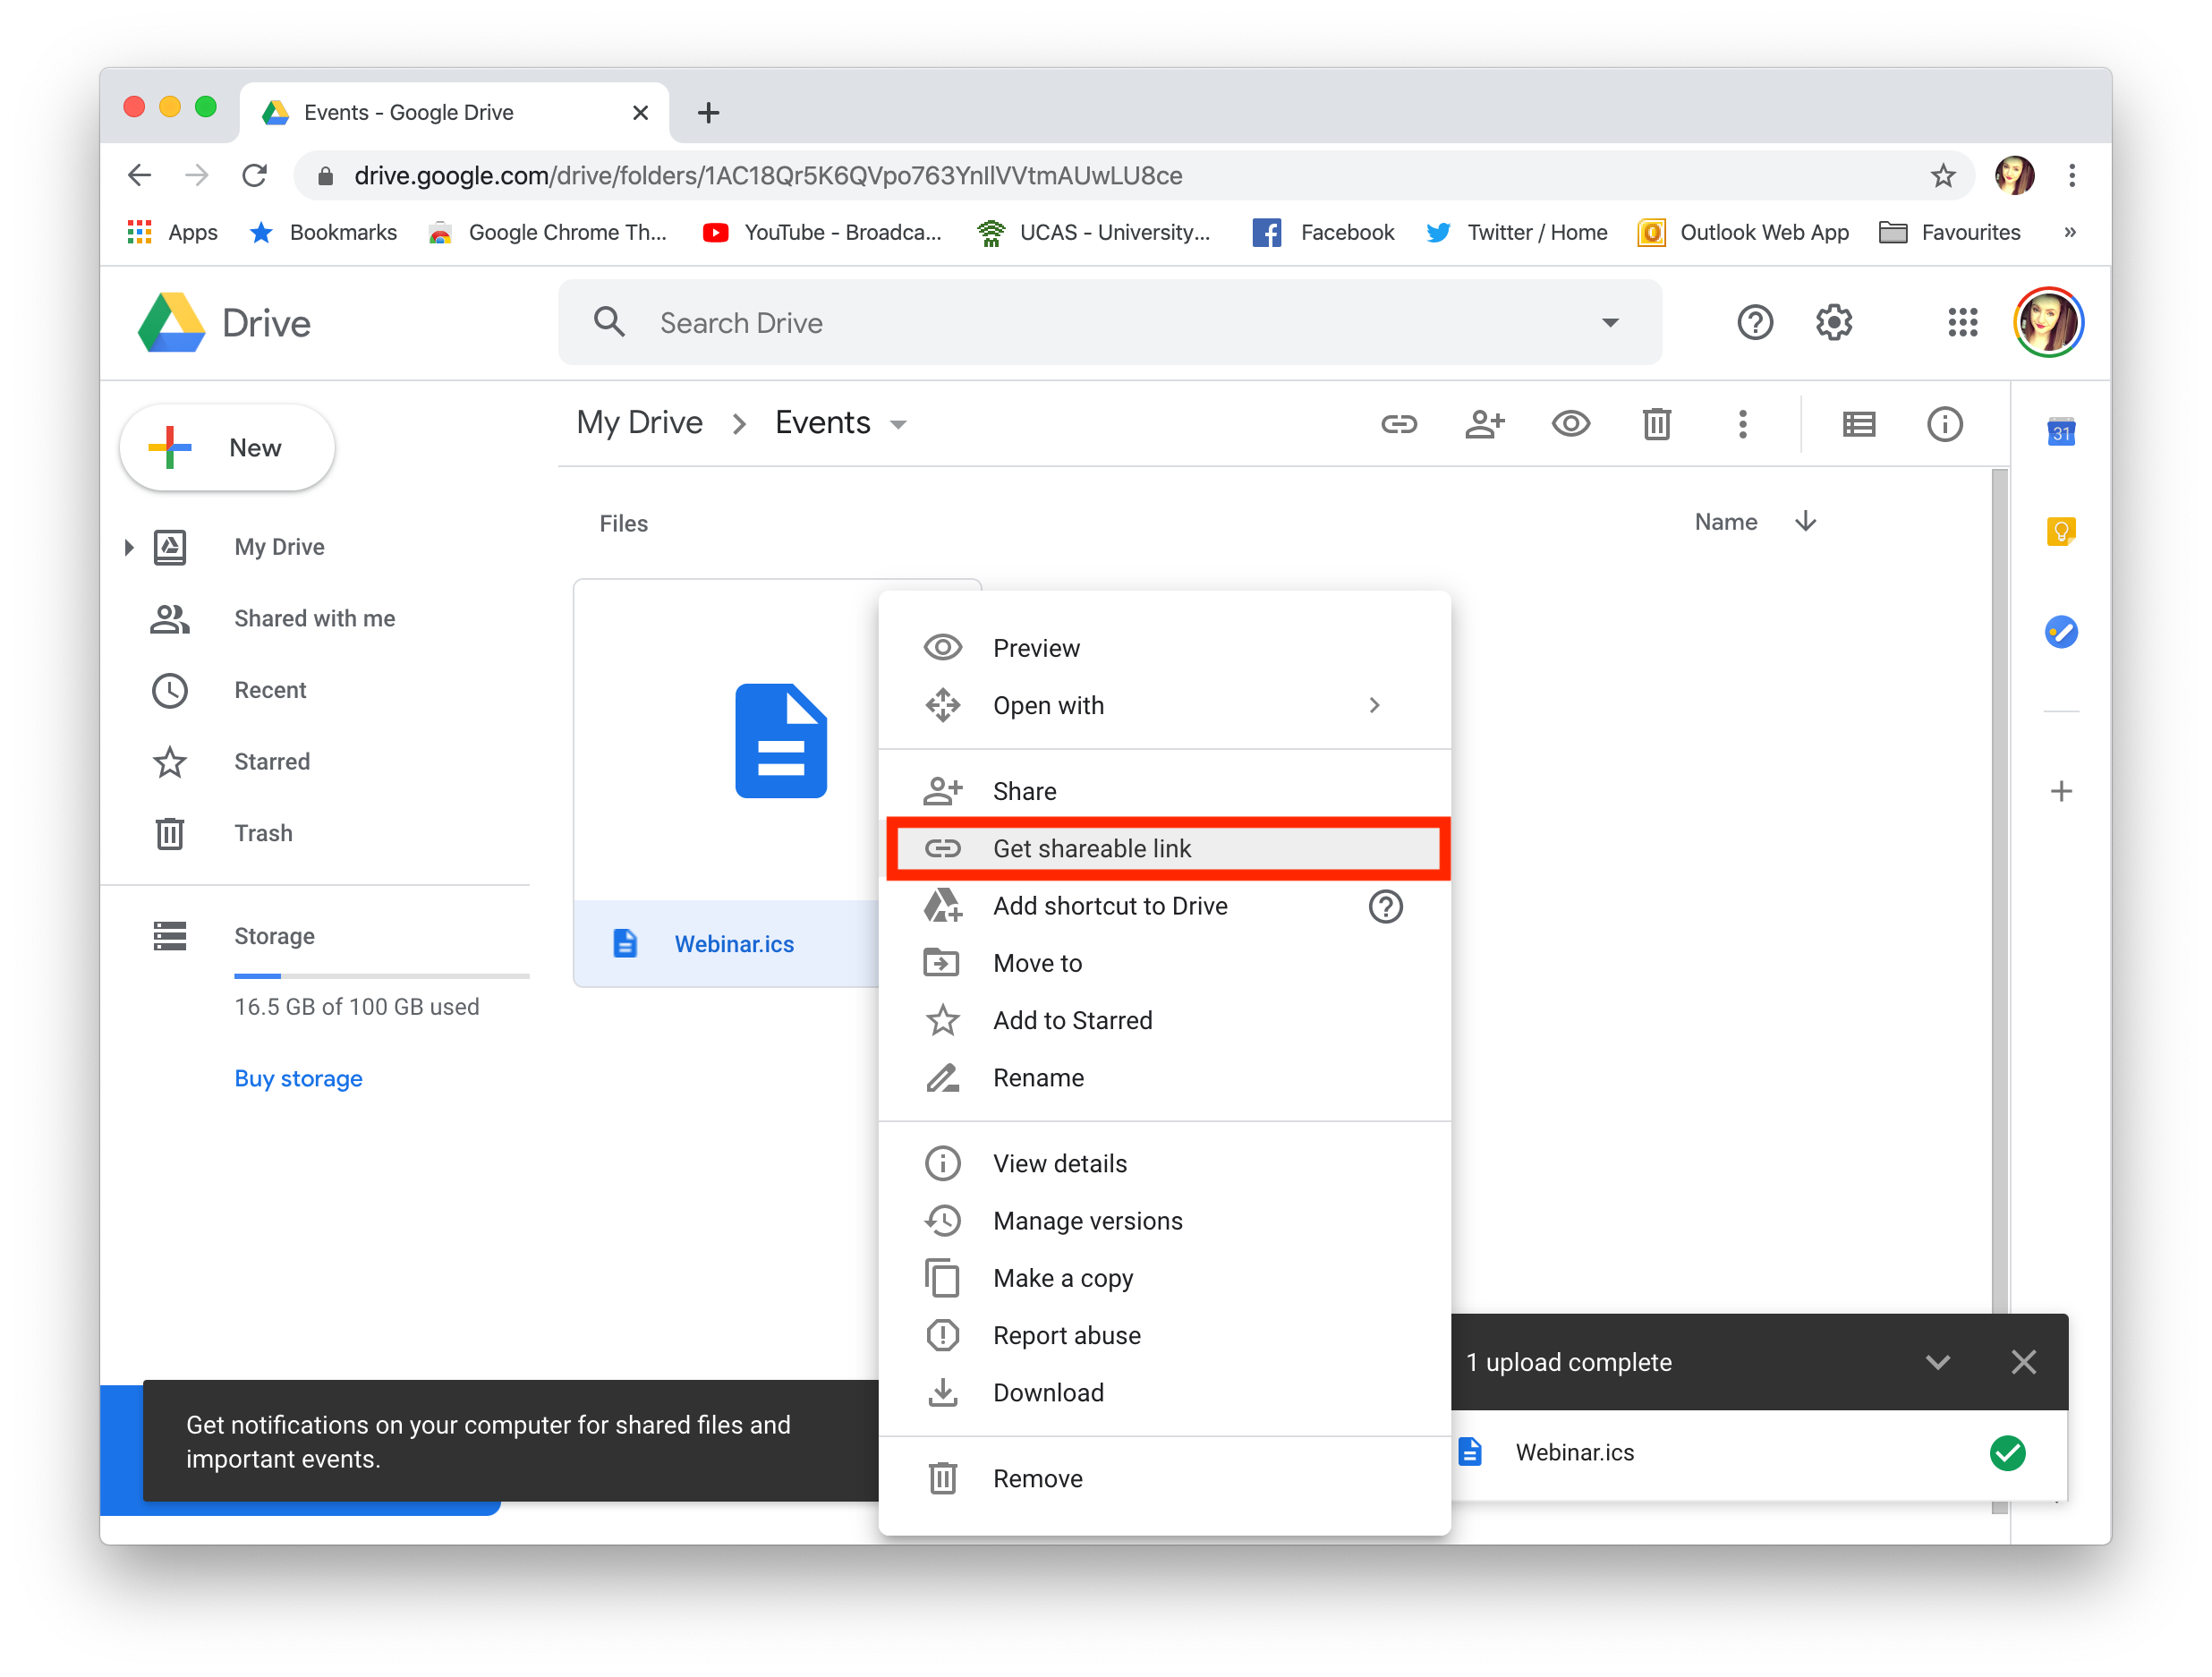 Remember to set the file to public if you are sharing it:
 You can now send a link to the calendar event to your subscribers, who can simply download the .ics file to add to their own calendar.
Tip: This tool is another great way of creating custom add to calendar links. Fill out your event's details and select the calendar service you wish to generate a link for (i.e. Google, Office 365, Outlook or Yahoo.) You can then copy the result to use in your Mail Designer 365 design.
You can now send a link to the calendar event to your subscribers, who can simply download the .ics file to add to their own calendar.
Tip: This tool is another great way of creating custom add to calendar links. Fill out your event's details and select the calendar service you wish to generate a link for (i.e. Google, Office 365, Outlook or Yahoo.) You can then copy the result to use in your Mail Designer 365 design.
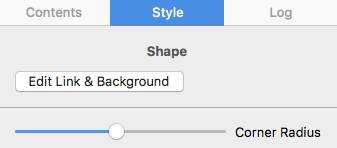
 Adjust the size of the image area as well as the size of the shape to fit your needs. You can also change the color of the shape. On right side, you can adjust the corners by moving the corner radius slide.
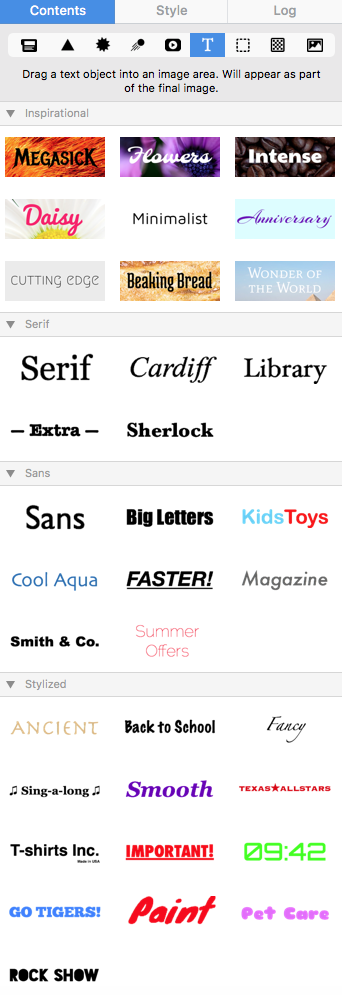
 Then, drag a text object into the image area to create a text box effect. You can find text objects under "T" icon within the "Contents" tab. Feel free to position the text box and change its font style, font weight, font size, font color, etc. to fit your needs.
 Please refer to the following page for further information on how to create the effect of having rounded text box corners:
To send your first email campaign, you first need to set up your email address and domain, so it's ok for Mail Designer 365 Delivery Hub to send emails on your behalf.
There are a few technical steps involved during setup. These steps are crucial, as leading email service providers will check that DKIM, SPF and DMARC authentication are configured in order to prevent spam.
Rest assured we've done all we can to make the setup process as simple and fuss free as possible for you. We recommend that you add all three methods to your domain so that your emails reach all recipients. If you require assistance at any point, reach out to your IT admin or get in touch with our support team.
Ready? Let's get started!
Step 1: Add and Verify your Email Address
Before you start, make sure that you have already set up a Mail Designer team. (If you have not done so already, check out our easy team setup guide).
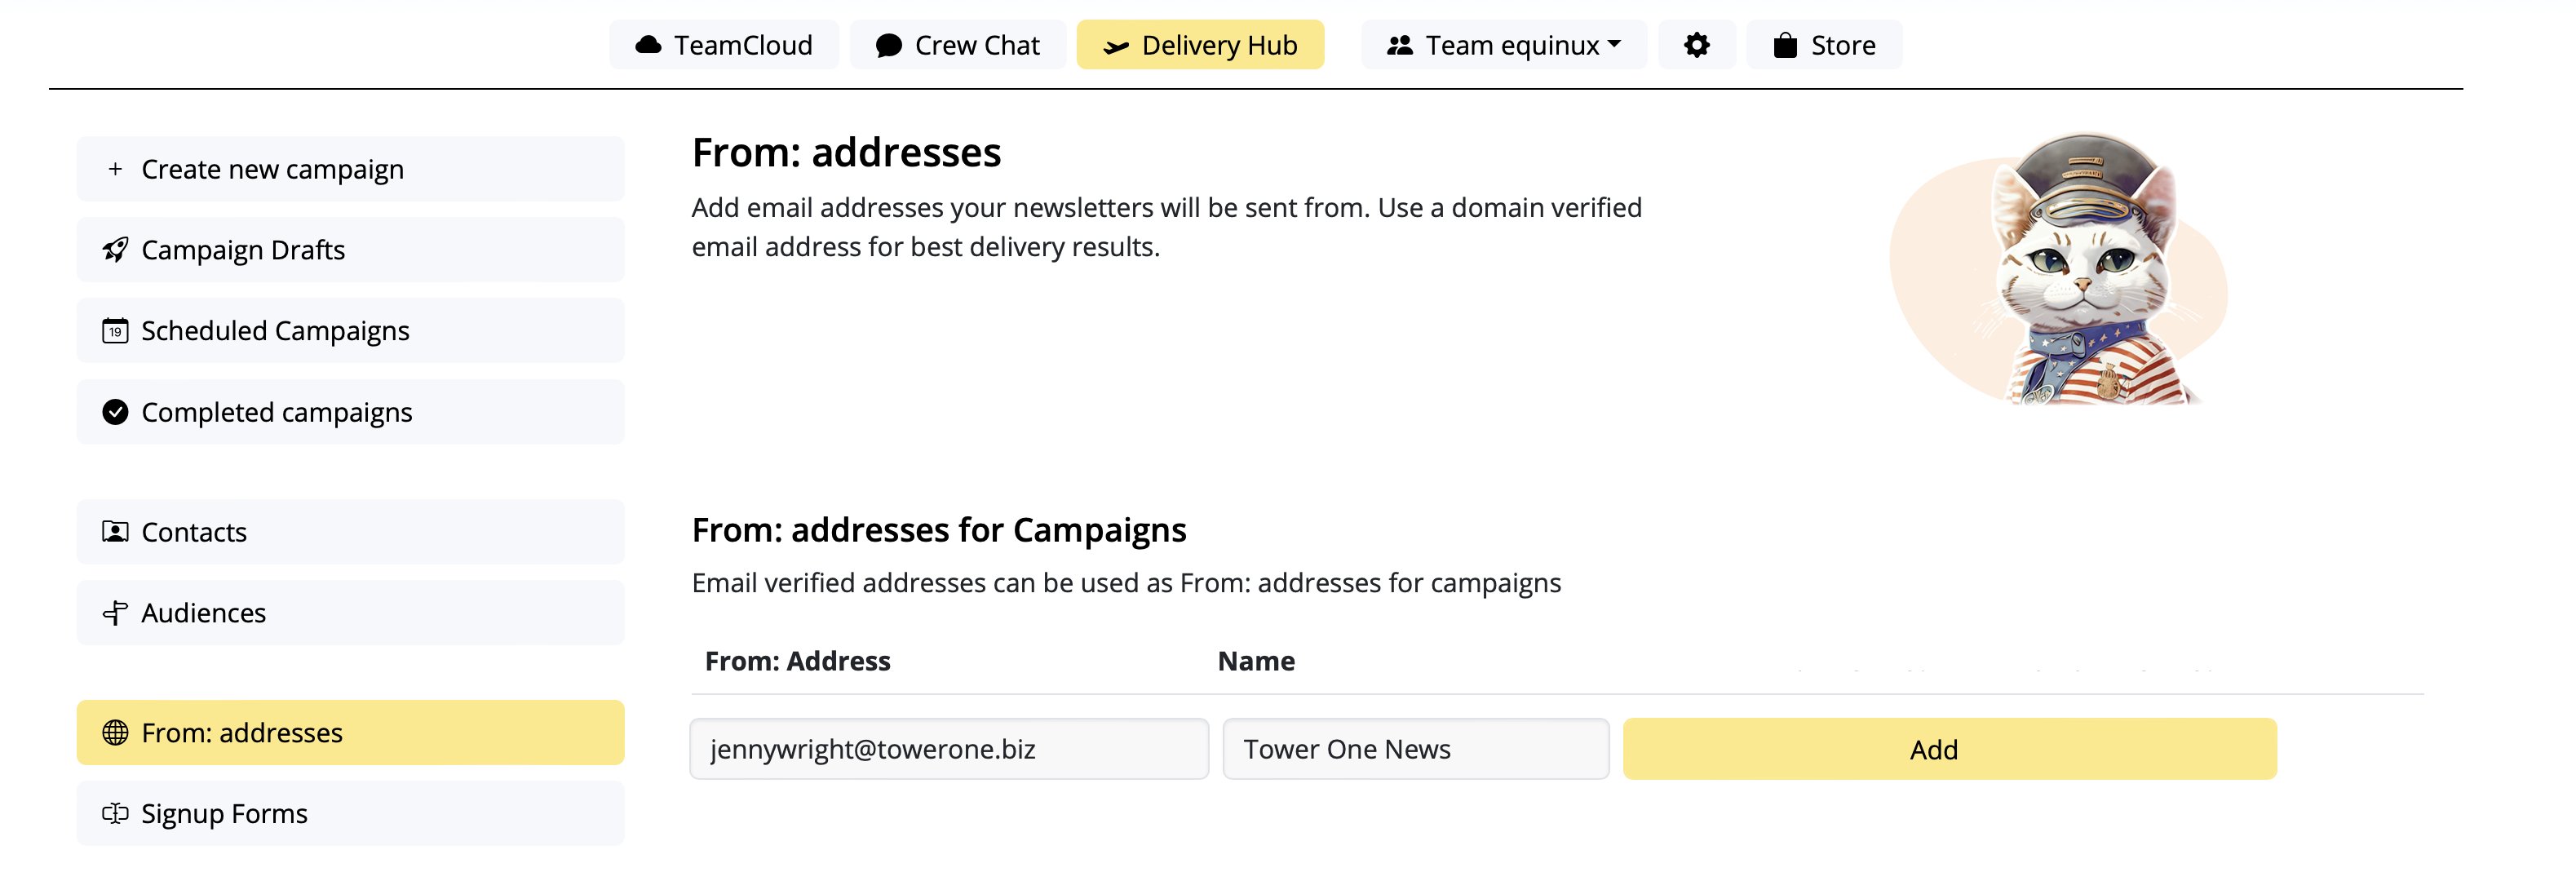
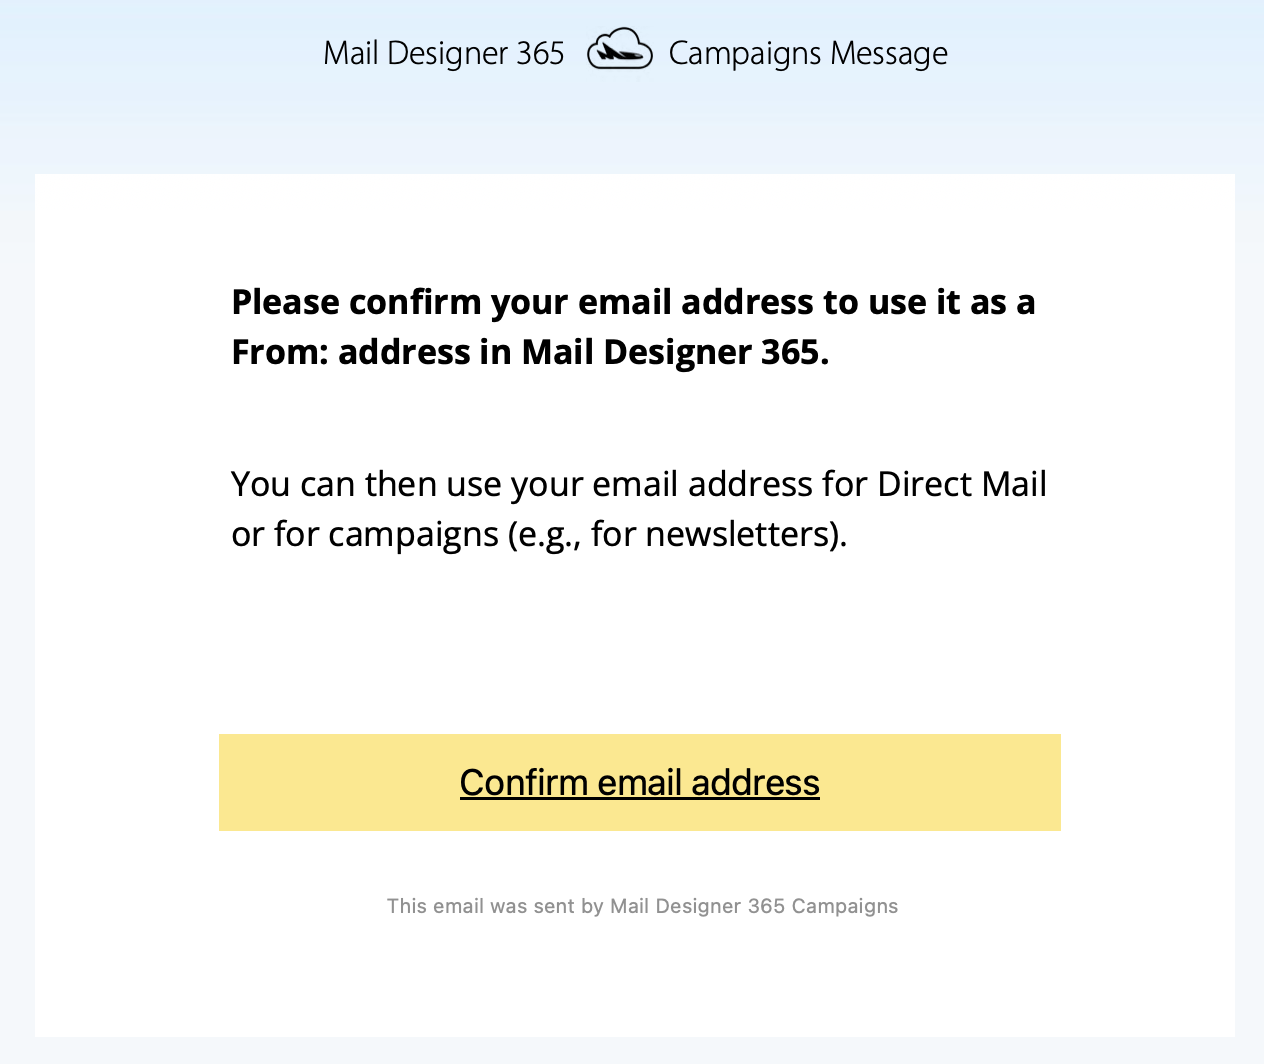
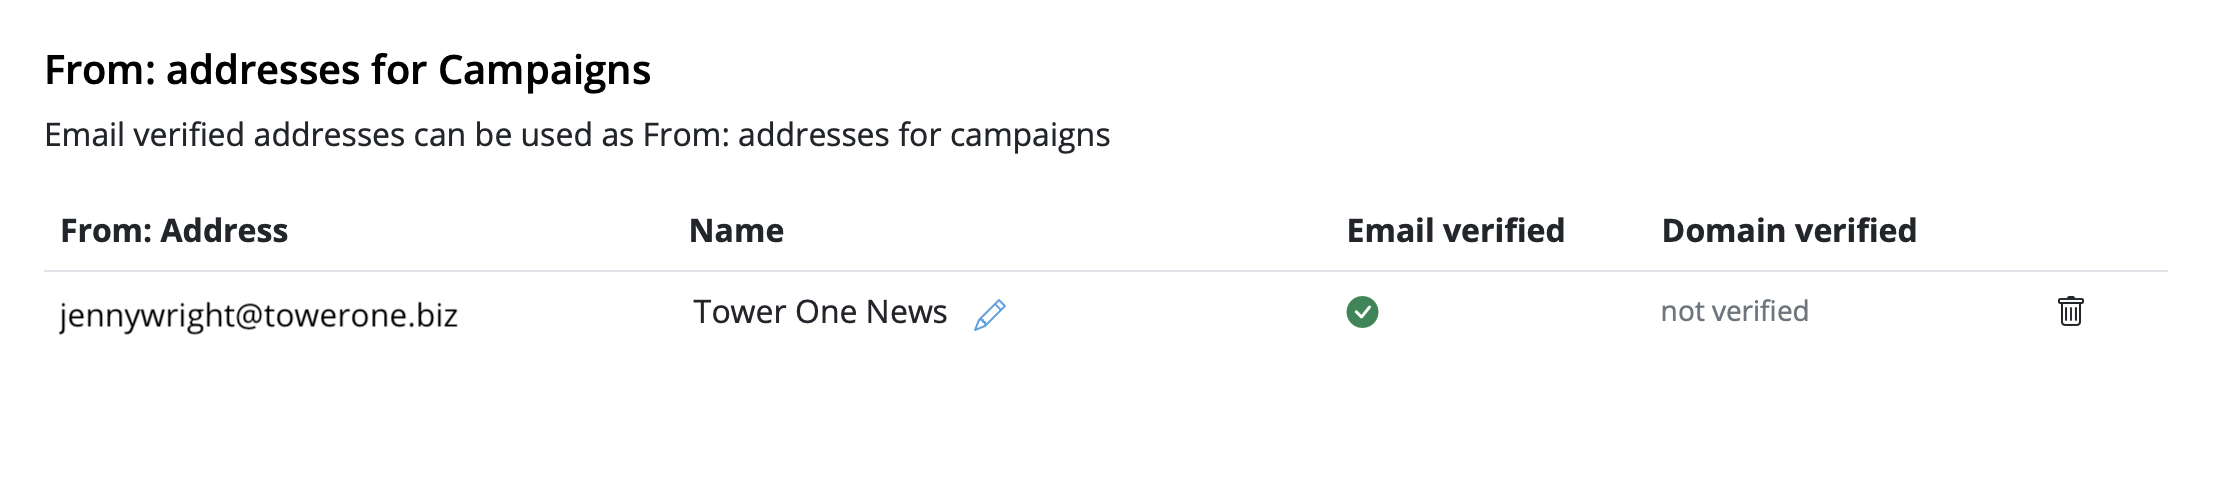
- Go to Settings > "From: addresses"
- Under "From: addresses for Campaigns", add a new sender by entering the "From Name" and email address your campaign will be sent from
- You'll now receive a verification email. Click the link to confirm you own the email address:
Step 2: To avoid to get marked as spam: Set up DKIM
For this you'll need to create a DNS entry for DKIM (DomainKeys Identified Mail) (more details about DKIM and why it's essential. You should definitely set up DKIM if you want to avoid your mailings ending up in the spam folder.
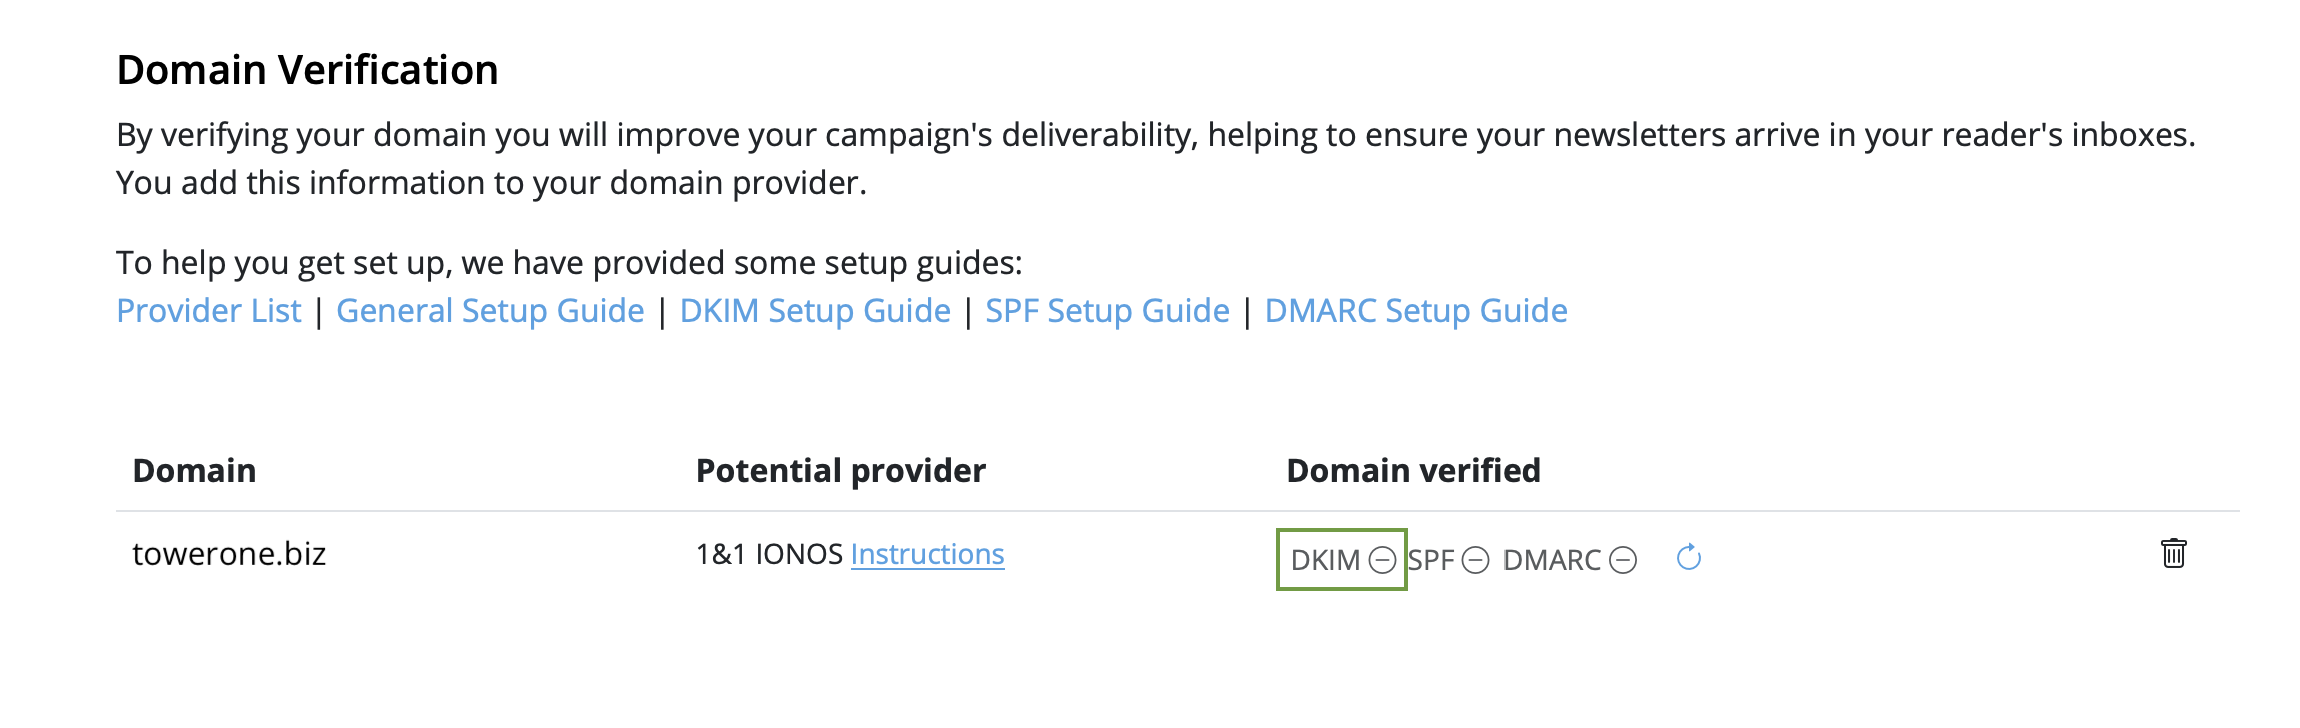
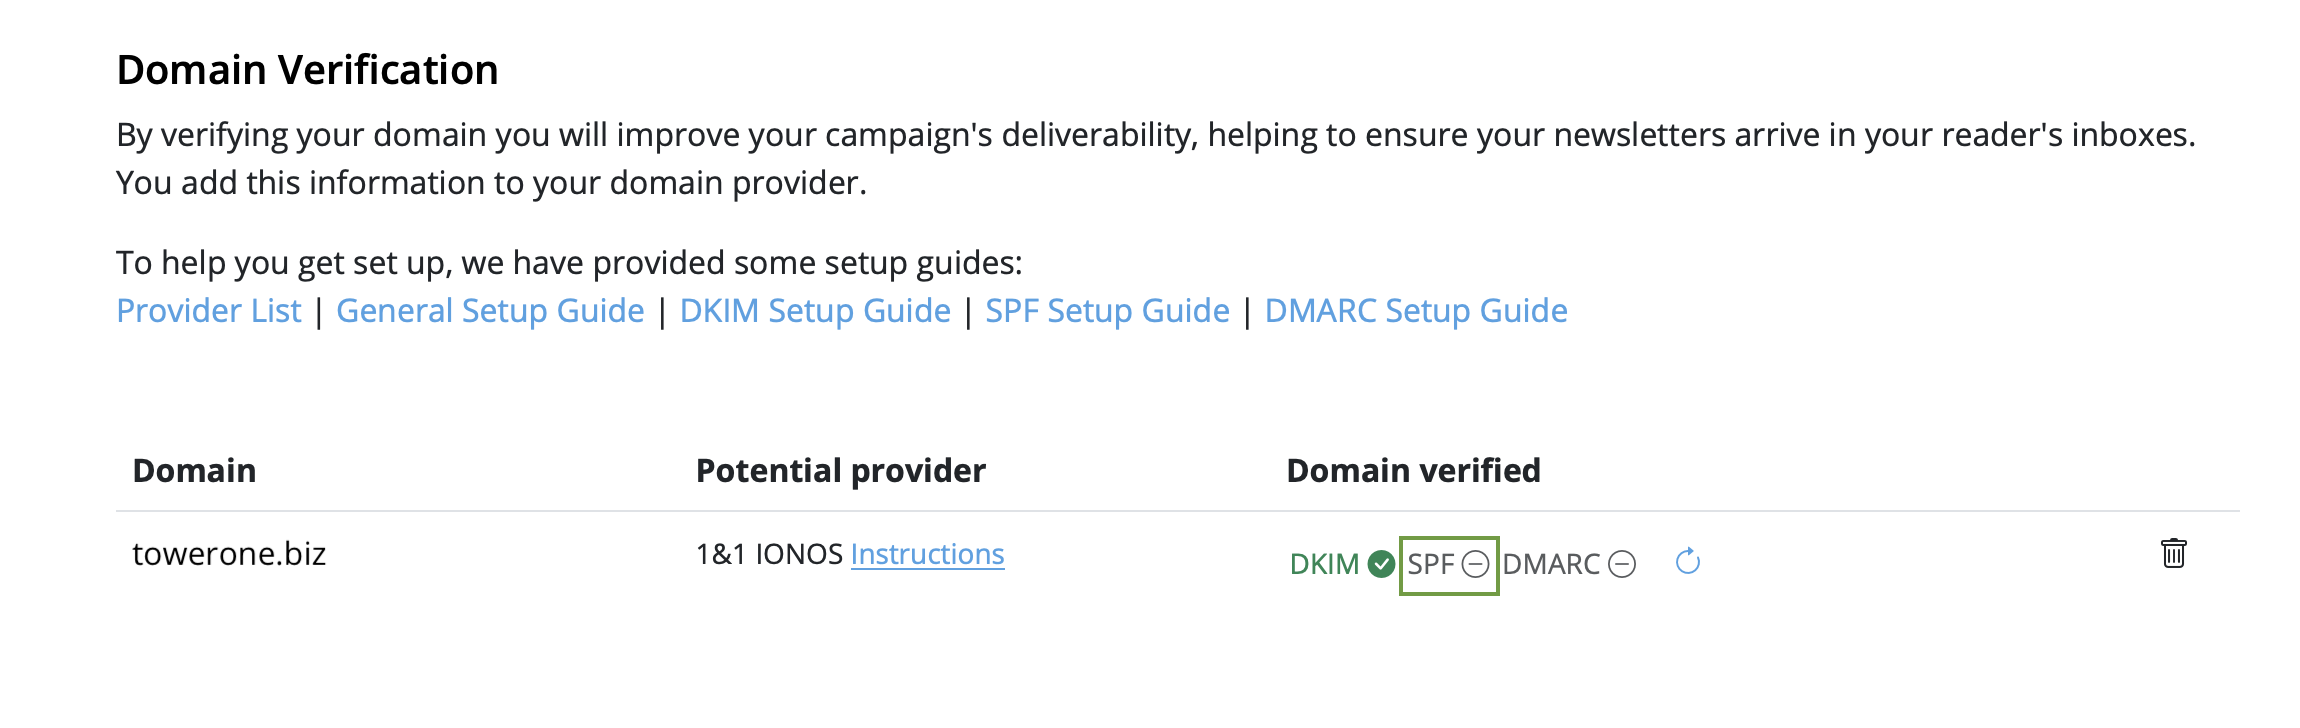
- Stay in "From: addresses" and scroll down to "Domain verification". You will now see the domain for the email address you just set up
- Now it's time to determine the DNS provider for your domain. Most likely, our system has already identified the provider and displayed it as a "Potential Provider," along with a link to the provider's guide. Tip: We've also compiled a list of links to setup guides for common providers in this article.
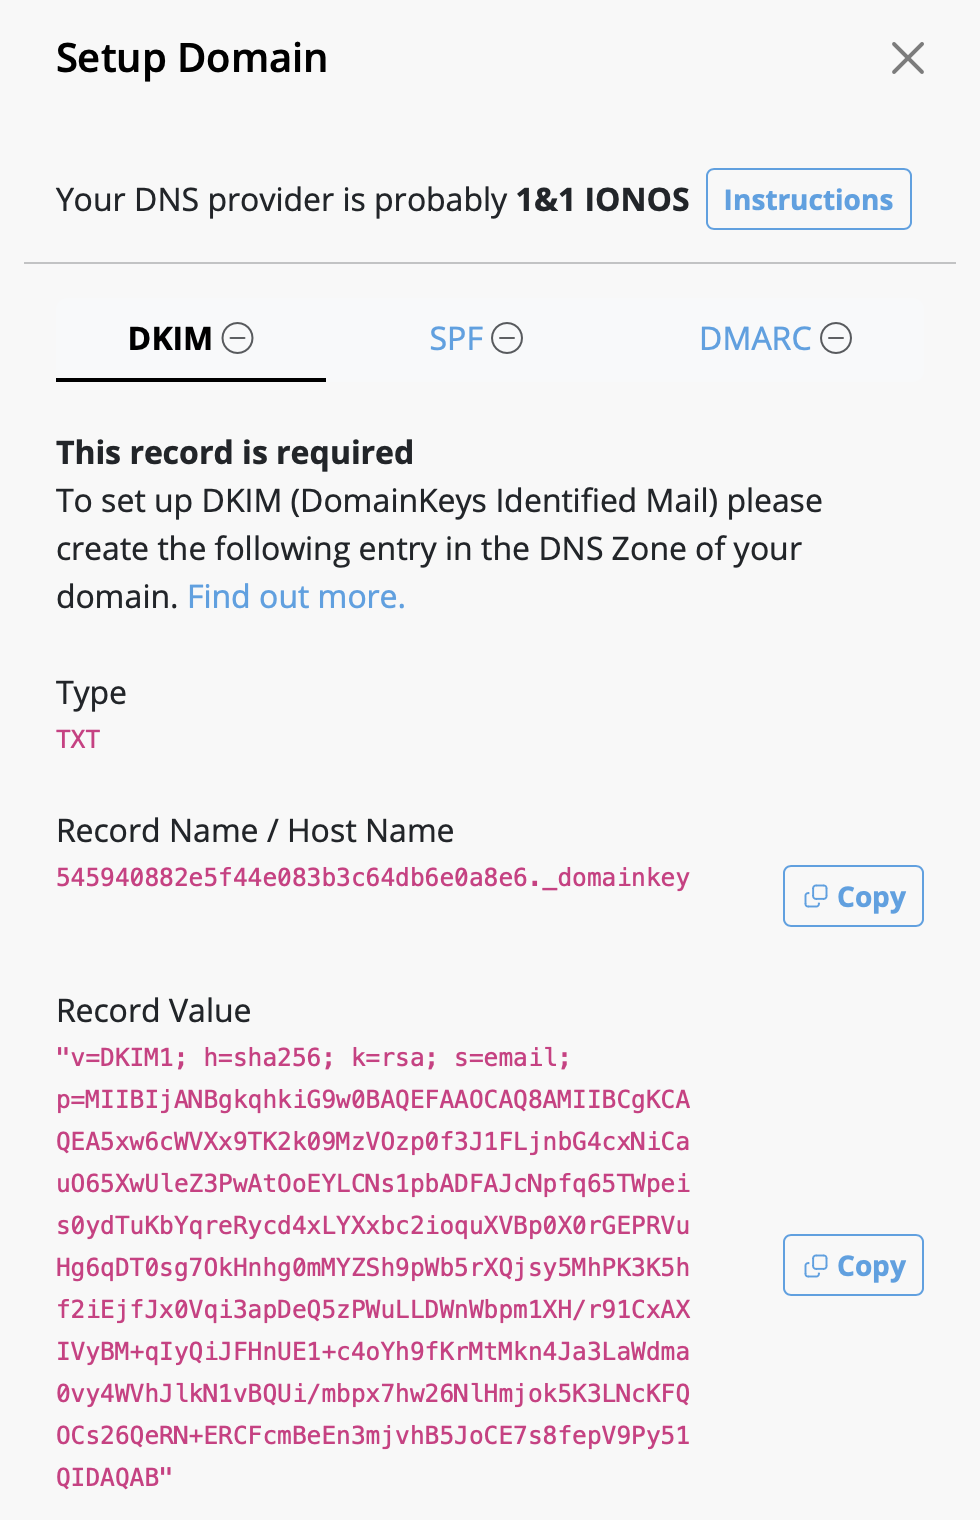
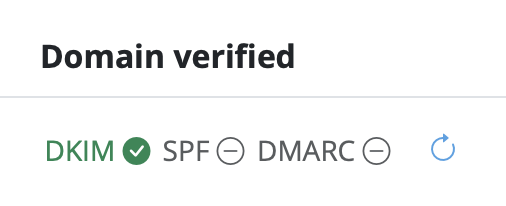
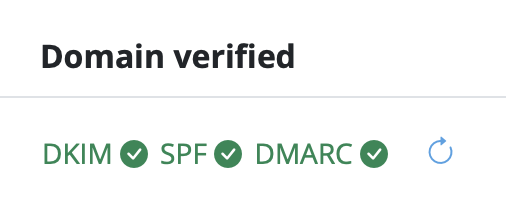
- Click on the "DKIM" icon in the "Domain verified" column:
- A DKIM record will be generated for your domain, along with the necessary type, name, and value of the record. Please use the exact information shown to set up the DNS record (including any special characters such as " or . ).
- Depending on your DNS provider, it may take up to 48 hours for the changes to propagate. Delivery Hub will periodically perform automatic checks. Alternatively, click the refresh icon to update results in real time:
- Once you've completed the setup, and the verification is successful, you'll see a green checkmark next to the DKIM icon:

Step 3: To avoid to get marked as spam: Set up SPF
Now, let's ensure your emails are properly authenticated with SPF (Sender Policy Framework), which prevents email spoofing (more details on SPF).
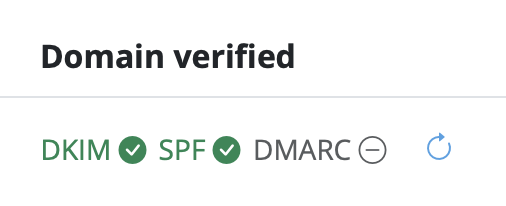
- Go back to your domain under "Domain Verification" and click "SPF":
- Next, go to your DNS provider and create an SPF record for your domain. The exact steps vary depending on your provider, so follow their guidelines.
-
Note: If you or your company have already created an SPF record, our
system will try to include the required part and display the full record
value respecting your previous content. If you feel confident and know what
you are doing, you can also manually edit your existing record and add the
following part:
include: spf.welovemails.com. - Once the verification has successfully completed, you'll see a green checkmark next to the SPF icon:
Step 4: Set up DMARC
Although not mandatory, setting up DMARC (Domain-based Message Authentication, Reporting, and Conformance) is recommended to add an extra layer of security to your emails (more details on DMARC).
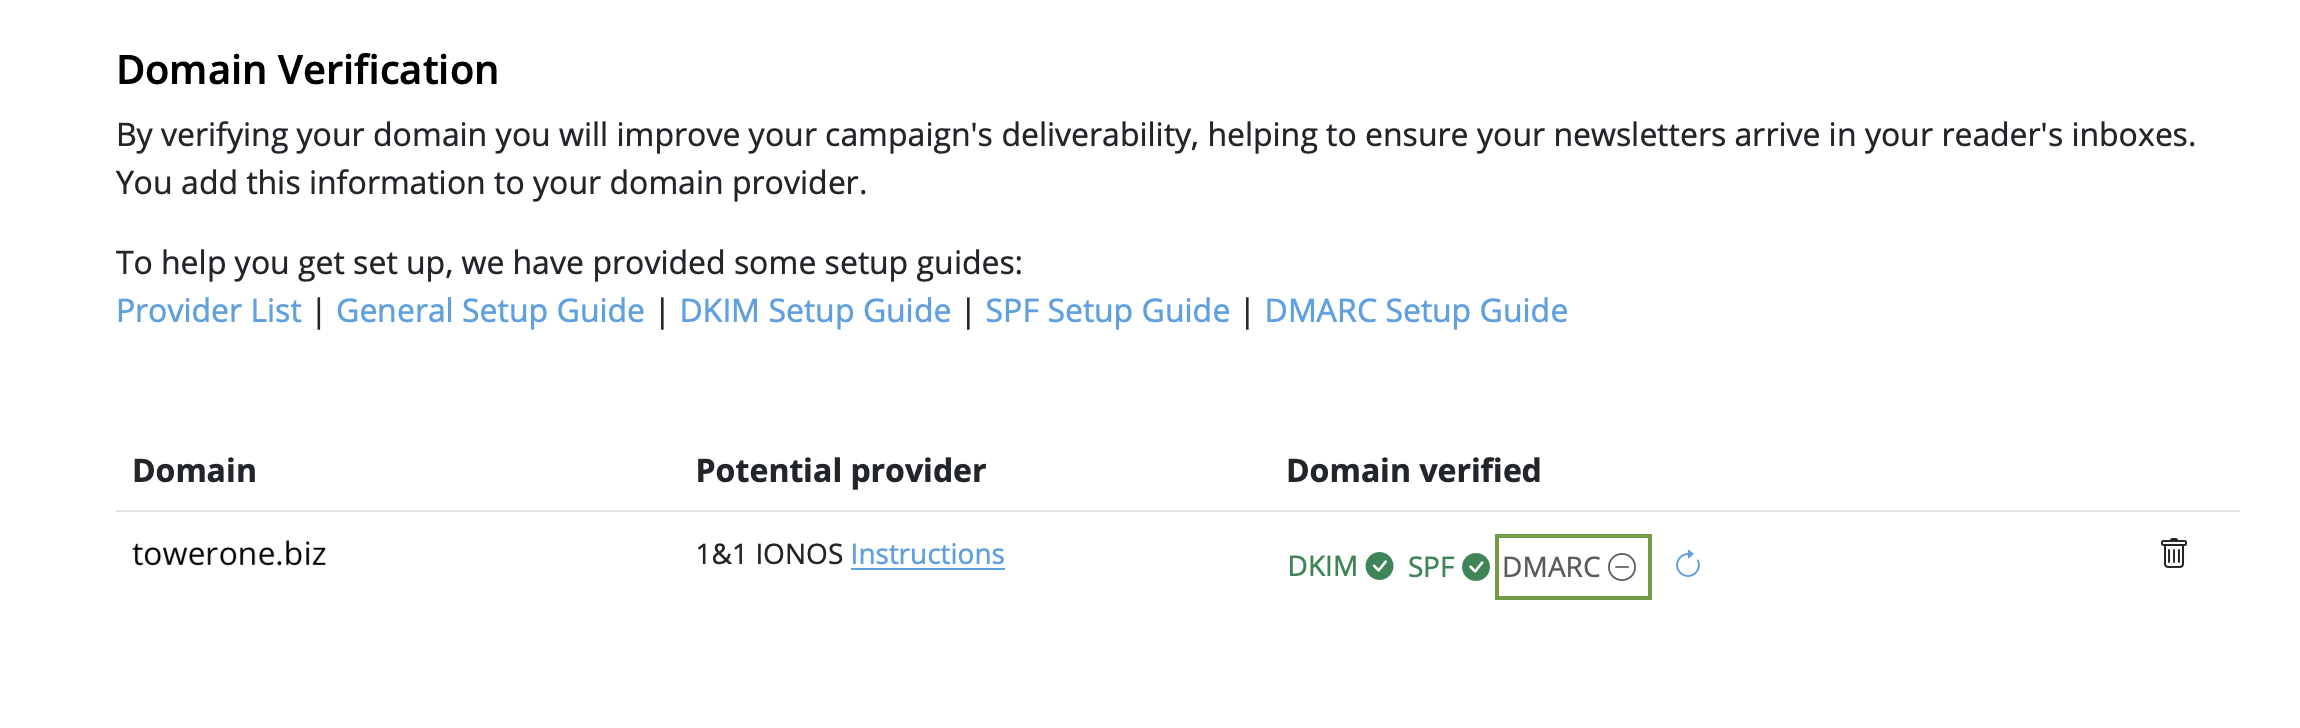
- Click on the "DMARC" icon under "Domain Verification":
- Then, create a DMARC DNS record for your domain
- Feel free to use the suggested record, or your own values. If you're unsure, check your organization's policies or ask your IT team
- Just like with SPF and DKIM, once the DMARC verification has successfully completed, you'll see a green checkmark next to the DMARC icon:
Congratulations! You've now set up and verified your from address and can start sending email campaigns to your audience.
In our testing, this has occasionally caused certain mail images to not load correctly at all (you should see a hint at the top of the Mail app):
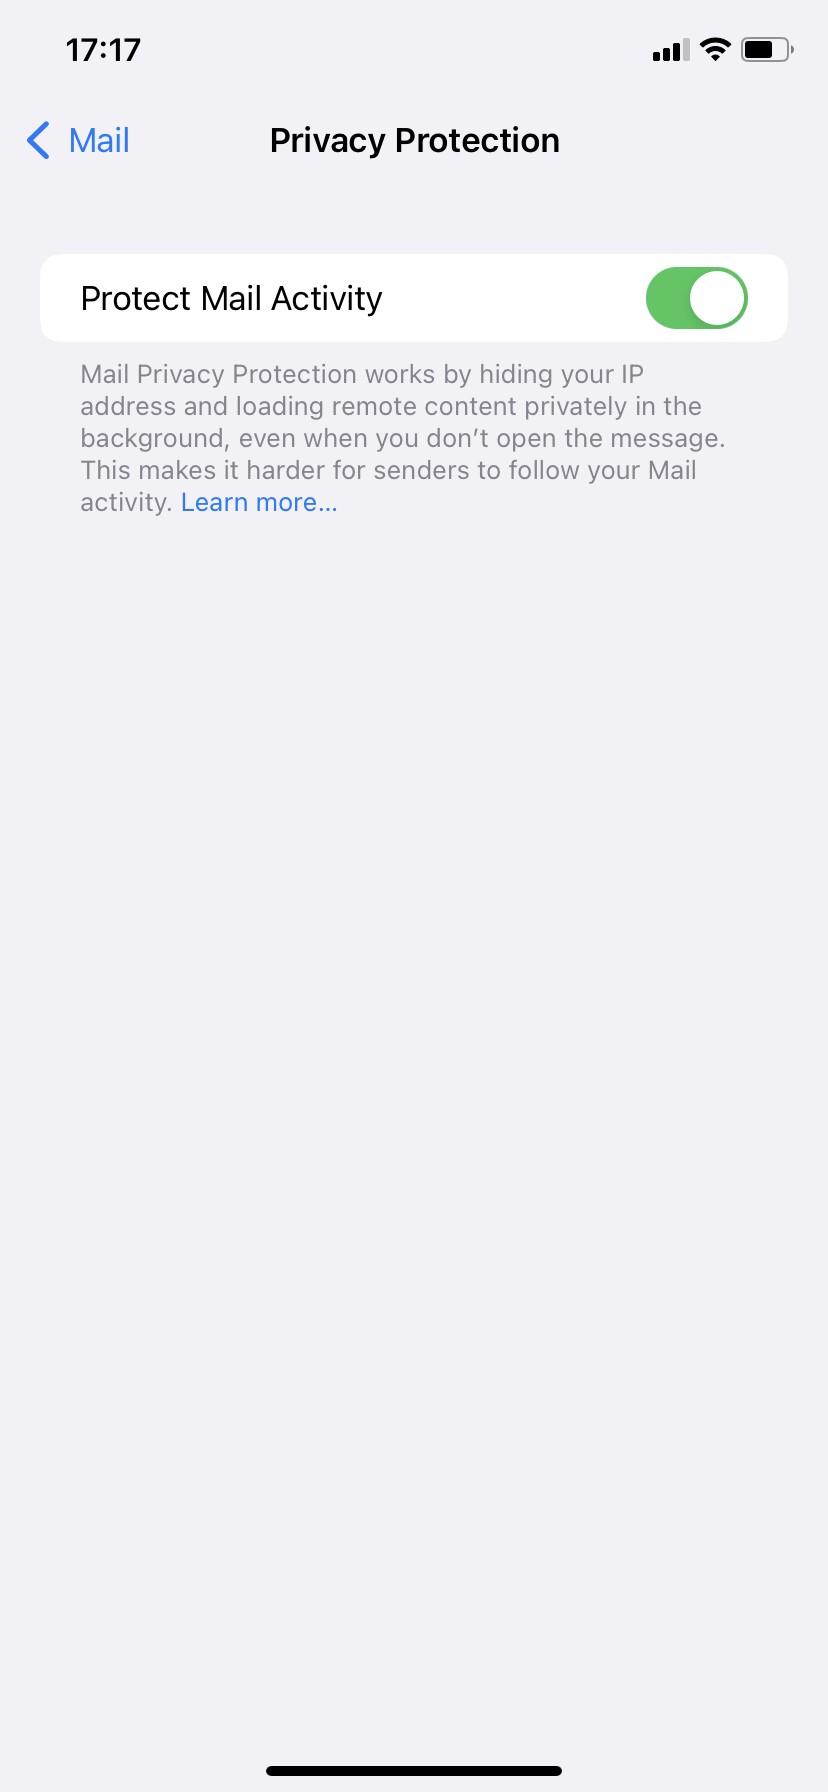
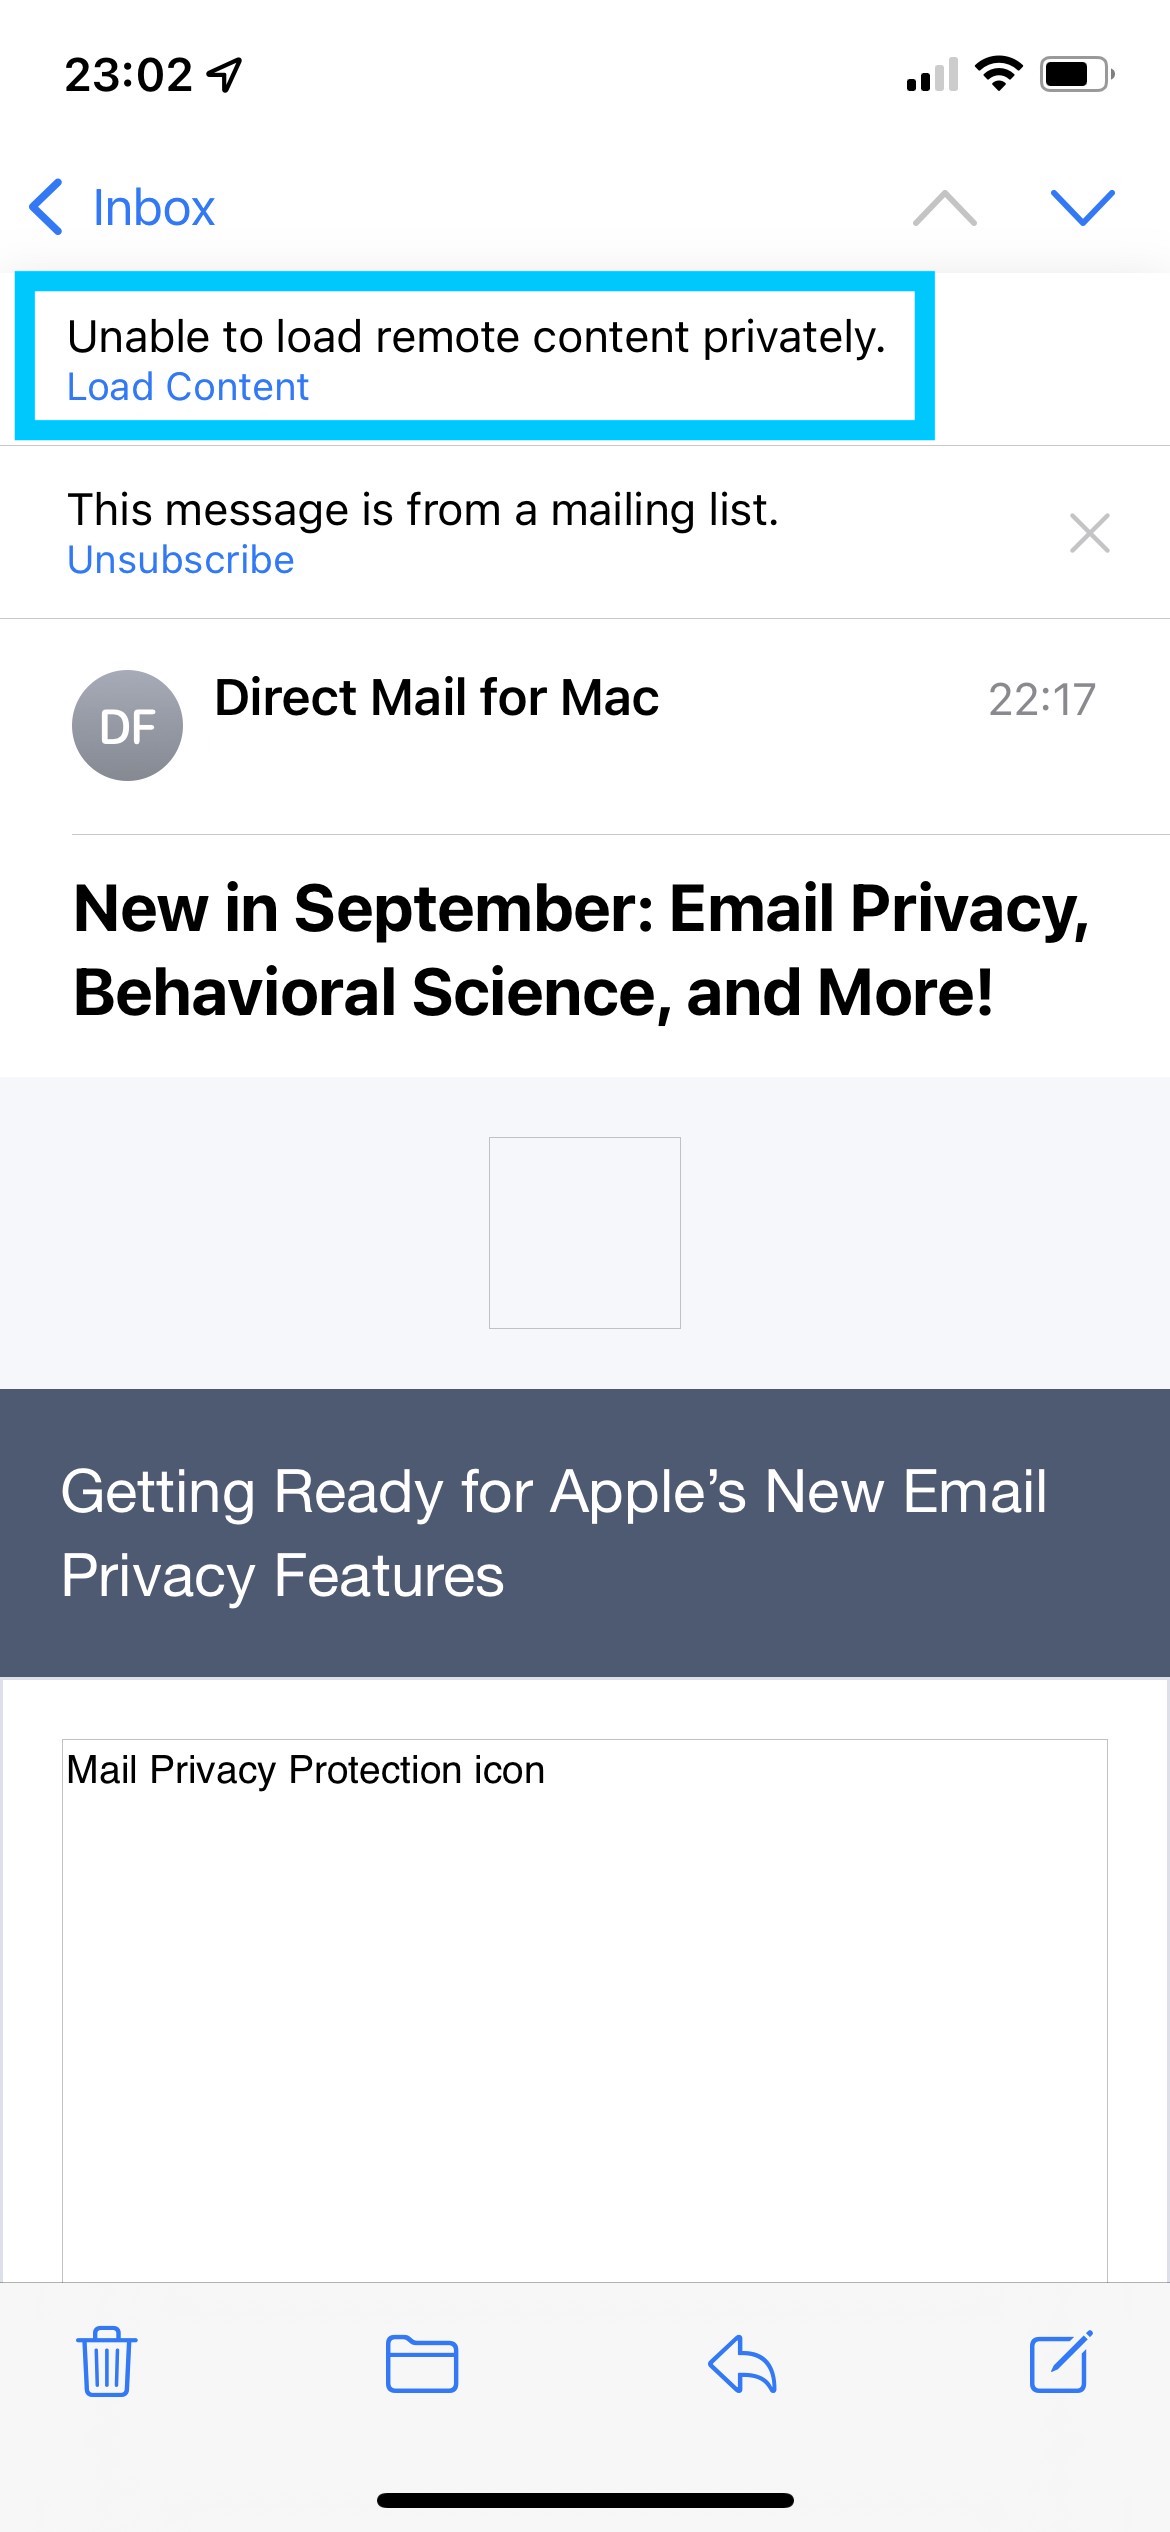 If you are unable to load the images in your email, try deactivating this feature and sending your email again.
To deactivate Mail Privacy Protection, open the Settings app on your iPhone, and choose Mail > Privacy Protection > Protect Mail Activity
 However, if you want to create the effect of having one image with multiple links, then check out our video tutorial:
Watch our video tutorial here:
Also, please refer to the following page for a step-by-step guide on how to create the effect of having one image with multiple links:
If you're trying to set up your email account in Mail Designer 365 and your password is being rejected, you may need to set up an app-specific password.
What is an app-specific password for? Many email providers now require a separate password to be used in 3rd party apps, in order to increase your overall account security. This may be required, even if you do not use 2-factor authentication to sign in to your email.
This means that you may need to create a separate password and use that in Mail Designer 365 in order to send emails directly from Mail Designer 365.
Please refer to your email provider's security or account settings, or visit your email provider's help pages on how to set up a 3rd party email app.
Links for selected email providers
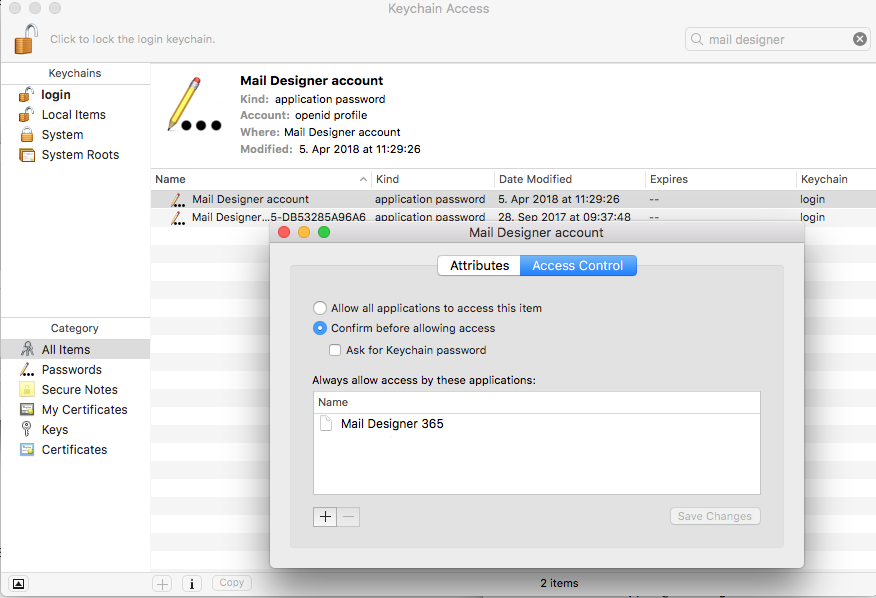
- Quit the Mail Designer 365 app.
- Open the "Keychain Access.app"
- Search for "Mail Designer" using the search field in the upper right corner of the window.
- Here you should find the entry "Mail Designer account." Double click on this entry to get details.
- Go to the "Access Control" tab and check to see if Mail Designer 365 is located under the "Always allow access to these applications" list.
- If you cannot see Mail Designer 365 on the list, please press the "+" underneath the list, find Mail Designer 365, and add it.
- Restart the app and login if prompted.
 Your login details for Mail Designer 365 should now be stored on your Mac. If you are still experiencing problems, please send us your debug logs and let us know via support@maildesigner365.com.
Quick summary of what to avoid when using Unsplash photos:
- ✘ people's faces are recognizable (unless you can get model release of those people)
✘ photos that show logos, trademarks, brands
✘ images that put people in a bad light
✘ photos of private property (e.g. private homes and buildings)
Is the Unsplash license the same as the CC0 license?
When it comes to using images that you did not take, create, or do not own, you should stay mindful of the laws and licensing types that guide images. Many image libraries are published under "CC0,” which means “no rights reserved." A CC0 license is also a way for photographers and artists to publish their work and give permission to the public to use their work for free. Curators who publish their works under CC0 and waive copyright of their works place them for public use. An image that has CC0 that carries this designation has “No Rights Reserved” and is free of copyright restrictions, and likely other restrictions (i.e., moral, publicity, and privacy rights). This is a very broad designation and it is clearly understood within the Creative Commons community that no work carries this designation unless it is explicitly marked as a CC0 work. As a result, anyone can use them, edit them, etc. without restriction of copyright law. Unsplash is similar to a CC0 license with one difference: the Unsplash license does not include the right to compile images from Unsplash and then use them to create a similar or competing service.While the Unsplash license give people a lot of freedom, keep these exceptions in mind before using an image:
- ‣ Are people’s faces identifiable? If they are, you will require their individual consent – and not just the consent of the artist or photographer who took the picture. Only use these photos if you are able to get model release from each person whose face is showing on the image.
‣ Does the photo show people in a negative way or can be interpreted in a negative way? If yes, then avoid using these photos. Otherwise, you will need to get model release from each person whose face is showing on the image.
‣ Does the picture show other products, trademarks, or logos? Refrain from using these types of photos because they may suggest that the other brand or product is endorsing your product or service.
‣ Do you see landmarks, buildings, homes, automobiles, etc. that are actually private property within the photos? If yes, avoid these pictures unless you can acquire the permission of the owner of the private property. Make sure that the photos you use do not show valuable information about other people's property like the address, license plate, etc.
The Unsplash license and the CC0 license have these in common:
- ‣ They are both sub-licensable (so you can use them)
‣ They are non-revocable, which means that you are able to use them forever.
‣ They allow users to use the photos for free.
‣ They allow you to modify and/or distribute, perform the photos for free.
‣ They allow users to use the images for personal and commercial purposes.
‣ They do not require attribution, although it would be nice.
Although you are not legally obligated to follow the list below, these are still good practice suggestions:
- ‣ You can use Unsplash photos for commercial use. However, try to edit or add to the photo creatively through image editing or other methods.
‣ Unsplash photos are non-revocable. However, if a photographer decides to remove his or her photo, it is good practice that you respect the photographer's wishes and refrain from using the photo.
- Log in to your AOL account and go to your account settings
- Go to the "Account Security" tab and choose "Manage app passwords."
- From the dropdown menu, select "Other" and give the app a name (i.e. Mail Designer 365)
- Click "Generate" to create a new password. This will appear on your screen
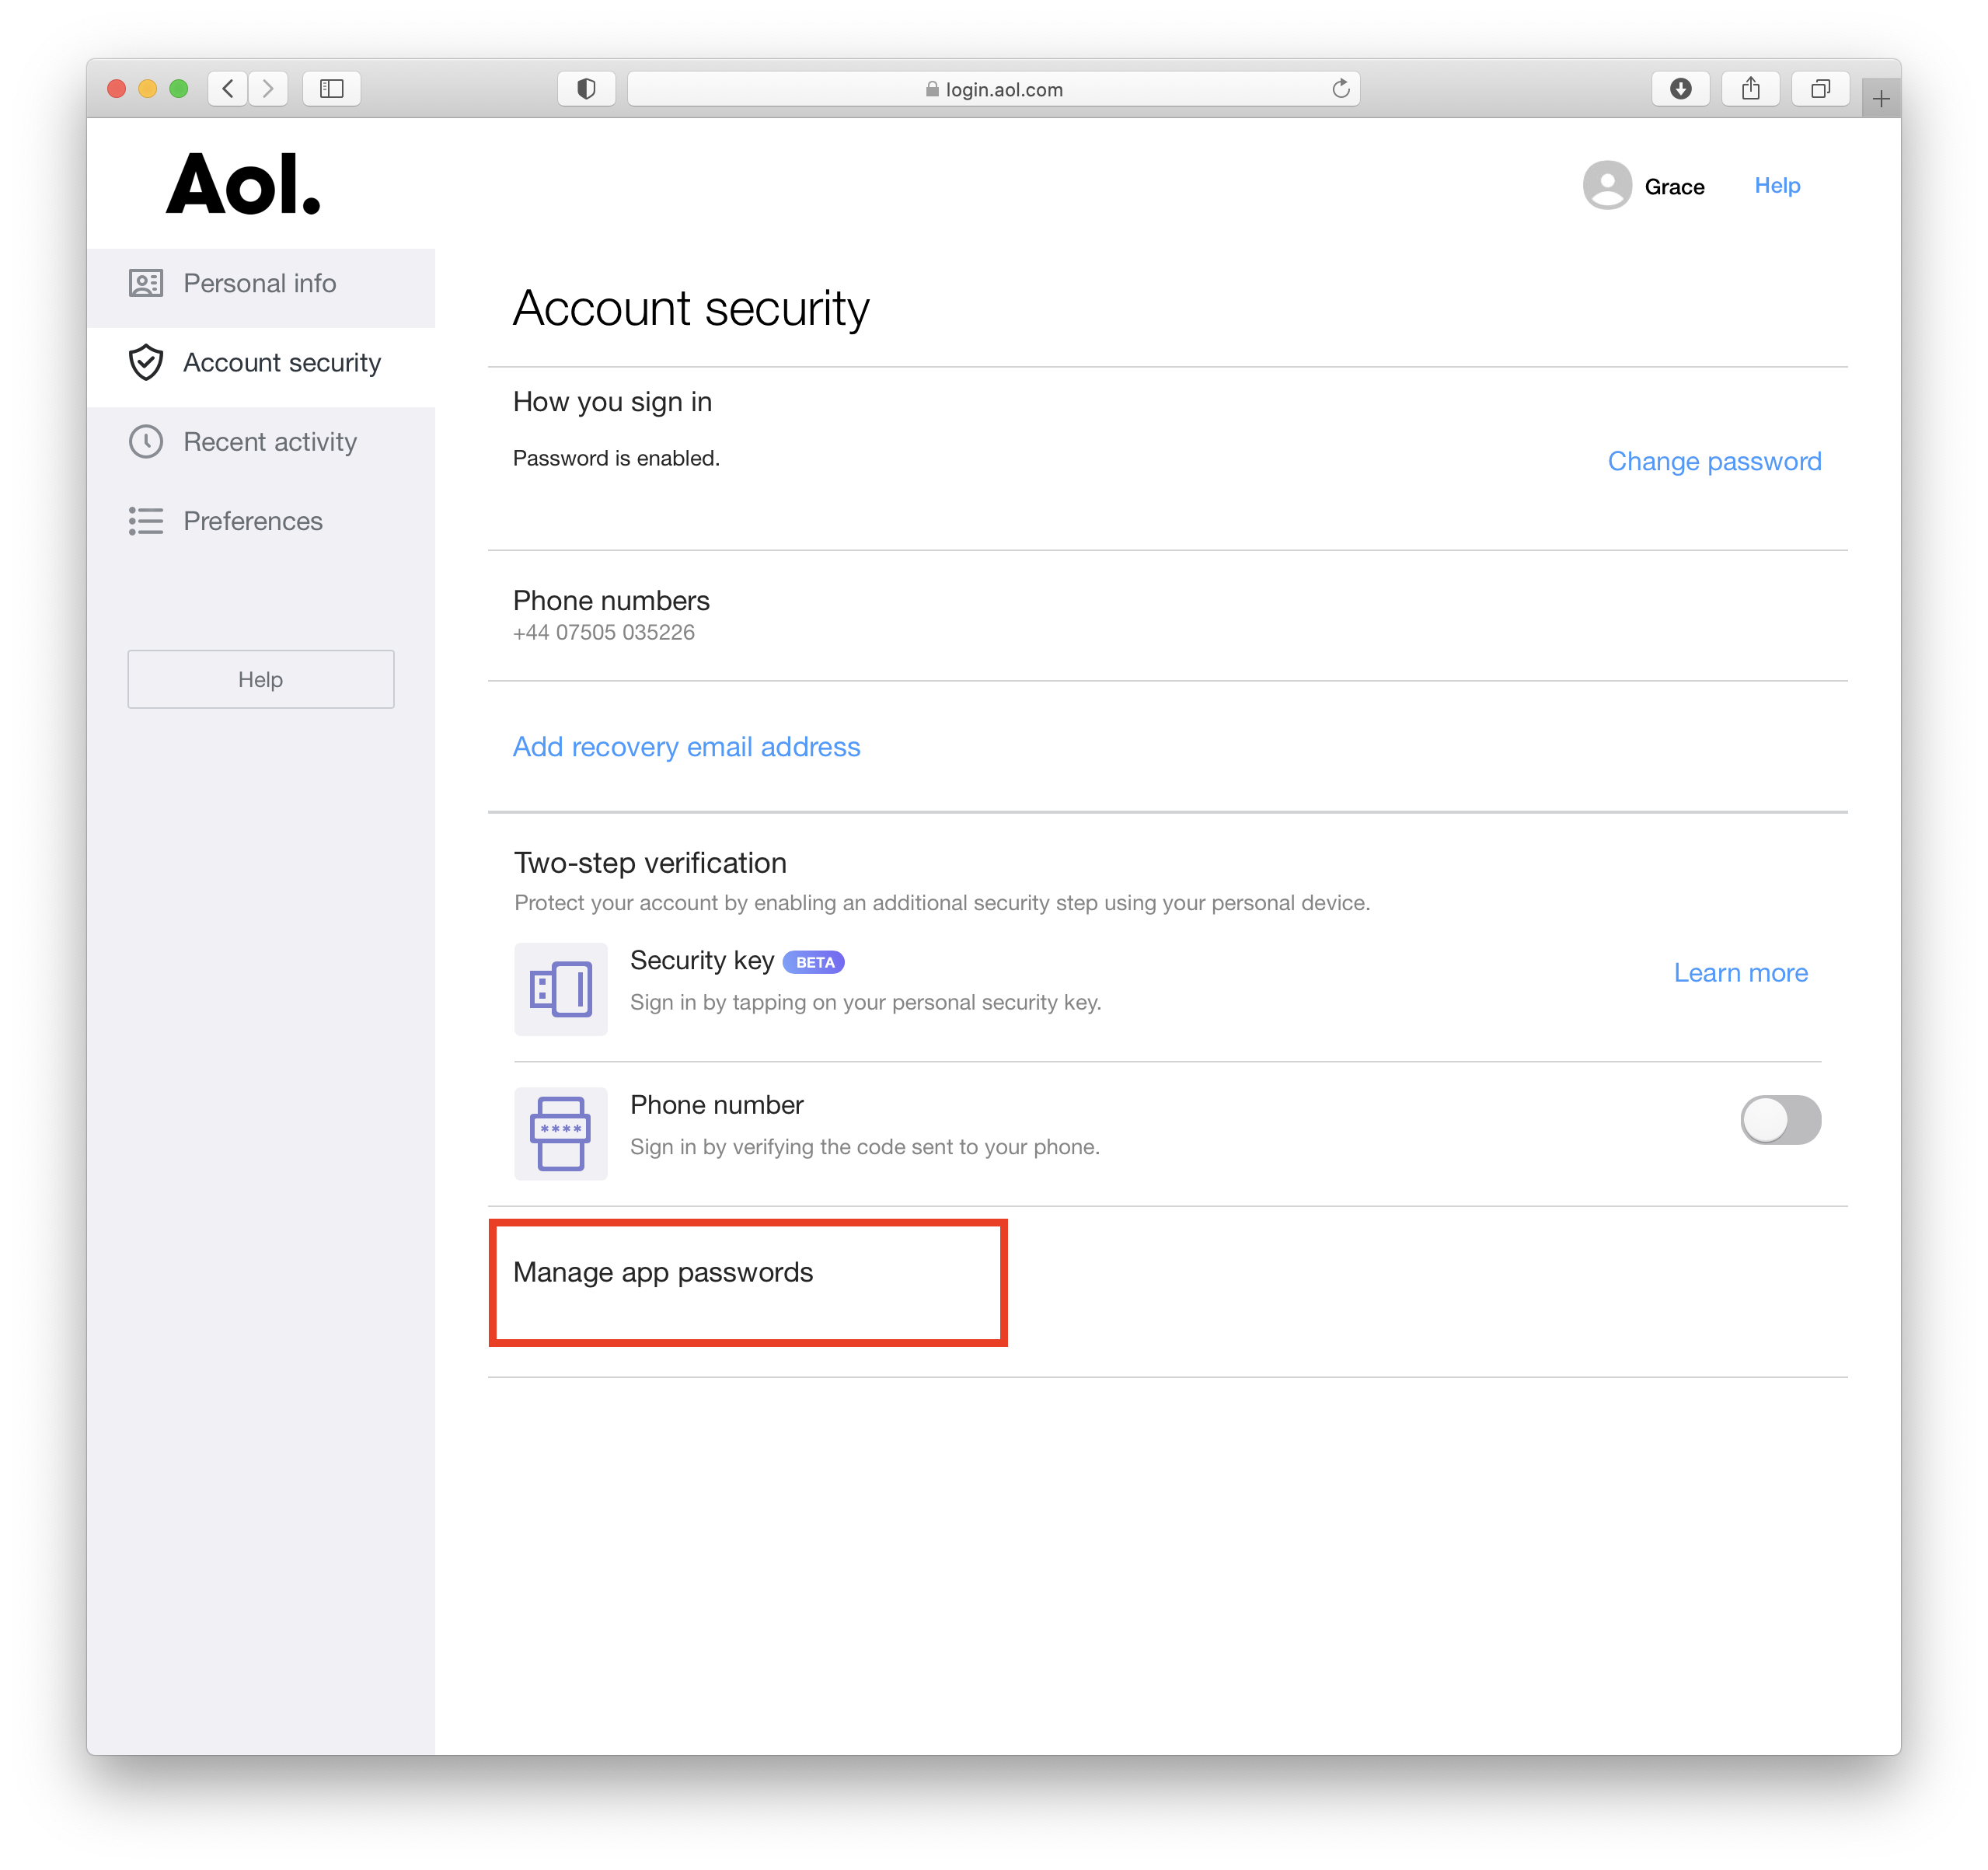 This password you have just created is the password you will need to use to set up your AOL account in Mail Designer 365.
We have put together a list of the best known providers including a link to the corresponding DNS setup guide.
If you cannot find your provider in the list please do not hesitate to contact our support team for assistance.
- In general, try to reduce the number of layout blocks used. Each layout block has a HTML structure that adds to the total size of your newsletter and by reducing the number of blocks you reduce the amount of space needed for these structures.
- Avoid repeating blocks and try to find solutions for “merging” blocks. For example, don't add two or more consecutive spacer blocks. Instead, use just one spacer block and change its height accordingly.
- Sometimes you can avoid using spacer blocks altogether, for example by adding the space to a nearby image block instead, using the “spacing before/after” feature in “Styles” or simply adding blank lines.
- Instead of using several consecutive text blocks, use just one and style the paragraphs using the “Styles” feature.
- Avoid detaching blocks (that is, avoid doing modifications that only affect the mobile or desktop version). A detached block results in two blocks in the document: one for desktop and another one for mobile, which uses more space than if the same block can be used for both mobile and desktop.
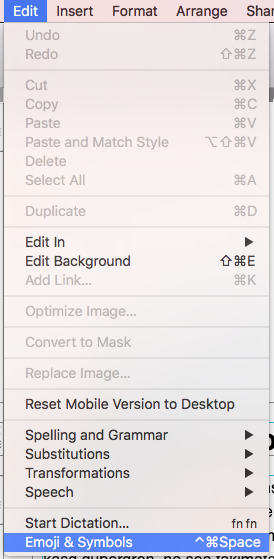
To add special characters:
‣ Open your email template if it is not already opened.
‣ Choose “Edit" > "Emoji & Symbols”
You have different options from different categories like emojis, arrows, bullet points, stars, currency symbols, latin alphabet, trademark symbols, other letterlike symbols, math symbols, parentheses, pictographs, and punctuations. Please refer to the following page for more information on how to add emojis and special characters in Mail Designer 365:
In order to ensure that your images are displayed properly on all devices, you should always try to use images with high resolution. An alternative would be to resize lower-resolution images to be smaller so they remain crisp.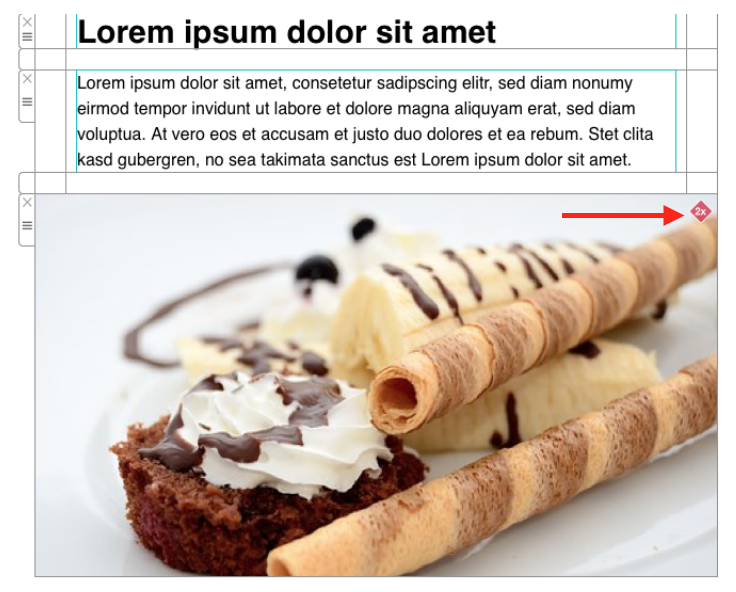
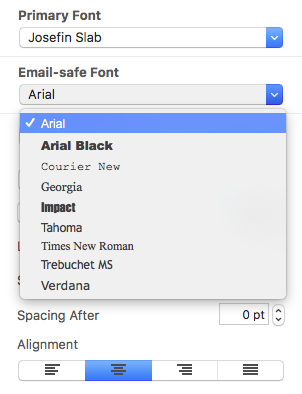
Email-safe fonts are the basic fonts installed on everyone's devices. If you have selected a font that is available on macOS but not on iOS, there will be a visible difference on the corresponding devices. If both devices have the font installed, then the email template will look the same on both platforms. You can use Web Fonts which the recipient's e-mail client can downloaded on demand. Most e-mail clients except Outlook support Web Fonts.
This link will directly take you to your profile administration:
https://apple.co/2Th4vqI
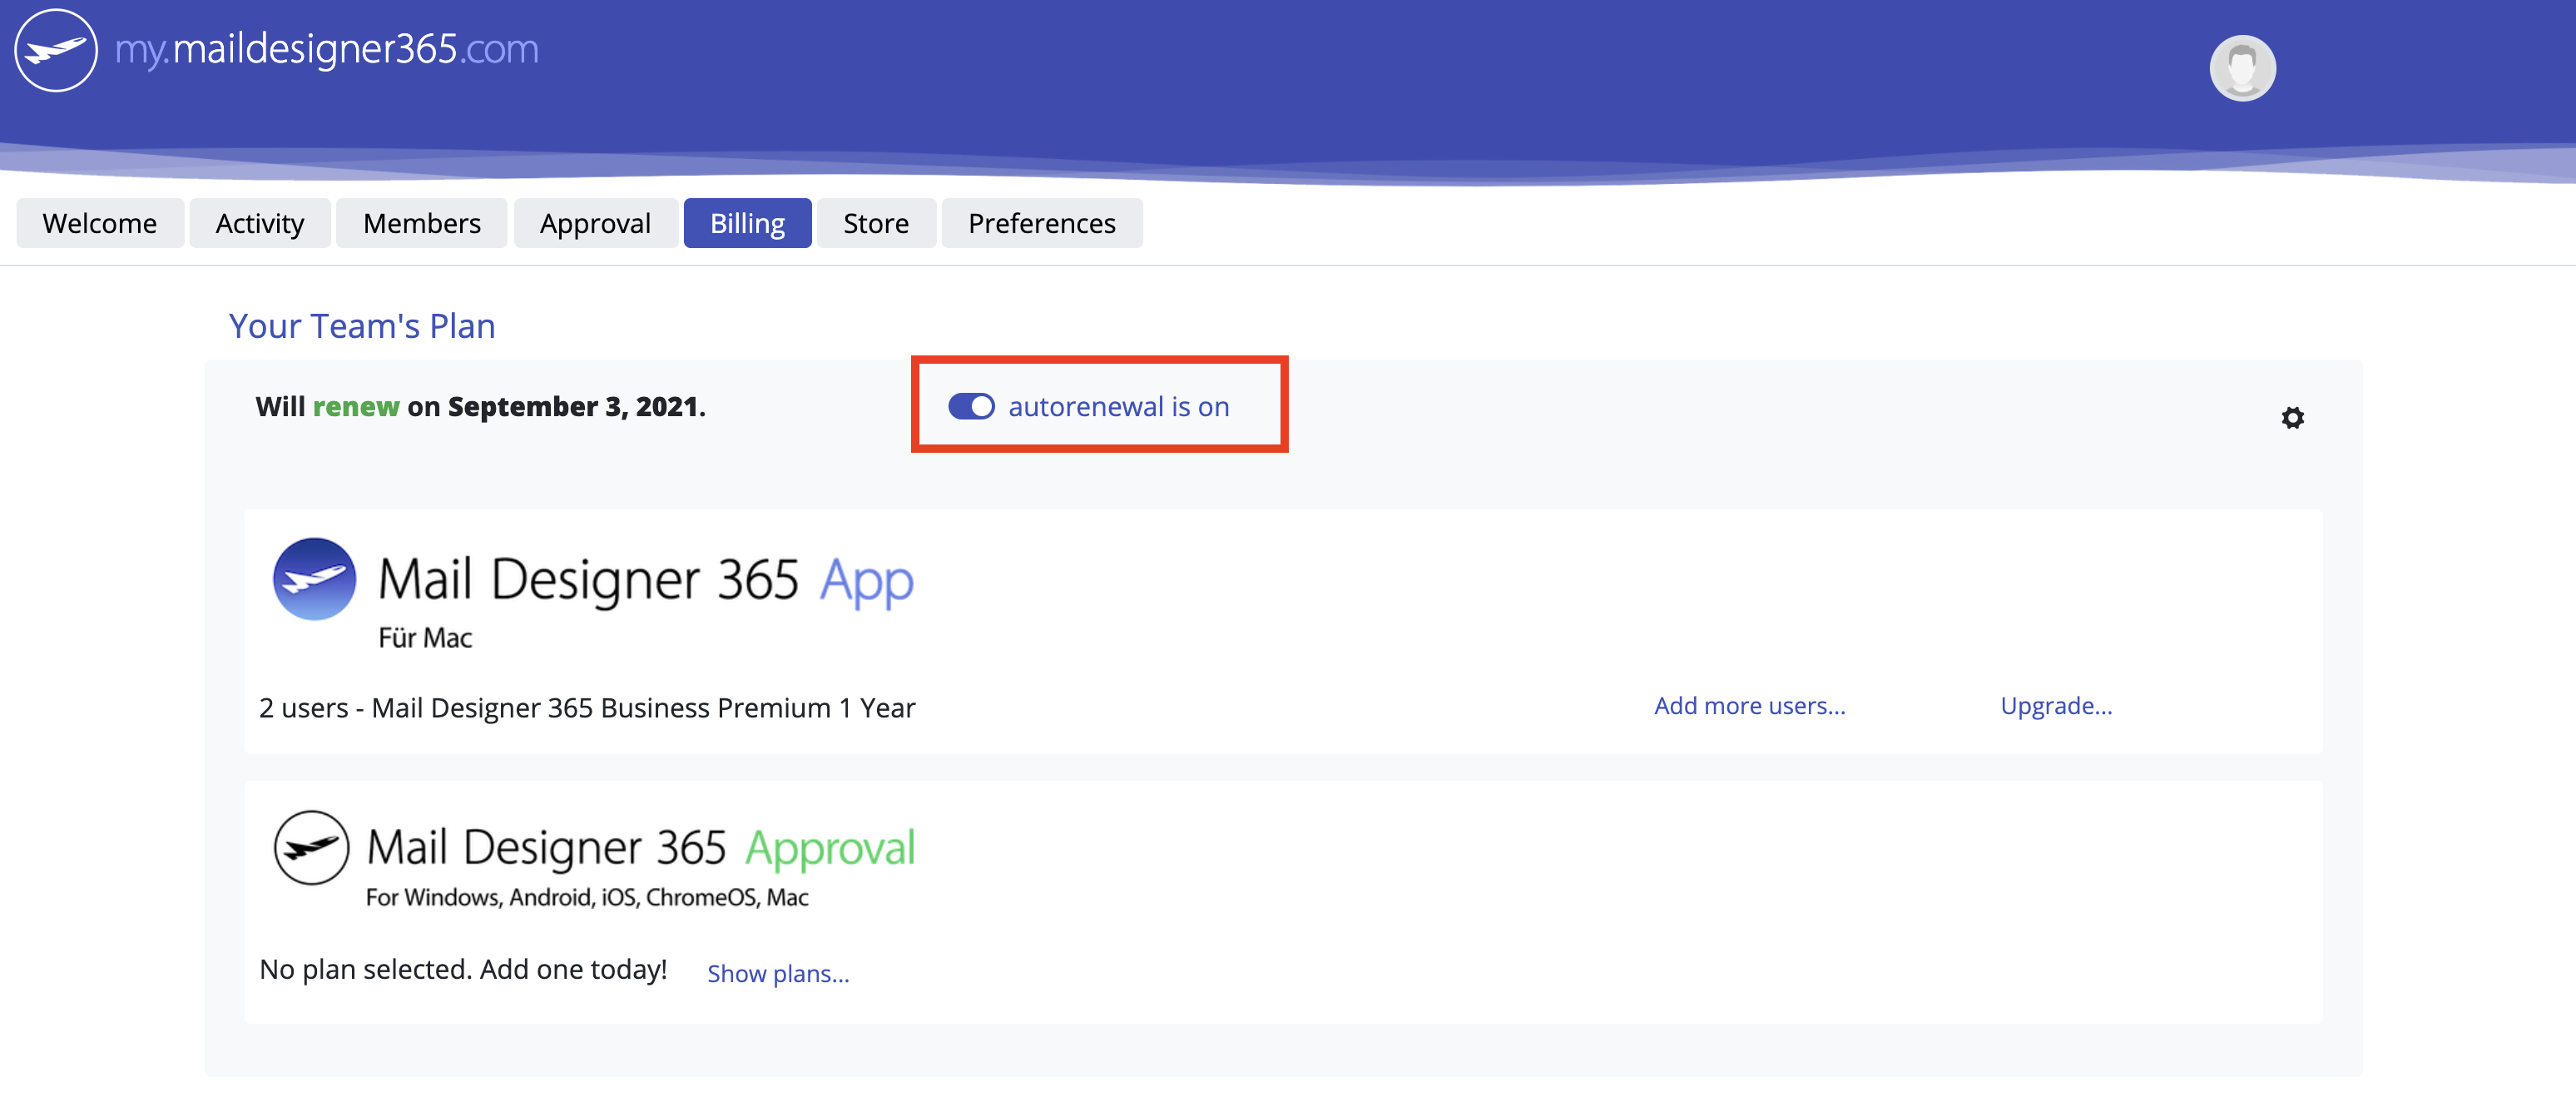
You will find all running subscriptions under "Subscriptions." You can also disable the automatic extension of your subscriptions.
 From here, go to the "Members" tab and click "Invite members."
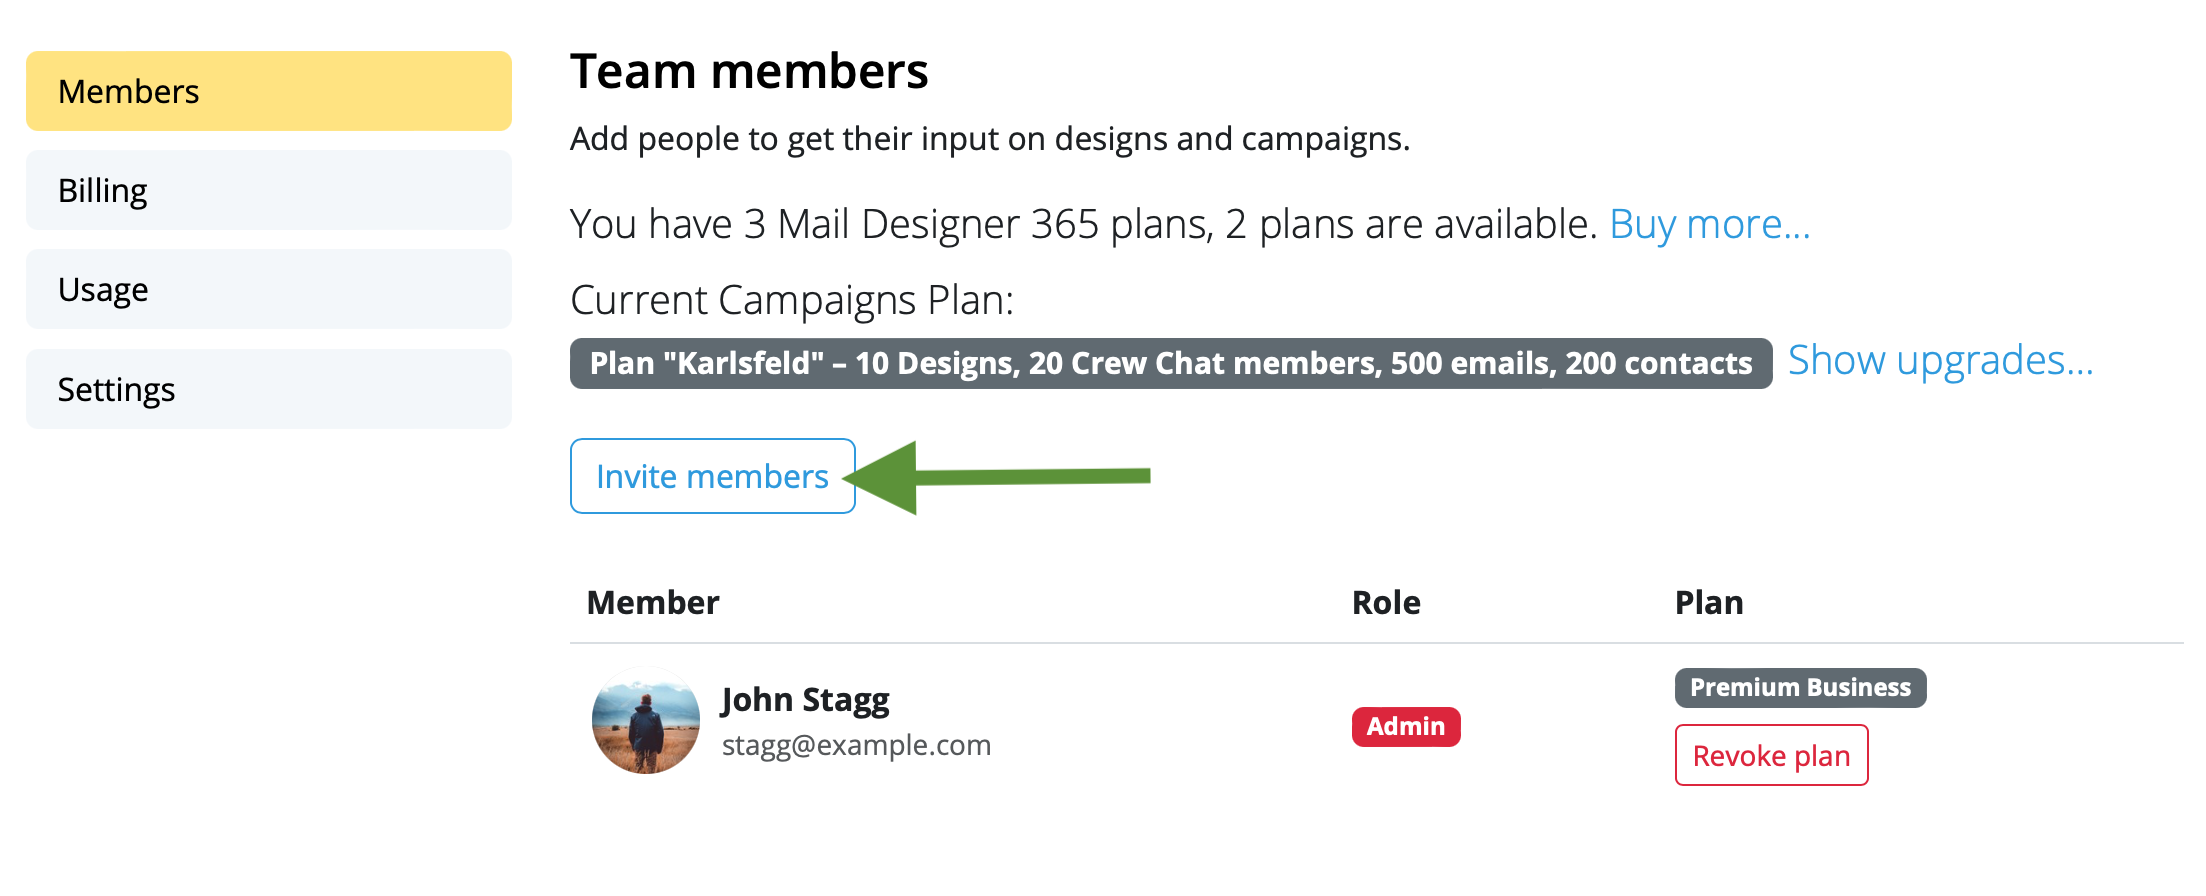 Enter the email address(es) of the colleague(s) you want to invite to your team and click "Invite". You can invite up to 10 team members free!
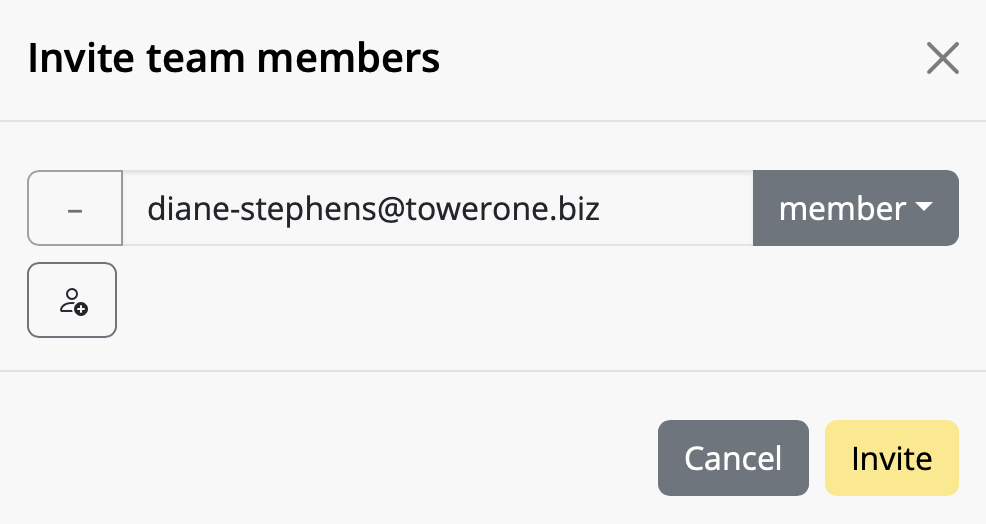 Team members can accept your invitation by clicking on the link in the email.
Once you've invited new team members, start using Mail Designer 365 Campaigns to discuss, approve and schedule email campaigns for your audience. Try it out free!
Team members can accept your invitation by clicking on the link in the email.
Once you've invited new team members, start using Mail Designer 365 Campaigns to discuss, approve and schedule email campaigns for your audience. Try it out free!
Email is the lifeblood of modern communication, but its ubiquity also makes it a prime target for cybercriminals seeking to deceive, defraud, or disrupt. To safeguard against these threats and ensure the integrity of your email communications, there's a powerful tool known as DMARC, or Domain-based Message Authentication, Reporting, and Conformance.
The Challenge of Email Impersonation
Before we dive into DMARC, it's essential to understand the challenges of email communication. Emails pass through multiple servers and networks on their way to the recipient, creating numerous opportunities for malicious actors to tamper with or impersonate senders.
DMARC: Your Email Security Guardian
DMARC, which stands for Domain-based Message Authentication, Reporting, and Conformance, is a comprehensive email authentication protocol designed to combat email impersonation, phishing attacks, and other email-based fraud.
How DMARC Works
DMARC builds on the foundations of SPF and DKIM but takes email authentication to a whole new level:
- Policy Declaration: The domain owner (the sender) publishes a DNS record that specifies how email from their domain should be handled if it fails SPF or DKIM checks. This DNS record contains DMARC policy settings.
- Email Reception: When an email is received by the recipient's email server, it performs SPF and DKIM checks as usual. If these checks fail, the server consults the sender's DMARC record.
- DMARC Verification: DMARC instructs the recipient's server on how to handle emails that fail SPF or DKIM checks. The sender can choose to monitor these failures, quarantine suspicious emails, or reject them outright.
- Reporting: DMARC provides valuable feedback by generating reports about email authentication activity. These reports help domain owners monitor and improve their email security.
The Significance of DMARC
- Protection from Impersonation: DMARC is a formidable defense against email impersonation. It ensures that emails claiming to be from your domain are indeed legitimate, making it exceedingly difficult for cybercriminals to impersonate you.
- Enhanced Email Trustworthiness: Implementing DMARC enhances the trustworthiness of your emails. Email providers are more likely to recognize your emails as safe and deliver them to the recipient's inbox.
- Reduced Phishing Risks: DMARC is a powerful deterrent against phishing attacks. By reducing the success rate of such attacks, it safeguards individuals and organizations from potential harm.
- Reputation Management: DMARC helps protect your domain's reputation. It ensures that your legitimate emails are not diluted by fraudulent ones, preserving trust in your brand or organization.
Conclusion
In an era where email threats are prevalent and sophisticated, DMARC emerges as the ultimate guardian angel of email authenticity. Although it operates discreetly in the background, DMARC is a potent tool in the fight against cyber threats. Its implementation is highly recommended for individuals, businesses, and email service providers, as it offers a robust defense against email impersonation and enhances the overall security of email communications. The next time you send or receive an email, know that DMARC is diligently working to protect you from email-based deception and fraud in the vast digital landscape.
In some circumstances, Mail Designer may not be able to store your account login credentials in your Keychain.
To fix this issue, please try the following:
- The easiest way to fix this problem is to restart your Mac.
If the problem still pops up, try this:
- Quit Mail Designer
- Open Keychain Access from Applications > Utilities
- Select your login keychain
- Choose File > Lock Keychain “login”
- Then choose File > Unlock Keychain “login”
Now re-open Mail Designer and try signing in again.
This points to an error while authenticating your email account. Try checking the following:
- The username is wrong/incomplete. For example, iCloud accounts sometimes work with "username" but most times need the whole email address as a log in.
- The password is wrong.
- If you're trying TLS, try STARTTLS instead.
- Maybe your server is using a custom port - though this is unlikely.
If you have a Mail program you use (e.g. Apple Mail) try comparing the outgoing mail settings there and use the same settings in Mail Designer.
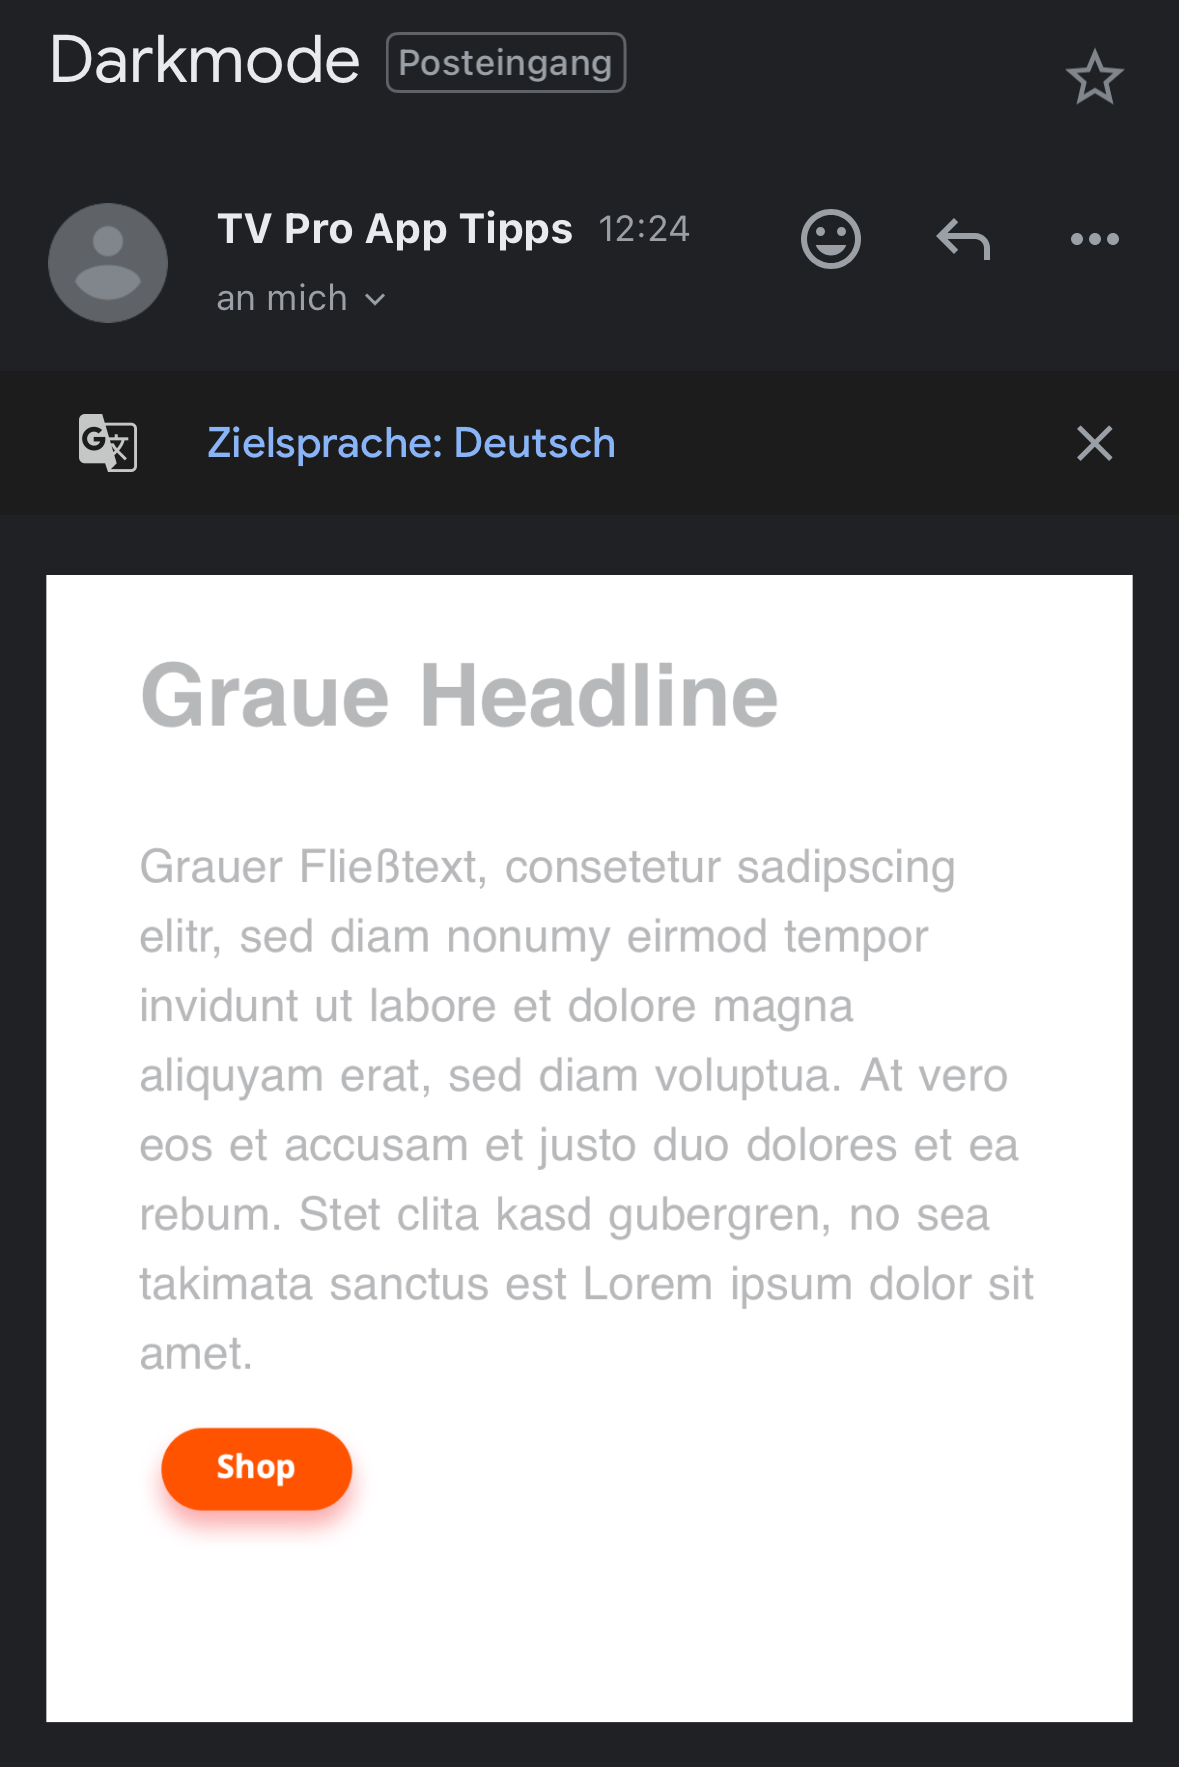
 In dark mode, email apps display this as a readable shade of gray.
 Further reading:
https://litmus.com/blog/the-ultimate-guide-to-dark-mode-for-email-marketers
Further reading:
https://litmus.com/blog/the-ultimate-guide-to-dark-mode-for-email-marketers
Alt text and Apple WebKit
Email services using Apple's WebKit (Apple Mail & email clients accessed via Safari) only display image alt text when the alt text is short enough to fit in the first "line" of the image area: If the alt text is longer than this, Apple will display no alt text for the image area at all:
Other issues to be aware of
When you are working with a design in Mail Designer 365 where image areas in the desktop and mobile versions are attached, your desktop alt text will also be used for the mobile version of your email. As image blocks in the smartphone view aren't as wide, this means the cut-off point for your alt text will come sooner, so the alt text will need to be even shorter if the design versions are paired.Ways to resolve this issue
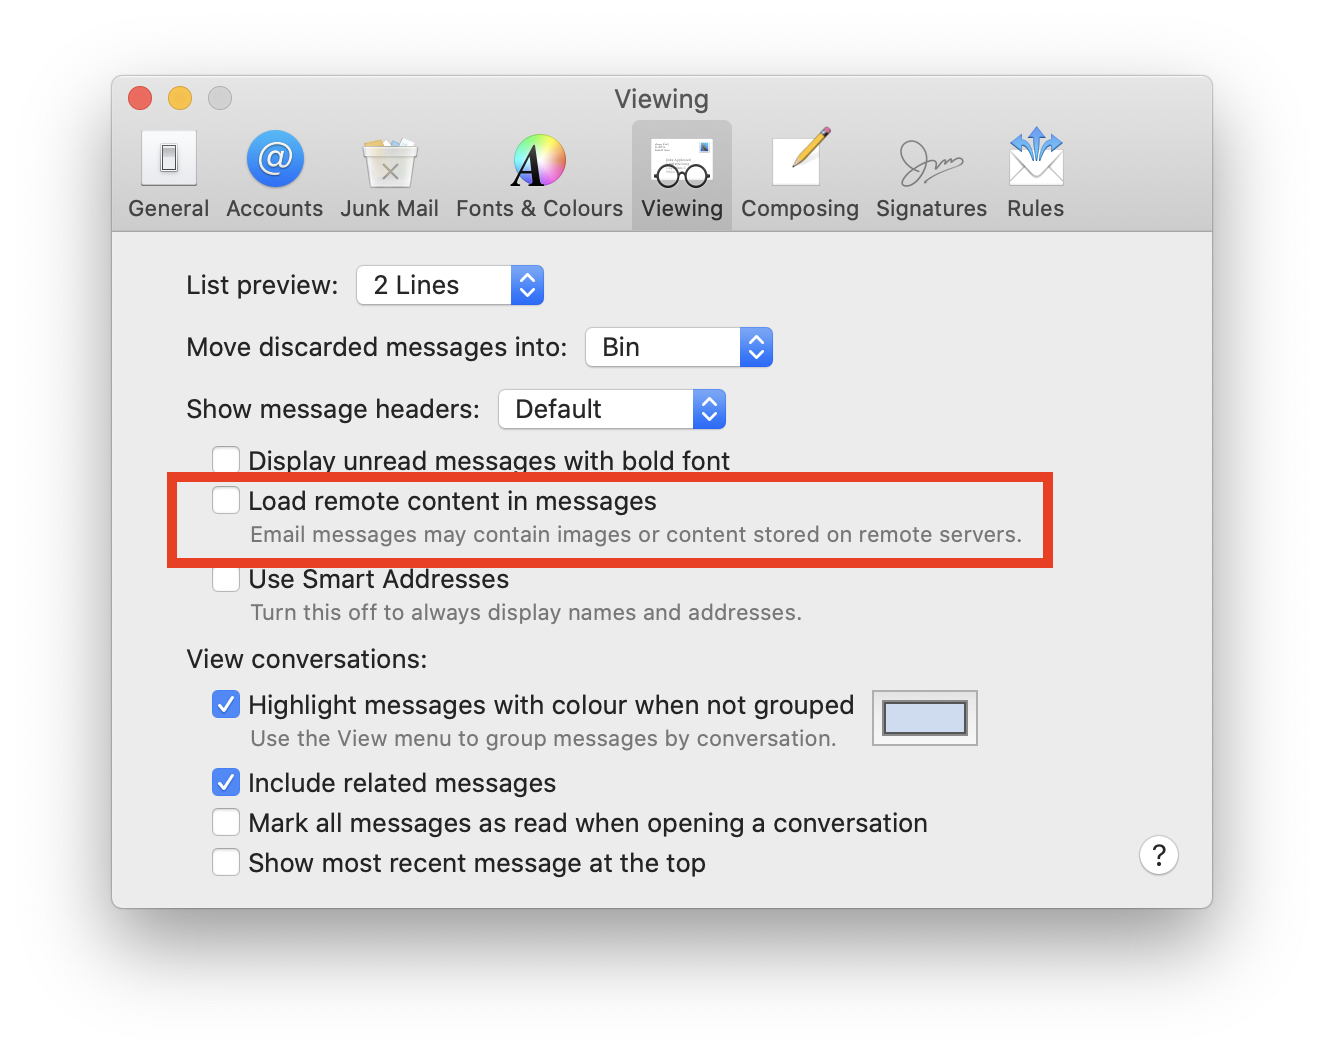
We appreciate this is a difficult issue and unfortunately, there is no one-size-fits-all approach that can be applied to your alt text length. This is mainly due to the fact that the size of image areas can vary massively in different email designs, as well as the mobile issue mentioned above. Ideally, the optimal solution would be for Apple to change things behind the scenes. However, until this happens, the best workaround is to keep your alt text as short as possible and TEST TEST TEST! To test the length of your alt text is suitable before you send, carry out the following steps:- Go to Mail > Preferences > Viewing and uncheck the box by "Load remote content in messages."
- In Mail Designer 365, use the Testmail service to send yourself a test version of your design.
- Open the email in Mail and check through all the image areas to see if the alt texts appear. Then, do the same on an iPhone to check the mobile version.
‣ Choose “File" > "Export…”Please refer to the following page for further information on how to export your email design as a .zip file:‣ Save your file. ‣ Then, find your saved file in the location that you saved it to. ‣ Right-click the file and choose "Compress “YOUR FILE NAME”" in the menu bar:
‣ This will create a .zip file:
 This will allow you to rotate the object freely. You can rotate shapes, graphic elements, and image masks. You will be able to tell how many degrees you have rotated the object by the label that pops up during rotation:
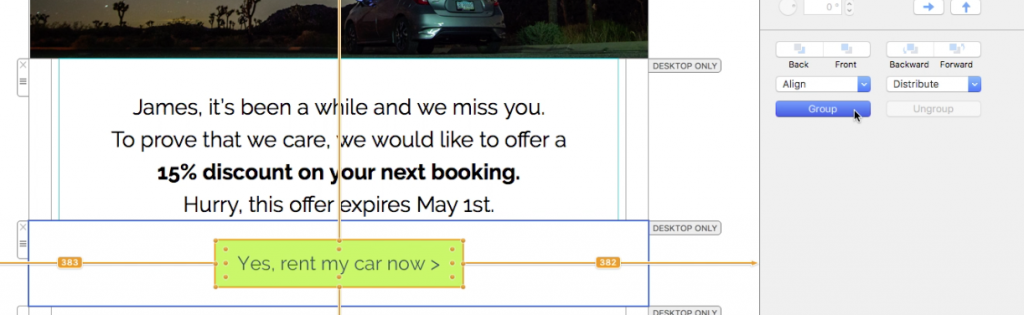
 If you want to rotate both the text and the object, hold the Command ⌘ key and click on both the shape and the text. You will see that the two things are now selected. Click “Group” on the right side.
 Once you have grouped the two things together, hold the command key and click on the resize controls. Again, you will see that the cursor will turn into a rotate icon. Then, feel free to rotate the selected items to your liking.
Please refer to the following page for further information on how to rotate objects:
Once you have grouped the two things together, hold the command key and click on the resize controls. Again, you will see that the cursor will turn into a rotate icon. Then, feel free to rotate the selected items to your liking.
Please refer to the following page for further information on how to rotate objects:
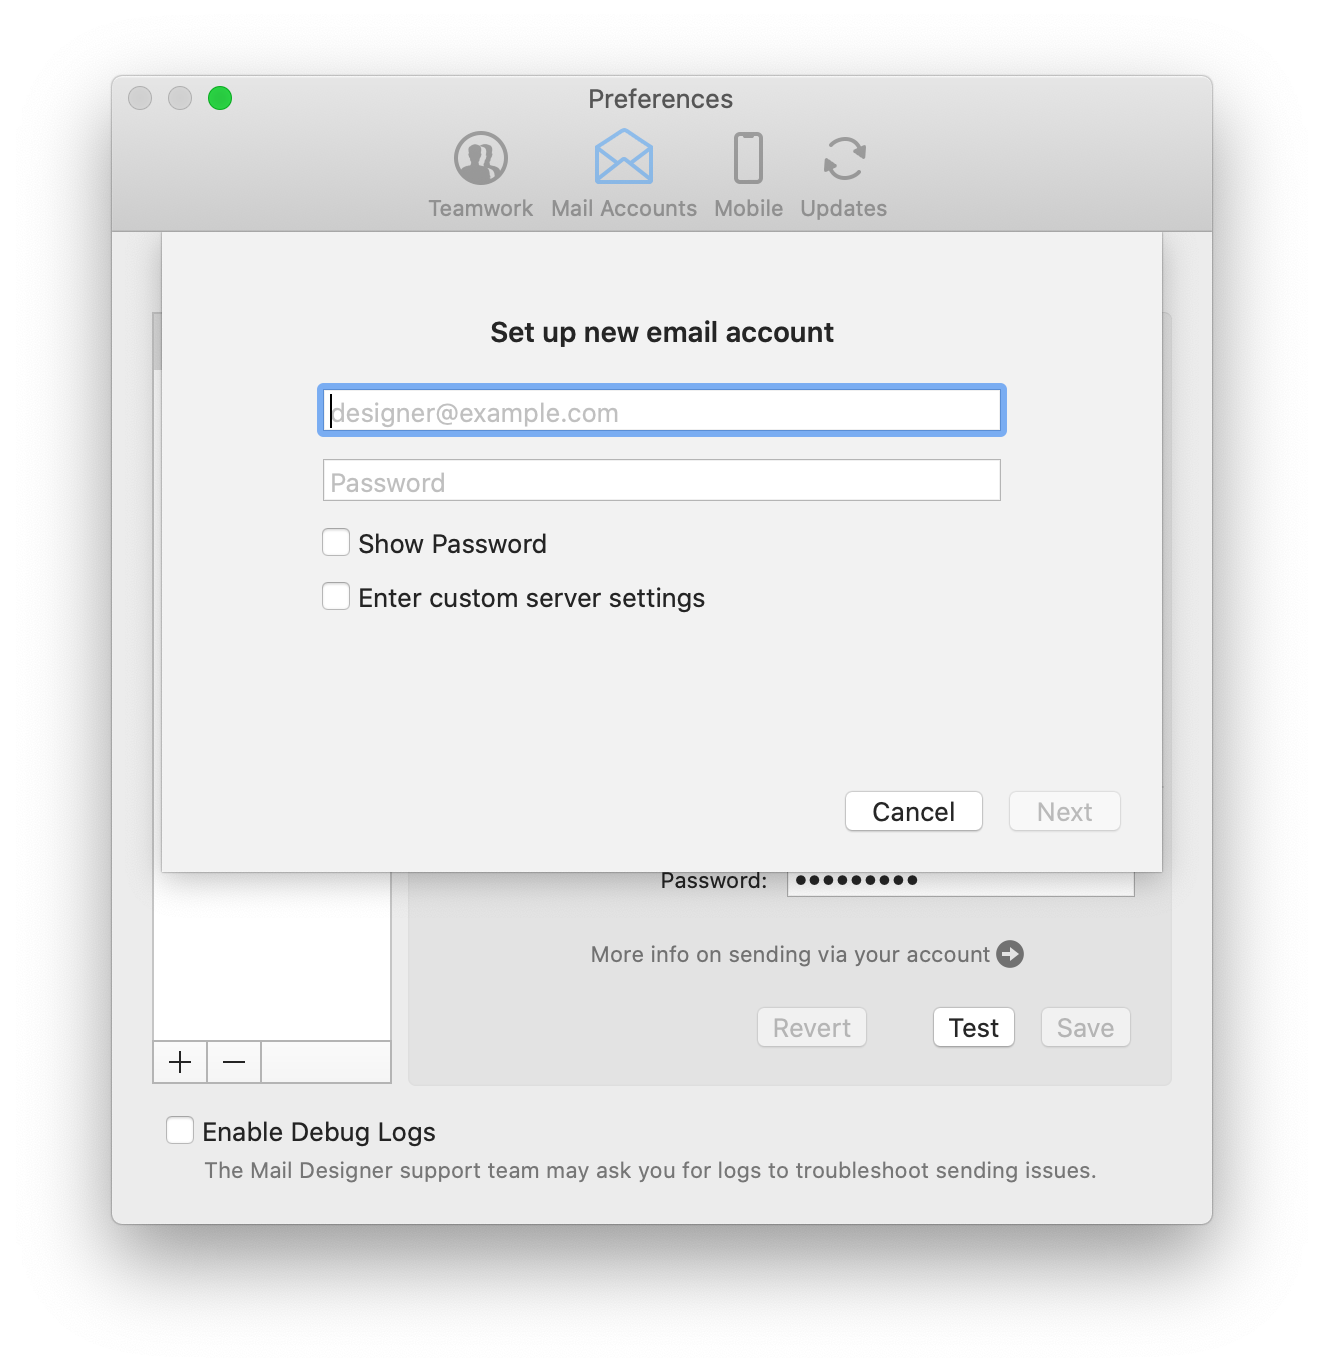 Note: This will work for most generic email accounts (e.g. Outlook, Hotmail, Gmail, etc.) by taking you to the external login page for the respective email client. For custom/internal email accounts (i.e a work account), your network administrator may have to provide you with the information which you can enter by ticking “Enter custom server settings.”
Click “Next” to set up your account. You will now see that your email account’s settings have been automatically detected by Mail Designer 365:
Note: This will work for most generic email accounts (e.g. Outlook, Hotmail, Gmail, etc.) by taking you to the external login page for the respective email client. For custom/internal email accounts (i.e a work account), your network administrator may have to provide you with the information which you can enter by ticking “Enter custom server settings.”
Click “Next” to set up your account. You will now see that your email account’s settings have been automatically detected by Mail Designer 365:
 You are now free to use your personal email address to send email designs from directly within the app.
- Navigate to the folder:
Your username/Library/Group Containers - In this folder you will see a Folder ending in
.Mail Designer - Navigate to
Documents/MD365within this folder - Restore the
MD365folder to your new Mac
Sending test emails
Mail Designer 365's Testmail service is designed for sending internal test emails to yourself or to your team – i.e. to preview how your finished email design will look in the inbox. Test emails will be sent from the Mail Designer 365 Testmail service via our secure servers.How it works
To get started, click the Test icon in the Mail Designer 365 toolbar.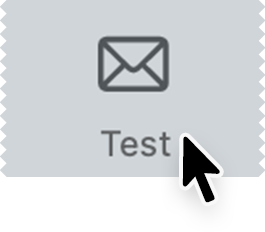 Now choose from the following test mail options:
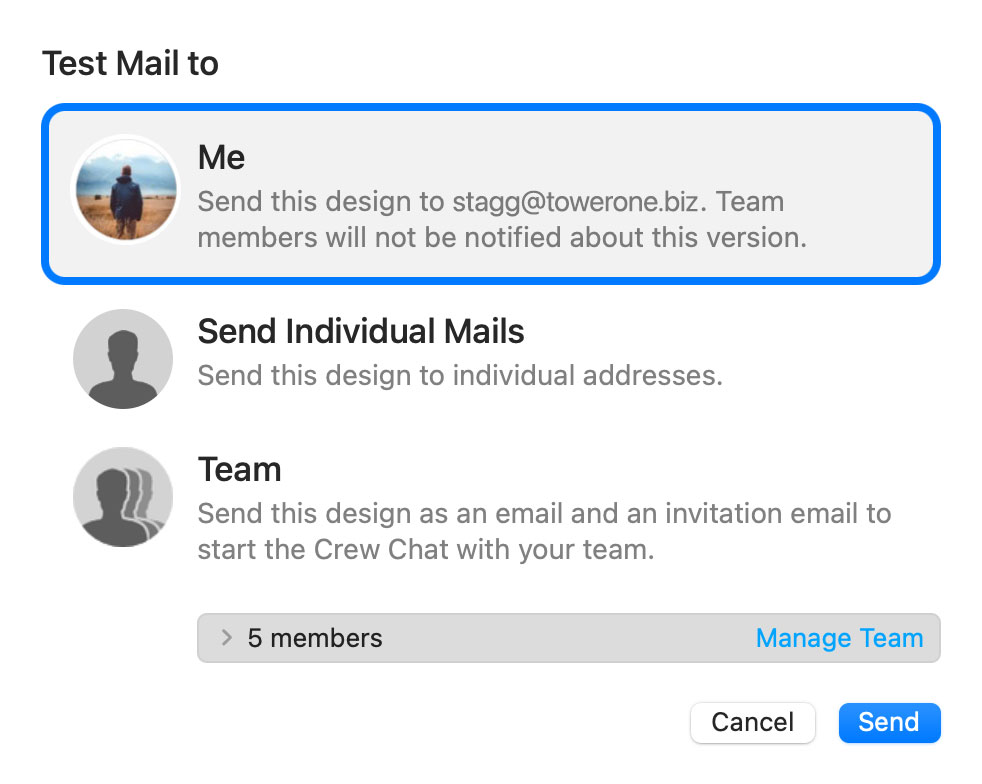
The latest version of your email design will be uploaded via TeamCloud and sent to the selected recipient(s):
Sending individual emails
You also have the option to send your email design as a single email via Delivery Hub. This email will be sent from your own email address. This option is designed for external emails (i.e. sending emails to contacts who are not part of your Mail Designer 365 team) and replaces the legacy "Send via your email account" option.How it works
In this view you can add one or more recipients for your email (e.g. your client's email) and send them your design from your own email address.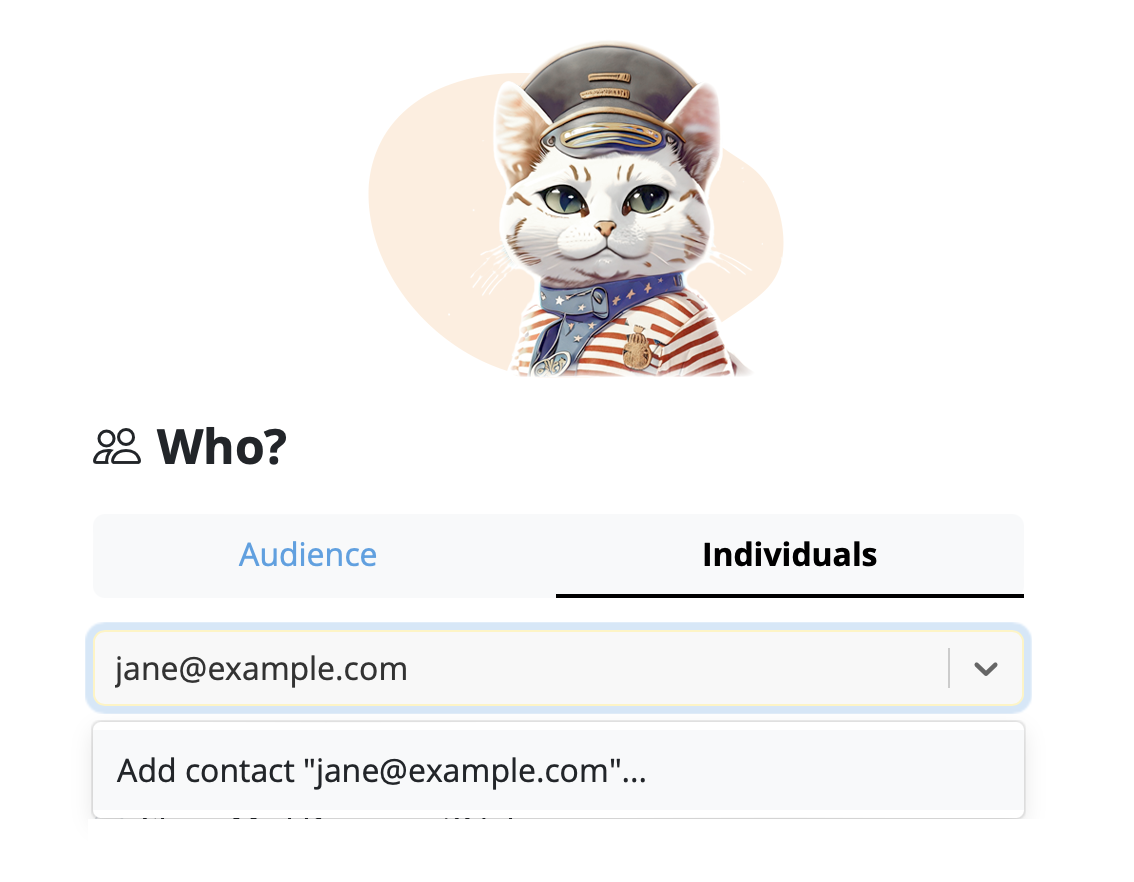
On the left of the setup window, you can choose your from address:
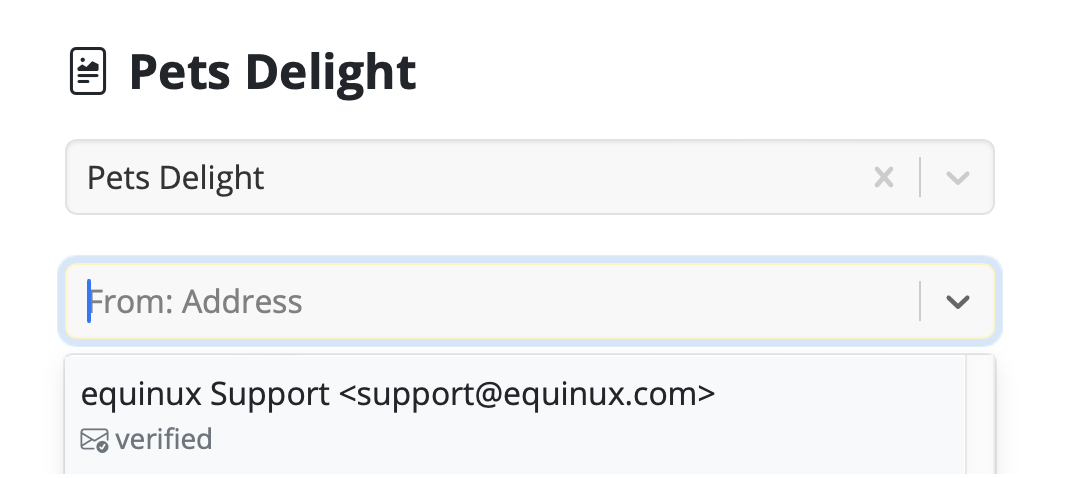
Tip: If you have not done so already, follow this guide to set up your "from address" for sending. Finally, send your email by clicking the green "Send" button. It will go directly to your recipient via your email server:
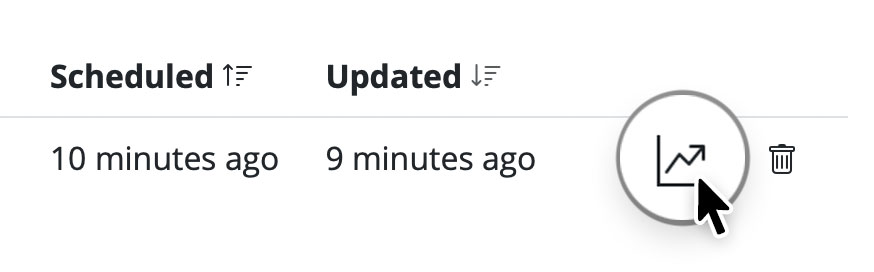
Good to know: Following send, you can easily check if your recipient has received and opened your email by clicking the analytics icon:
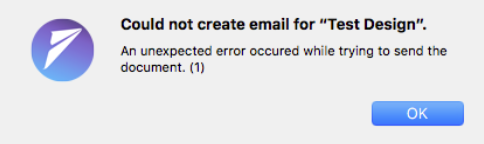
invalid_grant: Bad Request (-10)Please carry out the following steps:
- Go to Mail Designer 365 > Preferences > Mail Accounts.
- Remove your Gmail address from the list using the "-" icon.
- Then, click the "+" icon to re-add your Gmail account. You will be prompted to sign in with your Gmail credentials again.
Email has become an integral part of our daily communication, from personal conversations to business dealings. However, with this convenience comes the constant threat of email-based fraud and phishing attacks. To combat these threats and ensure the authenticity of your emails, there's a simple yet crucial tool known as SPF or Sender Policy Framework.
The Vulnerabilities in Email Communication
Understanding SPF requires a brief insight into how email communication functions. When you send an email, it travels through multiple servers and networks before reaching its intended recipient. At each stop, malicious actors can potentially intercept, modify, or impersonate the email.
SPF: The Guardian of Email Authenticity
SPF, which stands for Sender Policy Framework, is a security protocol that acts as a guardian, protecting your email domain from being used by cybercriminals to impersonate you. SPF helps verify the legitimacy of incoming emails by checking if they originate from authorized servers associated with the sender's domain.
How SPF Works
SPF is relatively straightforward in its operation:
- Sender Declaration: The domain owner (you or your organization) publishes a DNS record specifying which servers are authorized to send emails on its behalf. This record is known as the SPF record.
- Email Reception: When an email is received by the recipient's email server, the server checks the SPF record of the sender's domain to see if the server that sent the email is authorized to do so.
- Validation: If the sending server's IP address matches one of the authorized IP addresses listed in the SPF record, the email is considered legitimate and is accepted for delivery. If not, it may be flagged as suspicious or rejected.
The Significance of SPF
- Protection Against Spoofing: SPF plays a crucial role in preventing email spoofing. It ensures that emails claiming to be from your domain indeed originate from authorized servers, making it harder for cybercriminals to impersonate you.
- Enhanced Email Deliverability: When you implement SPF, email providers are more likely to trust your emails, leading to better deliverability rates. Your legitimate emails are less likely to end up in spam folders.
- Reduction in Phishing: By making it more difficult for cybercriminals to impersonate trusted senders, SPF contributes to reducing phishing attacks, protecting individuals and organizations from potential harm.
- Branding and Reputation: SPF helps maintain your email domain's reputation. It assures recipients that your emails are legitimate, strengthening trust in your brand or organization.
Conclusion
In an age where email is a primary mode of communication and email-based threats are prevalent, SPF serves as a reliable shield against impersonation and fraud. Although it may work silently behind the scenes, SPF is a powerful tool in the fight against cyber threats. Its implementation is highly recommended for individuals, businesses, and email service providers alike to bolster the security of email communications. So, the next time you send or receive an email, remember that SPF is working diligently to protect you from potential email impersonation in the vast digital landscape.
‣ Copy text that has formatting you want to preserve ‣ Choose “Edit" > "Paste and Match Style” from the menu barPlease refer to the following page for further information on how to copy and paste text, while preserving its style:This will preserve the style of the original text that you copied.
- View, comment on and approve email design drafts
- Receive test emails
- Manage email contacts and audiences
- Schedule and send email campaigns
- Access post campaign analytics
The Anatomy of an Email
Before diving into DKIM, let's briefly understand how emails work. When you send an email, it's like sending a digital letter. It travels through various servers and networks before reaching its intended recipient. Each server it passes through can potentially be a point of vulnerability where malicious actors might tamper with the email's content or disguise themselves as legitimate senders.
Enter DKIM: The Email's Digital Signature
DKIM, which stands for DomainKeys Identified Mail, is a security protocol designed to verify the authenticity and integrity of an email message. It does this by adding a digital signature to the email before it leaves the sender's server. This signature is like a seal of approval, assuring the recipient that the email has not been tampered with and genuinely comes from the claimed sender.
How DKIM Works
DKIM relies on a pair of cryptographic keys: a private key kept by the sender and a public key published in the sender's DNS (Domain Name System) records. Here's how it works:
- Email Signing: When an email is sent, the sending server uses the sender's private key to generate a unique digital signature based on the email's content. This signature is added to the email's header.
- Recipient Verification: Upon receiving the email, the recipient's email server retrieves the public key associated with the sender's domain from the DNS records.
- Signature Verification: The recipient's server uses this public key to verify the email's digital signature. If the signature matches the email's content and has not been altered in transit, the email is considered authentic.
- Filtering and Delivery: If the email passes DKIM verification, it's more likely to be delivered to the recipient's inbox. If not, it may be flagged as suspicious or sent to the spam folder.
The Importance of DKIM
- Protection Against Spoofing: One of the most significant benefits of DKIM is its ability to prevent email spoofing. Without DKIM, cybercriminals can easily forge email headers and pretend to be someone they're not. DKIM ensures that the email you receive from a trusted sender is indeed from that sender.
- Email Integrity: DKIM safeguards the integrity of your emails. It guarantees that your message hasn't been altered during transit, ensuring that the recipient receives the content exactly as you intended.
- Enhanced Deliverability: When your emails are DKIM-signed, email providers are more likely to trust them. This means your legitimate emails have a better chance of landing in your recipients' inboxes rather than getting lost in spam folders.
- Reduced Phishing: By reducing the effectiveness of phishing attacks, DKIM helps protect individuals and organizations from falling victim to scams that could result in data breaches or financial losses.
Conclusion
In an era where email fraud and phishing attacks are prevalent, DKIM serves as a crucial line of defense. It's like a digital fingerprint that assures the authenticity and integrity of your emails. While it may operate behind the scenes and go unnoticed by most email users, DKIM is a vital tool in the ongoing battle against cyber threats. Its use should be encouraged and embraced by individuals, businesses, and email service providers to create a safer digital communication environment for everyone. So, the next time you receive an email, remember that DKIM might be silently working to protect you from potential harm in the vast digital landscape.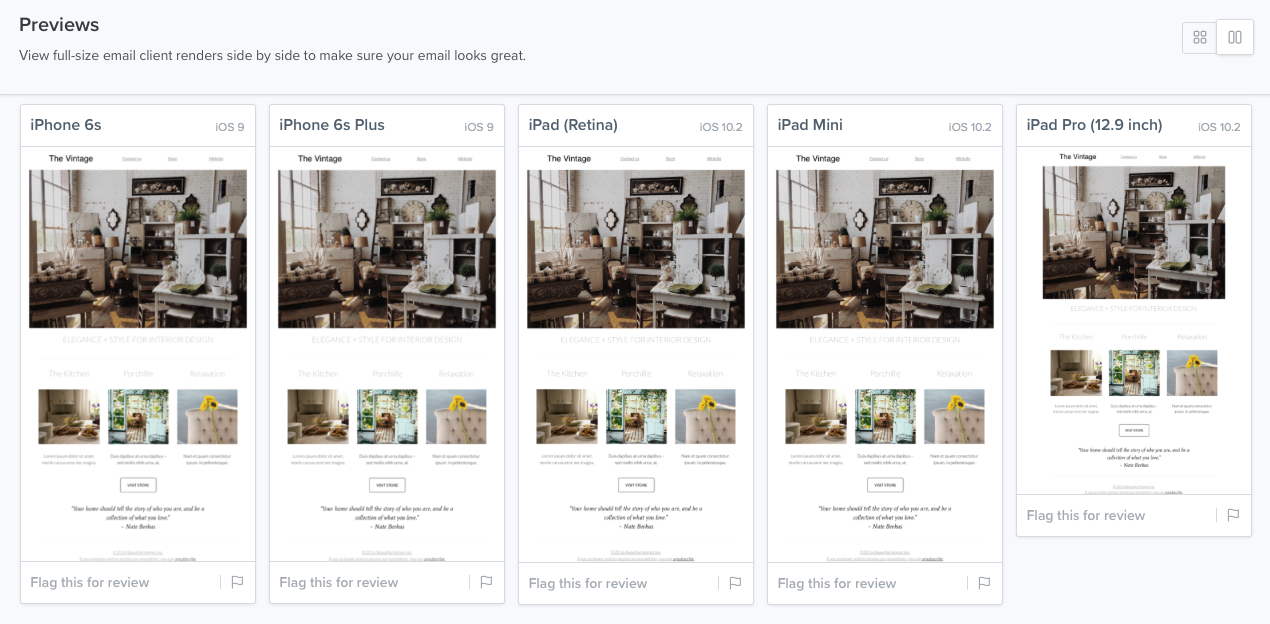
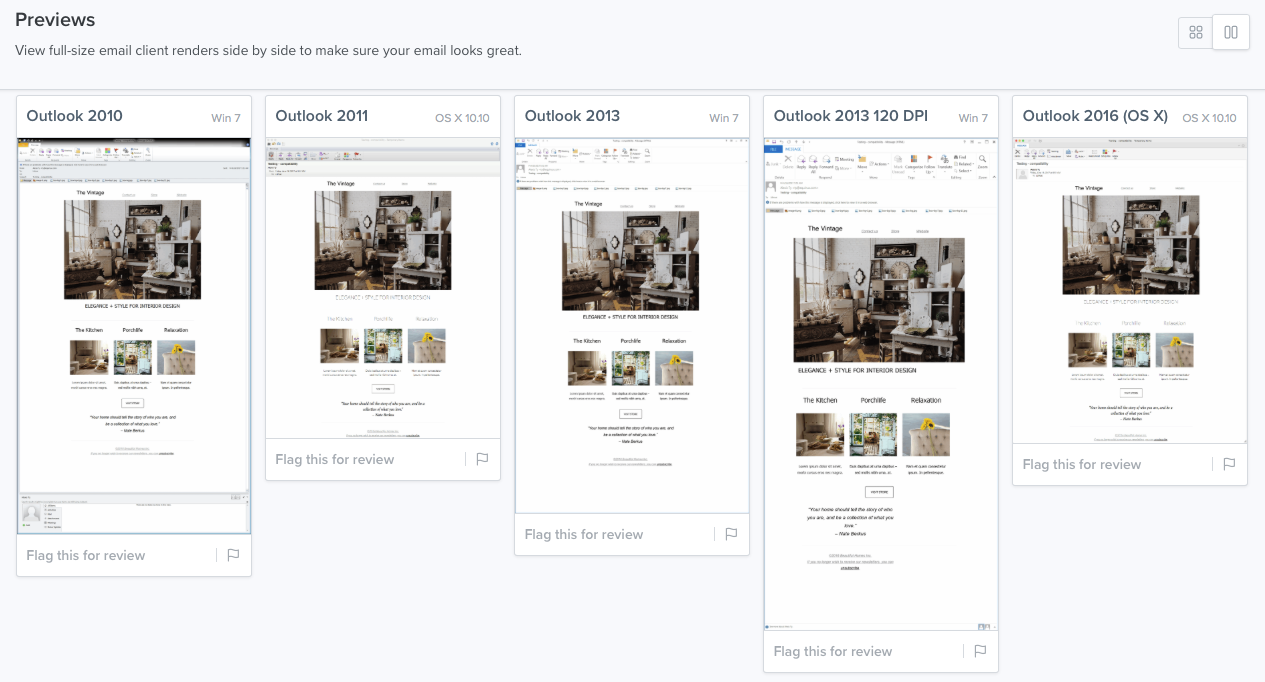
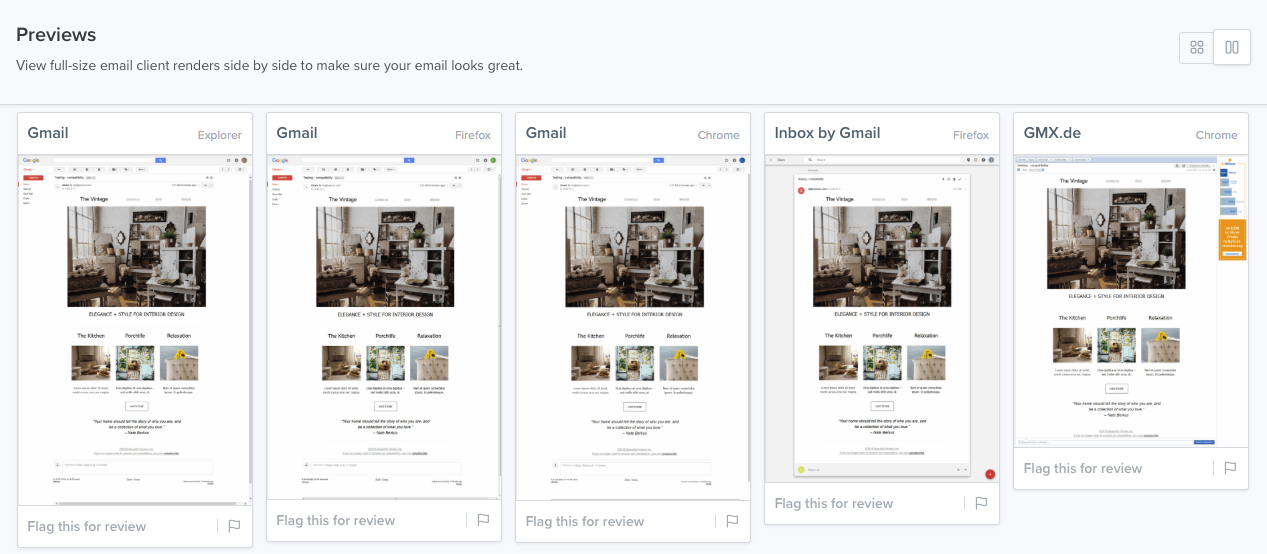
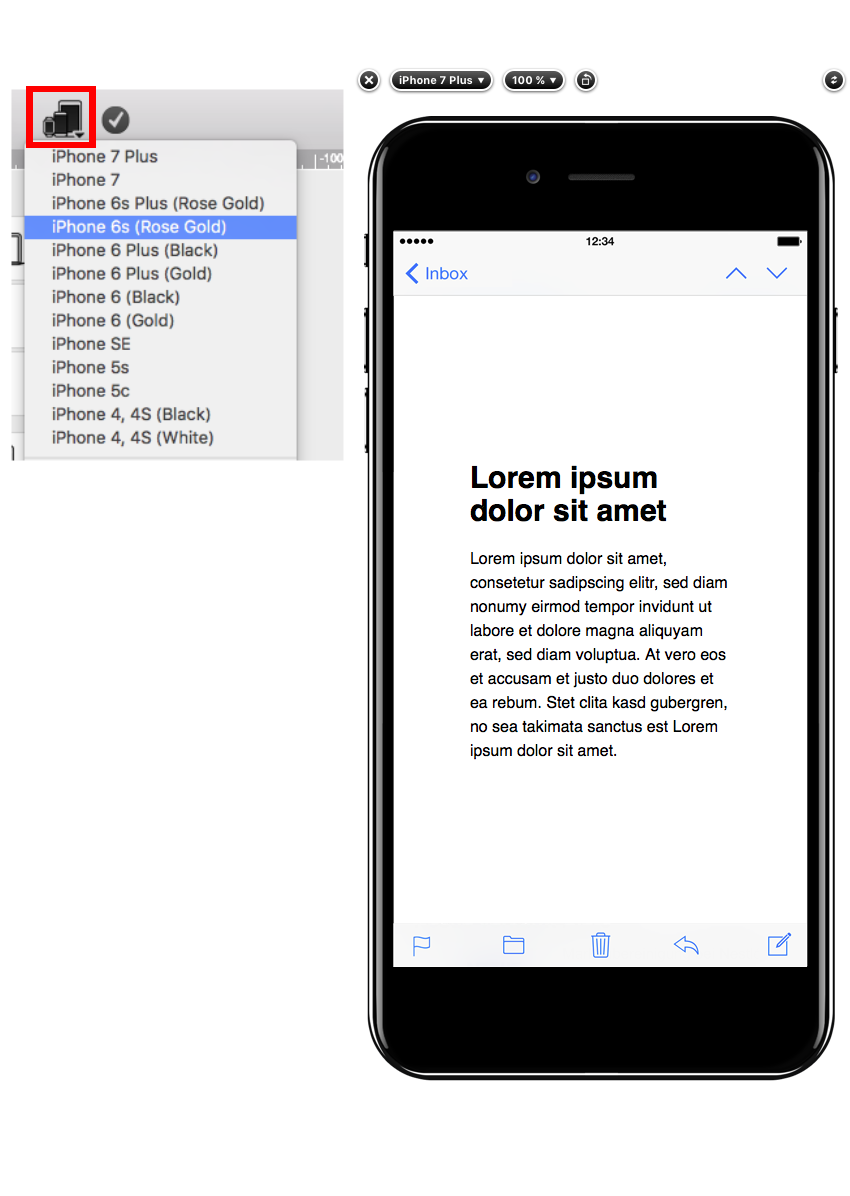
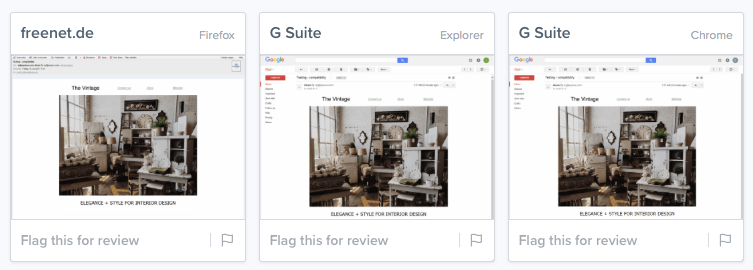 Mail Designer 365 does provide a preview for mobile devices. Keep in mind that this is only for the sole purpose of providing a rough idea of how the newsletter may look like on mobile devices. The actual rendering may be different, depending on the email client.
 Please visit this page for further information on how to preview your design for different email clients:
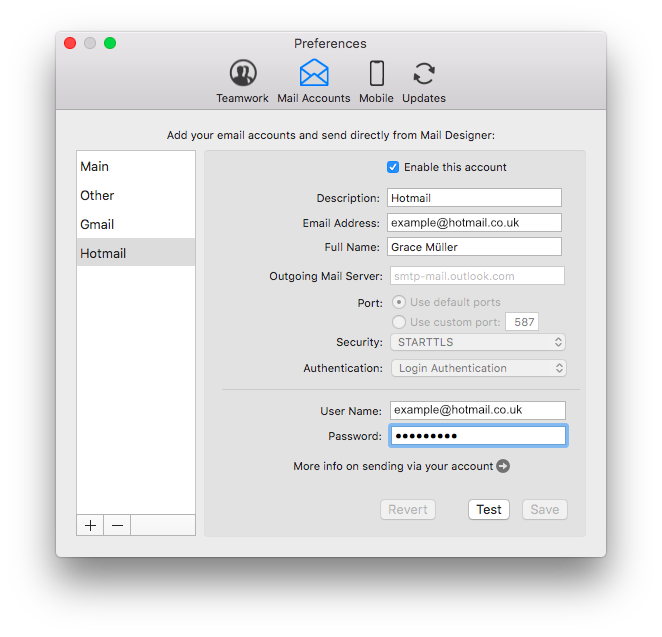
- Open Mail Designer 365 > Preferences
- Choose Mail Accounts…
- Click + to add a new account
- Enter your email account details
Tip: Find your email account settings in Apple Mail under Mail >
Preferences > Accounts > Server Settings > Outgoing Mail Server. Visit the Mail
Designer 365 Manual for a
step-by-step guide.
‣ Go to "File" > "Design Options."Please refer to the following page for further information on how to turn on and off text hyphenation:‣ Remove the check mark from the "Force hyphenation."
‣ Click "Ok."

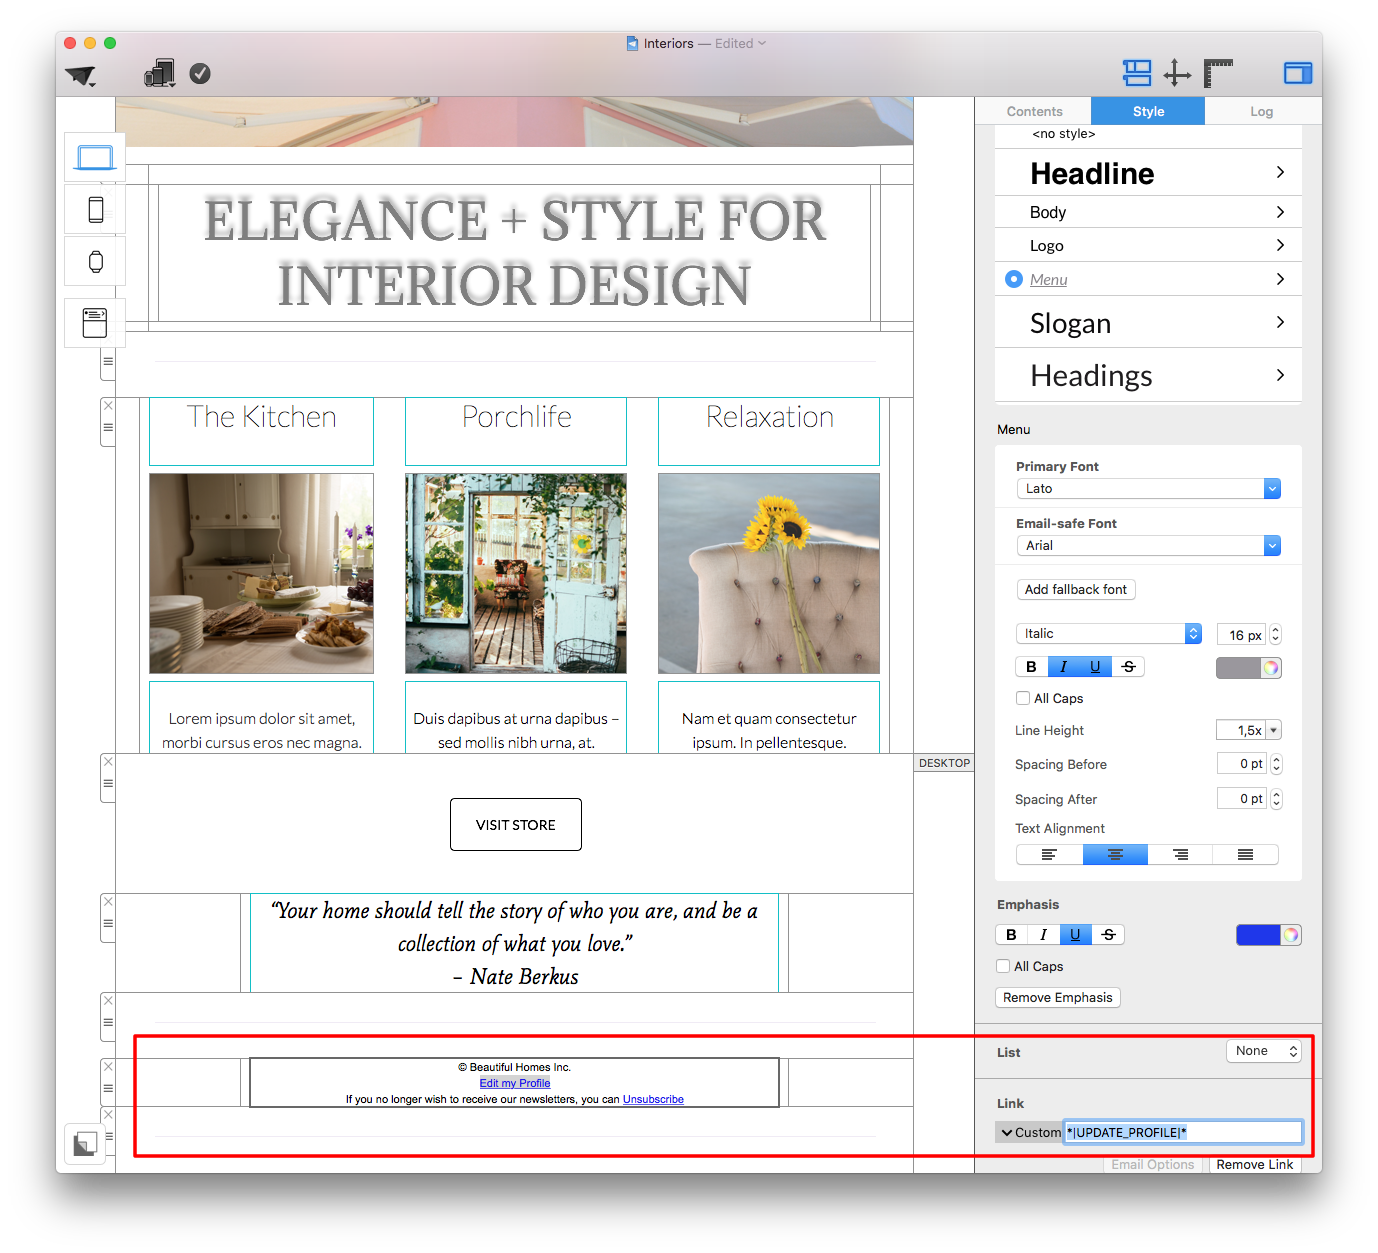
- In a text layout block, type the text you want readers to see (i.e. "Edit my Profile.")
- Highlight your selected text, then, in the sidebar, select "Add Link" from the "Style" tab.
- Choose link type "Custom."
- Enter your placeholder into the space provided (e.g. *|UPDATE_PROFILE|*)
 If you are unsure of how to label your placeholders, use Mailchimp's cheatsheet to find the correct label for any merge tag they support.
You can access the most important placeholders directly, as explained here, for other placeholders and custom merge tags.
If you are unsure of how to label your placeholders, use Mailchimp's cheatsheet to find the correct label for any merge tag they support.
You can access the most important placeholders directly, as explained here, for other placeholders and custom merge tags.
Mail Designer 365 allows you to send emails directly from within the application using the SMTP procotol.
In order to add your email account, please open the "Mail Accounts" tab in the preferences of Mail Designer, click "+" and enter the information for the account you want to configure. After you have entered all the required information, save the changes and choose this account in the send window.
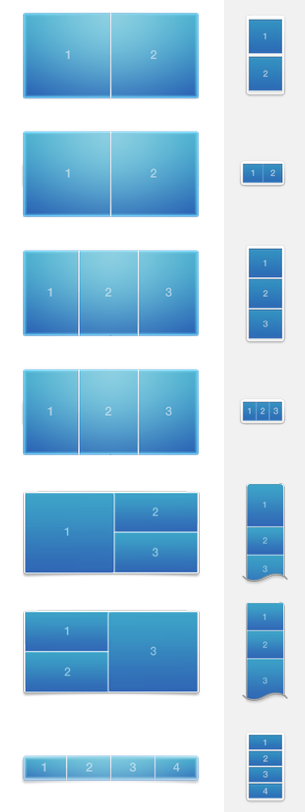
Follow this step-by-step guide for more information.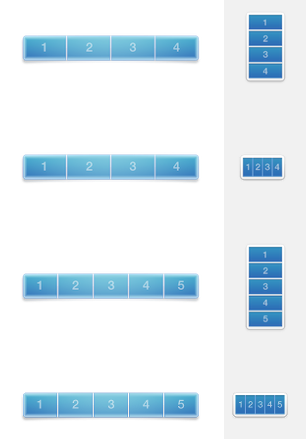 Within Mail Designer 365, you have multiple choices of different layout blocks with multiple image areas. Remember, one image area only allows you to add one link. When you send your email templates, an image area with different elements will be rendered as a single image, meaning you can only add one link within one image area and the link will be applied to that entire image area.
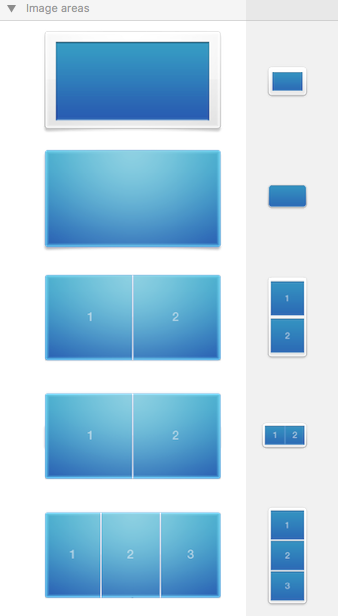
For the layout block, you can choose which layout you want and how many image areas there are within the layout block. Here is a layout block with 4 image areas:
Within Mail Designer 365, you have multiple choices of different layout blocks with multiple image areas. Remember, one image area only allows you to add one link. When you send your email templates, an image area with different elements will be rendered as a single image, meaning you can only add one link within one image area and the link will be applied to that entire image area.
For the layout block, you can choose which layout you want and how many image areas there are within the layout block. Here is a layout block with 4 image areas: Within each image area, you can add different graphic elements and a single link. Using a layout block, you can add a button with a unique link inside each image area. The different image areas will be rendered as their own individual images, even though it is one layout block.
 Please refer to the following page for more information on how to add different buttons with different links to your Mail Designer 365 email design:
Yes, it's possible to print your template by going to "File > Print…" from within the Mail Designer 365 app. Exporting to PDF can either by done in the lower left corner of the "Print" window or by selecting "File > Export as PDF…".
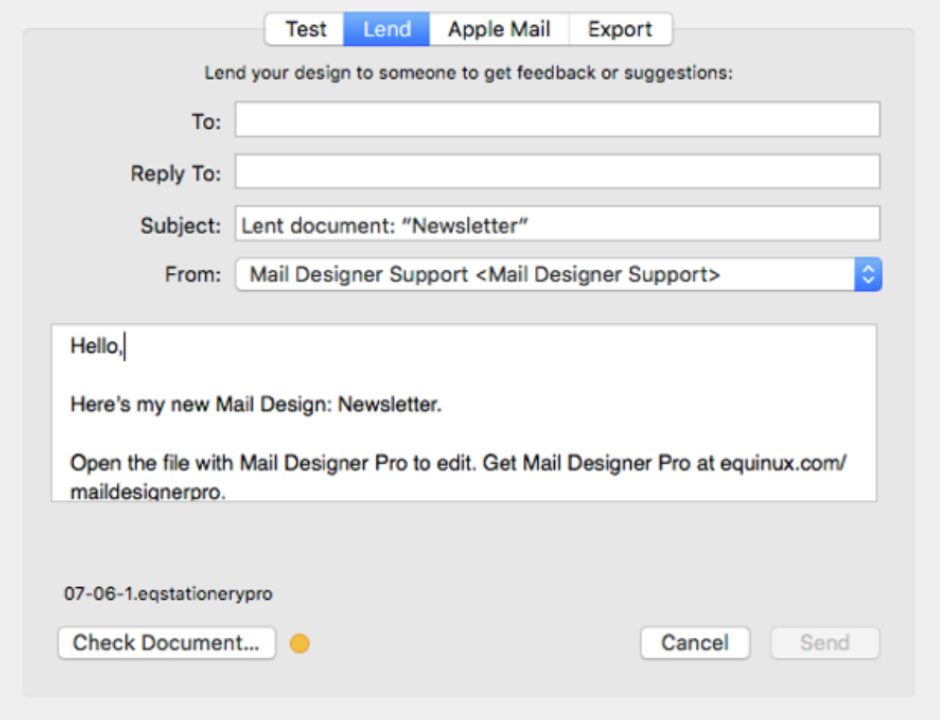
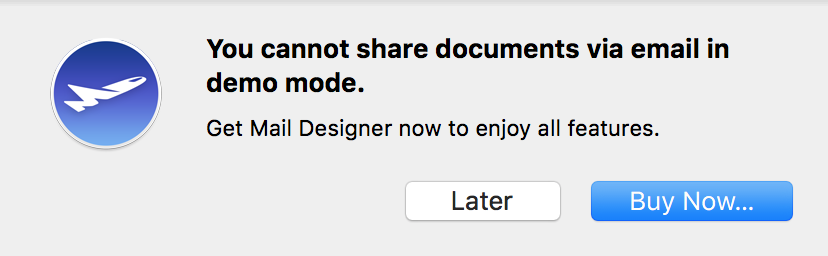
‣ Open the email template you wish to share. ‣ Choose "Share" > "Lend..."Remember: You cannot lend a document while on the demo version of Mail Designer 365.‣ Enter the recipient's email address and write him or her a short message. ‣ Click "Send."
 Please refer to the following page for more information on how to lend your email designs in Mail Designer 365:
Every Mail Designer plan offers a certain number of AI credits. These credits are automatically renewed every month as part of your subscription. During the beta, we have assigned all plans a number of credits for testing purposes, the number of credits in each plan may change in the future.
Every time you use TextScout AI features in Mail Designer, this is automatically reflected in your available AI credits.
How many credits are used?
How many credits a TextScout AI query will use depends on the complexity of the query itself and the number of results that TextScout was able to return. As the AI models are still being improved during the beta, the number of credits being consumed may vary.
Teams
If you are part of a Mail Designer 365 team with multiple plans, your credits are pooled so you can all use each others' credits.
I've run out of credits – what now?
Upgrade to Mail Designer 365 Business Premium to add additional credits to your account.
Already on Business Premium? Please reach out to our support team, we'd like to hear more about your experience using TextScout AI Beta.
When are credits refreshed?
AI Credits are automatically reset on the first of the month. Unused credits from the previous month do not roll over.
Creating an email link in Mail Designer is really straightforward. Simply follow the instructions below to get started:
- Type your desired text in a text layout block e.g. "Email me."
- From the sidebar select "Add link" and choose "Email mailto" as the type of link from the drop down menu.
- Add your email address.


Now your chosen text will appear as a link and when a customer clicks the link it will open a new email to you.
Our recommendations:
‣ One solution is to use the "redirect" feature, which is built-in to some emails to send it to another recipient. "Redirect" is different from forwarding the email because the redirect feature usually tells the email app to leave the original email design alone. ‣ Or you could add a link to your email on the web within the email template. This way, people have the option of viewing the email as it is, even after the email has been forwarded. Please refer to the following pages for further information:‣ Choose “Web Fonts" > "Download additional fonts…” from the font menu.
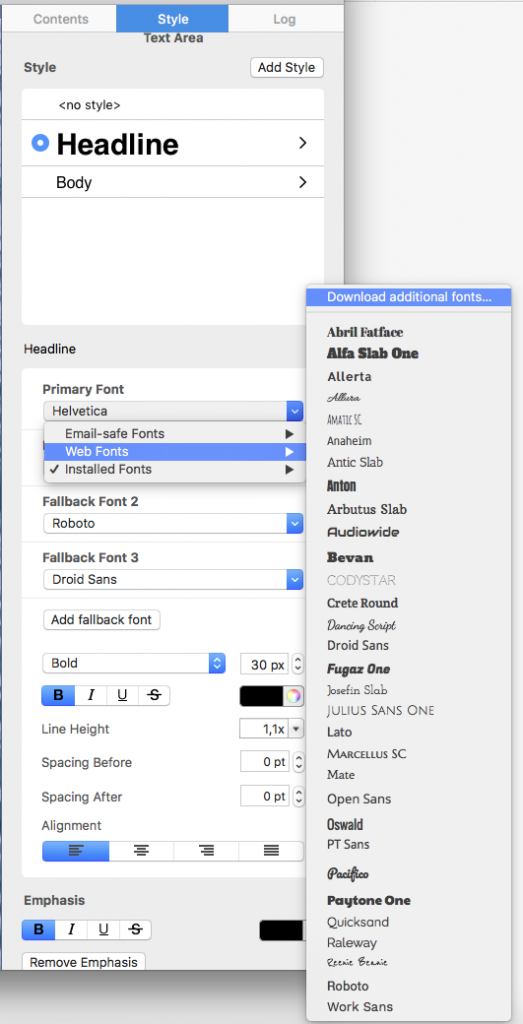 Then, you will be able to see a preview window where all available fonts will be displayed.
‣ Click ”Start Download“ to download additional Web Fonts you can then use in your template.
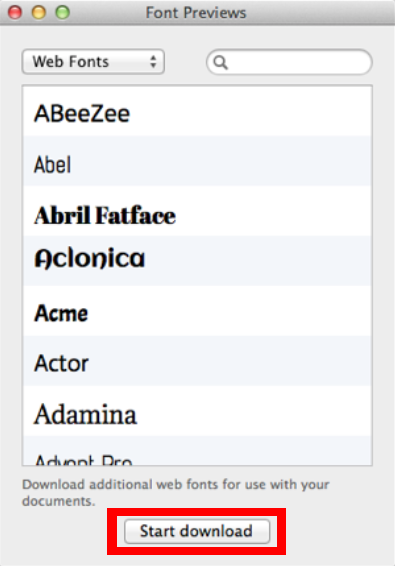
‣ After you click “Start download,” a popup window will open that shows the progress of the download:
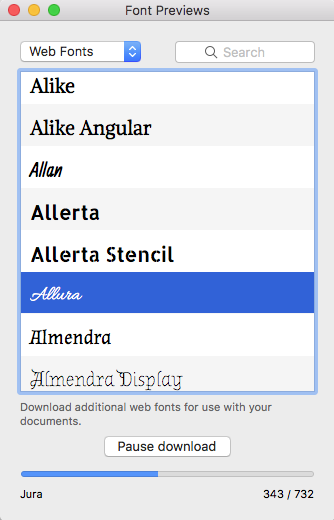
Things to understand when it comes to web fonts...
Although there are a wide range of fonts available when you download the additional fonts, we understand that some may still consider this as only a limited number of fonts. This is because the fonts are downloaded from Google’s directory of open source designer web fonts. We wanted to help ensure that our users are able to create designs with beautiful fonts in a legal manner. All the downloadable fonts are free and open source, which means that the fonts are accessible to everyone and are available to be used for both personal and commercial projects. Please refer to the following page for further information:Please note: You'll need to have a fairly detailed understanding of HTML and CSS layouts to create your own layout blocks. Mail Designer 365 uses advanced techniques to create highly compatible email layouts, so you'll need to be careful not to break email compatibility when creating your own. We can't provide HTML support for your custom designs or any issues that are caused by custom layout blocks so proceed with caution. (Or as our support team likes to say: With great power comes great responsibility…)
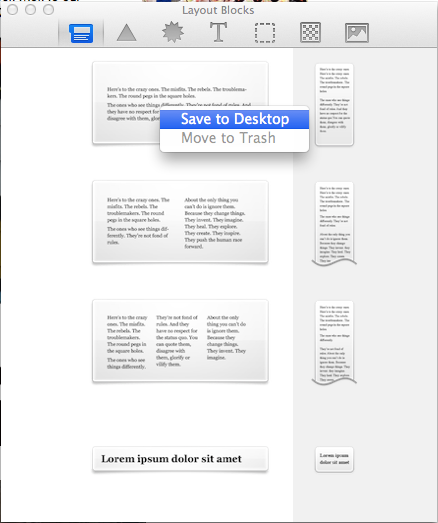
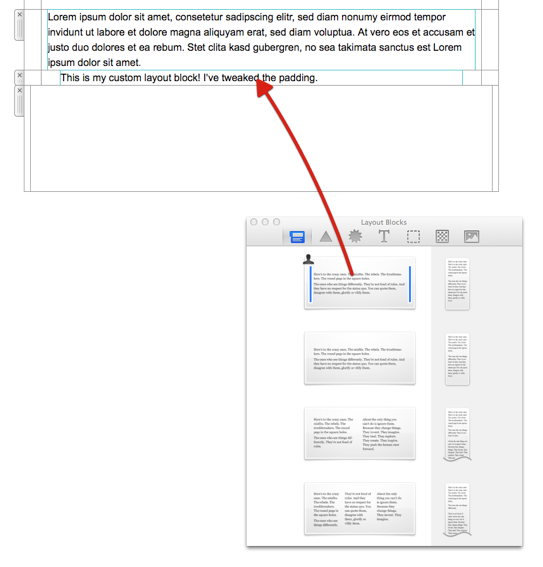
How to create a custom layout block
- Right click an existing layout block and choose "Save to desktop"
- Find the "..eqrmlayoutblock" on your desktop and edit the Content.html file
- Customize the preview image to match your new layout block
- Drag the entire folder with your custom layout block into the Mail Designer 365 Contents panel
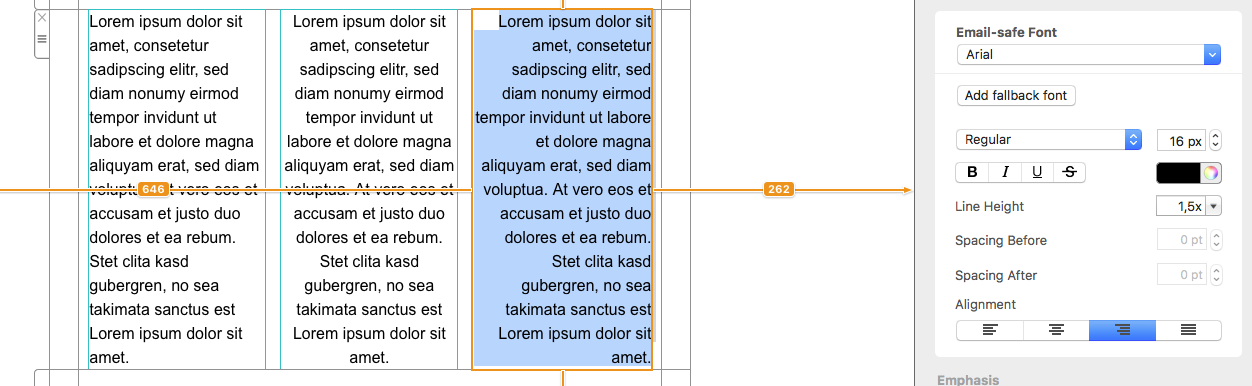
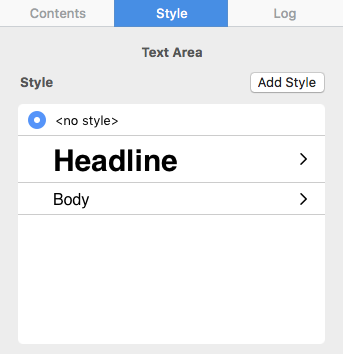
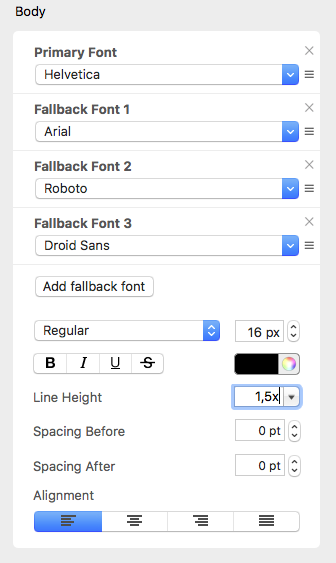
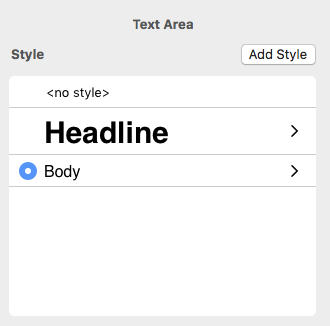 You also have the freedom of choosing different fonts and font colors for your text within a given text area. This is not limited to one font per paragraph.
 In order to assign different fonts within a paragraph, you must first select "no style" on the right side of your screen. Then, you can select the text that you want to change and assign it with its own font, font size, font color, etc.
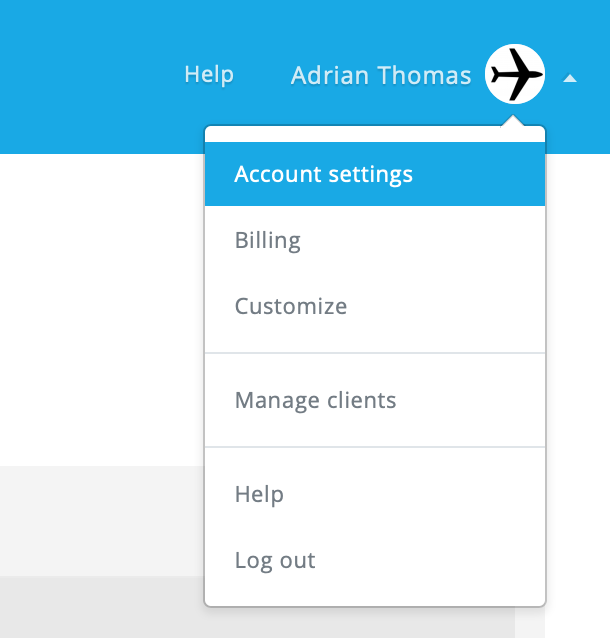
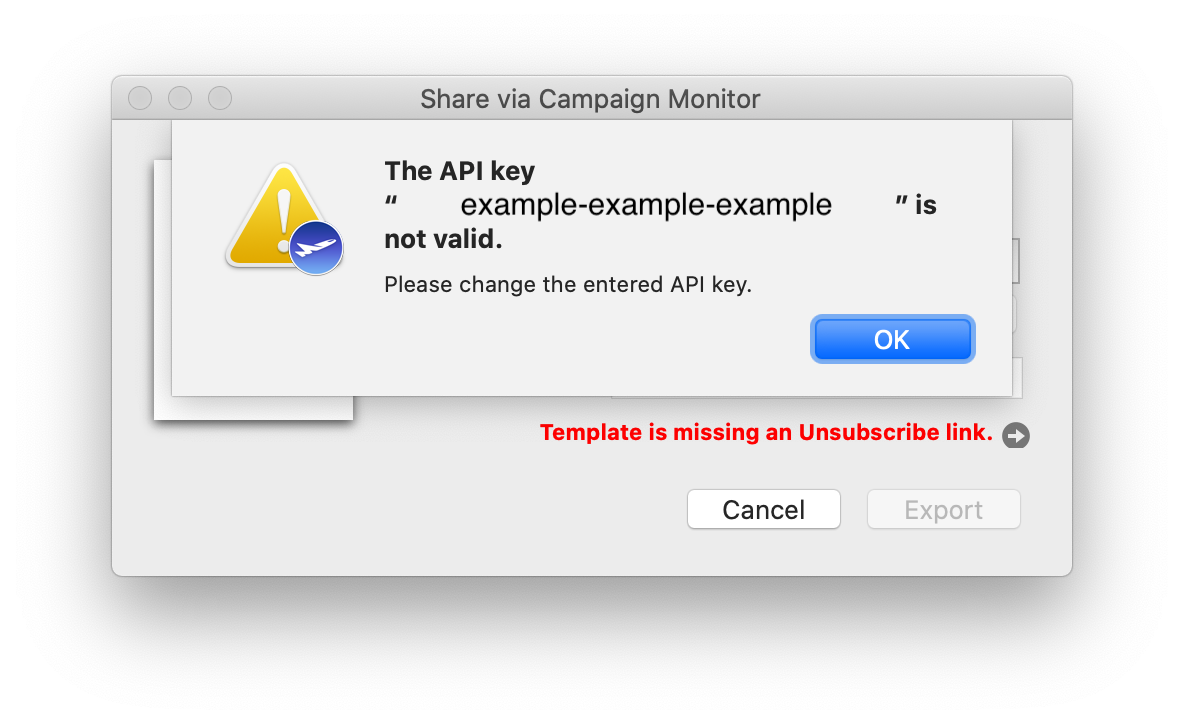 In order to generate a new API key and carry on exporting designs from the app as usual, log in to your Campaign Monitor account and head to "Account settings":
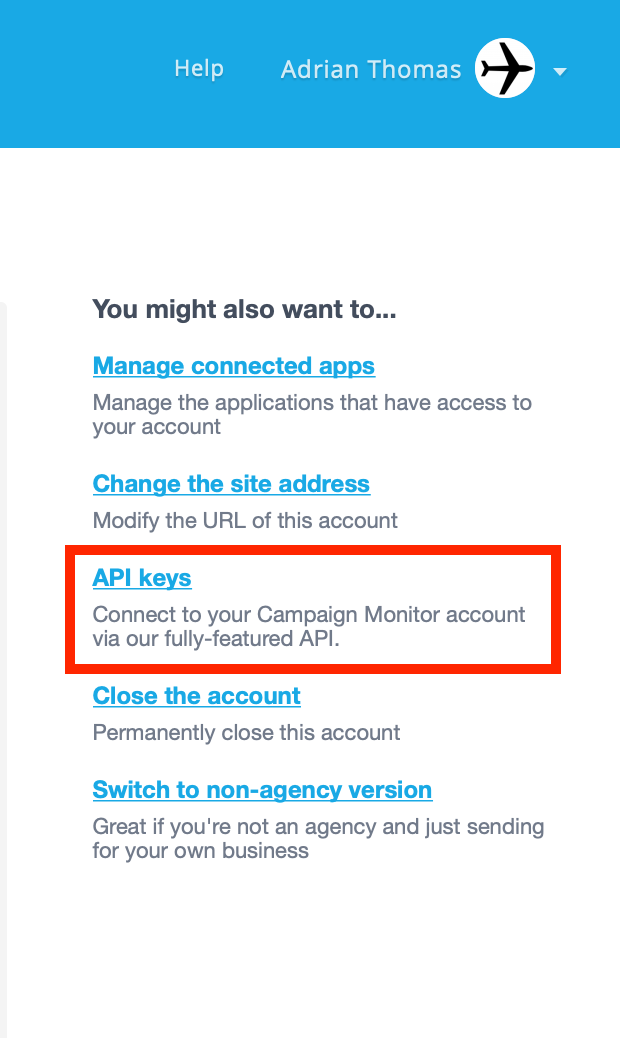
 Then, go to "API keys", where you can generate a new API key:
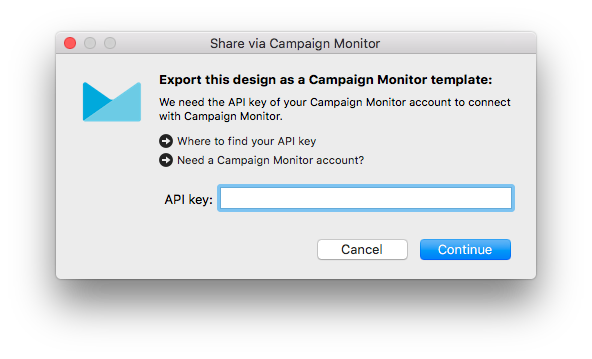
 Once you have done this, update your new API key in the app and try your export again.
‣ Go to "Mail Designer 365" > "Preferences."Please refer to the following pages for further information on configuration and sending emails via Mail Designer 365:‣ Then choose "Mail accounts"
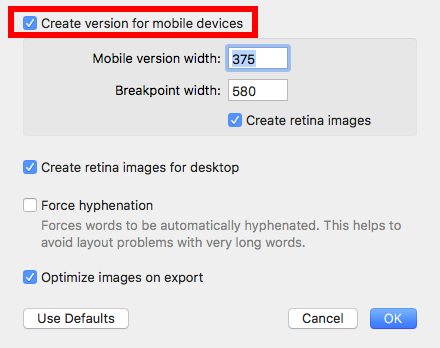
‣ In the Menu, please select "File" > "Design options."
‣ Remove the checkmark next to "Create version for mobile devices" and press ok.
‣ In the Menu, please go to "File" > "Design options" again.
‣ Activate the checkmark next to "Create version for mobile devices" and press ok
Once you have done this, you should be able to see the mobile modified Desktop version of your newsletter and you will be able to edit the layout blocks of the mobile view.
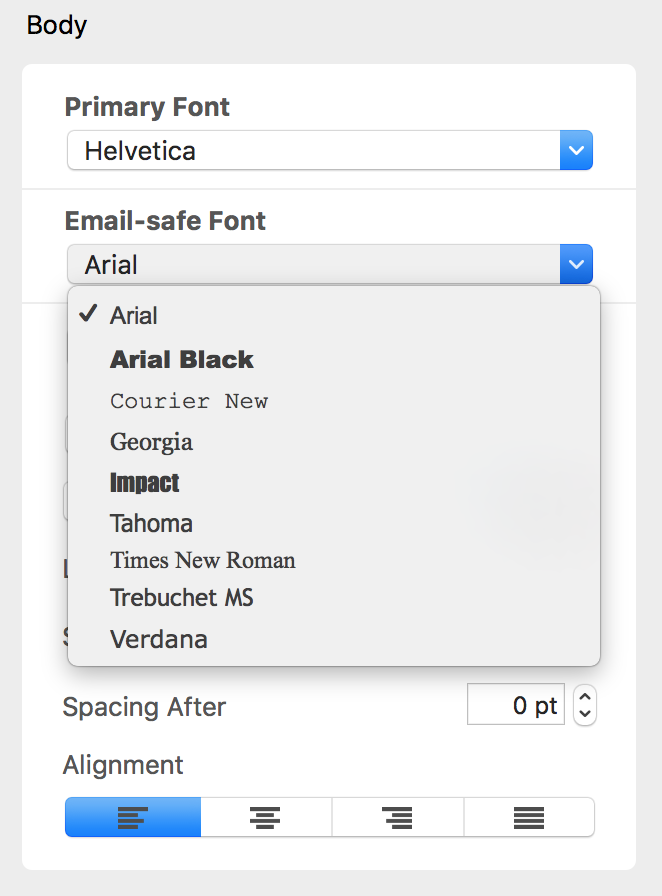 Email-safe fonts are the basic fonts installed on everyone's devices. If you have selected a font that is available on macOS but not on iOS, there will be a visible difference on the corresponding devices. If both devices have the font installed, then the email template will look the same on both platforms. You can use Web Fonts which the recipient's e-mail client can downloaded on demand. Most e-mail clients except Outlook support Web Fonts.
Important: Mail Designer 365 will warn the user about the missing font when the user opens the document.
Email-safe fonts are the basic fonts installed on everyone's devices. If you have selected a font that is available on macOS but not on iOS, there will be a visible difference on the corresponding devices. If both devices have the font installed, then the email template will look the same on both platforms. You can use Web Fonts which the recipient's e-mail client can downloaded on demand. Most e-mail clients except Outlook support Web Fonts.
Important: Mail Designer 365 will warn the user about the missing font when the user opens the document.

- If you haven't already, you can download Mail Designer 365 using this link.
- After the download has completed, launch the app and click the "Login" button in the top left-hand corner of the Design Chooser homepage.
- Enter your equinux ID and password in the space provided. Hint: This is the login you first created when purchasing Mail Designer 365 (or any other equinux software products) in our online store.
It sure does! And it does it brilliantly too!
Mail Designer can export an HTML file containing your entire design. This opens up a whole host of great options for you, as the user, to explore:
- Upload your design to third-party newsletter services
- Offer recipients, with email client programs that don’t support rich HTML content, the option to view your message as a webpage in their browser
- Create a link to your newsletter directly from your website: A great option for people that would like to see a newsletter before they subscribe
The best thing is: It's so easy to export your design as an HTML document
- Open your design
- Choose “Share > HTML...” from the menu bar
- Choose a location to save your design
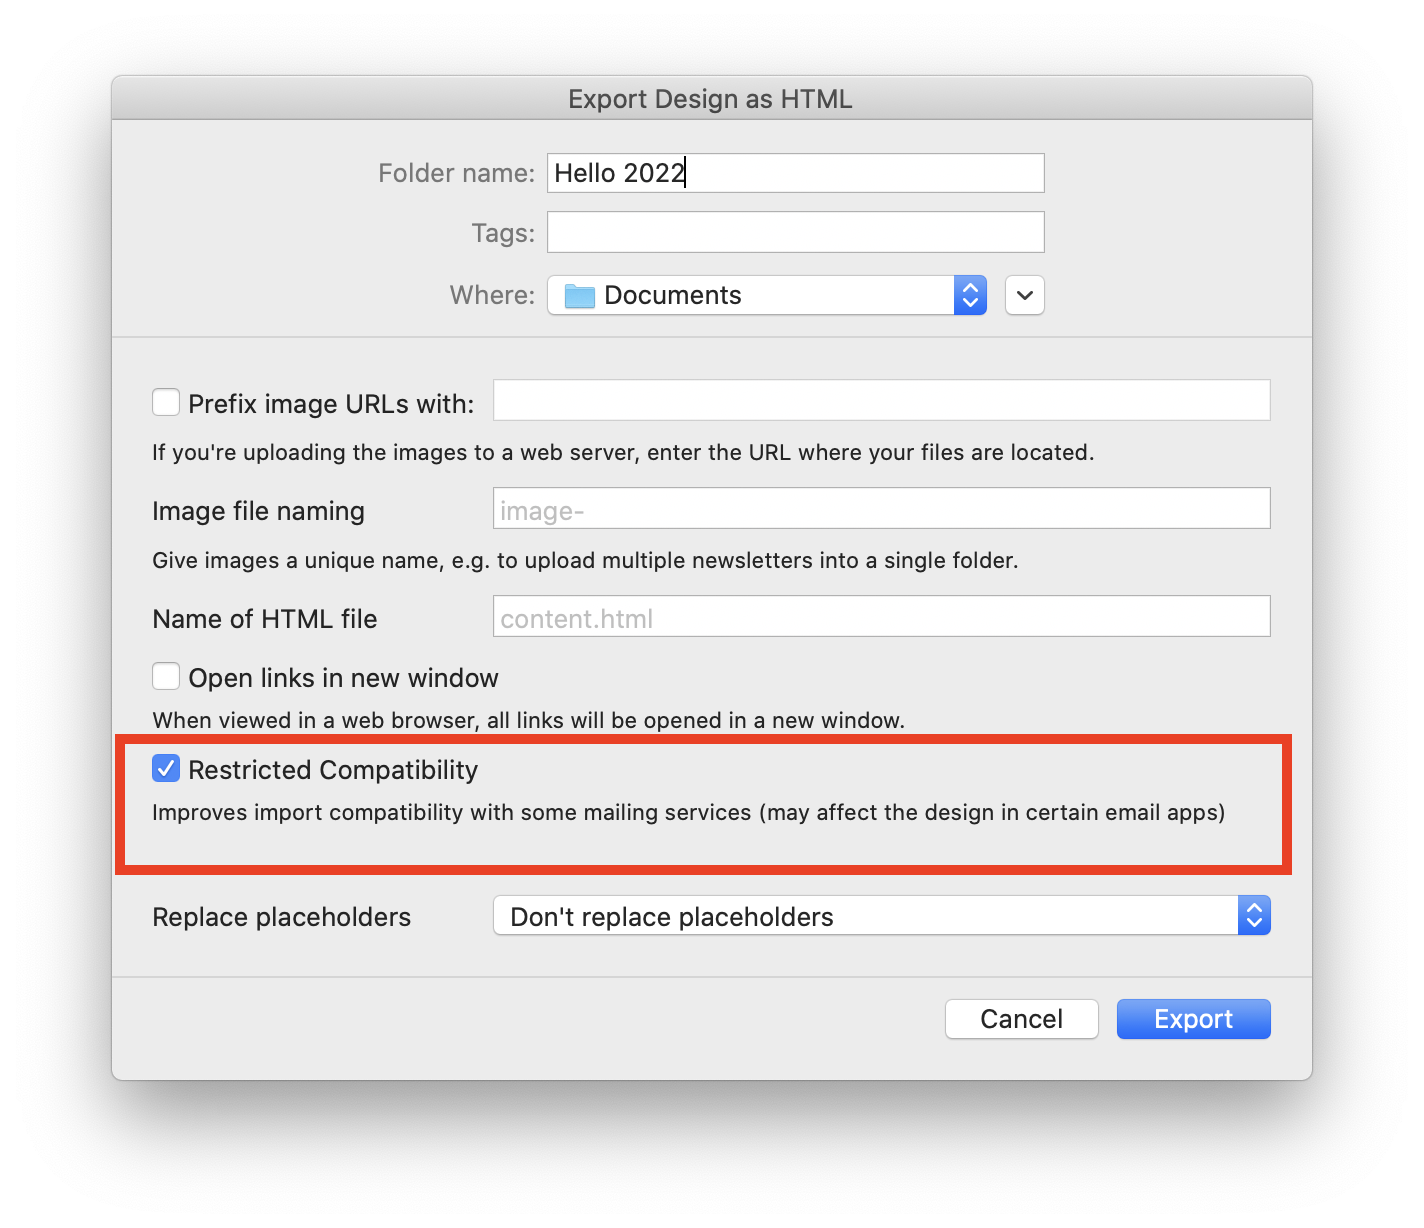
By the way: If you plan on uploading your images to a separate web server, you can enter an absolute URL prefix for images.
Mail Designer 365 supports the export of the template including MailChimp placeholders. Once uploaded to MailChimp almost all features offered by the website can be used. To make sure the layout stays intact we recommend not to use the "Edit" view of MailChimp for layout editing. Use Mail Designer 365 to make the necessary changes and export the new version to MailChimp.
‣ Click on the appropriate icon within the "Contents" tab to identify the location of your custom content. ‣ Choose this icon if you added custom content to your graphics section:‣ Choose this icon if you added custom content to your GIF/animated graphics section:
‣ Choose this icon if you added custom content to your backgrounds and photos section:
‣ Choose this icon if you added a custom folder with images and graphics:
‣ Once you have chosen, scroll down to the "Custom" section:
‣ Right-click on the image or graphic that you want to delete. ‣ Choose "Move to Trash" from the drop-down menu.
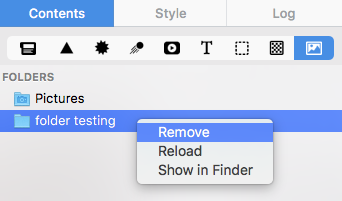
‣ To remove a folder, you will need to right-click on the folder and choose "Remove."
 It’s important to note that an entire image area will be displayed as a single image in your email. It does not matter how many shapes or graphics you have within a single image area, the entire image area will be displayed as a single image. Also, you can only assign one link per image area. If you want to add multiple links for different social media accounts, you will need to choose a layout block with multiple image areas.
First, let's go over how to assign 1 link to 1 image area (Great for linking to only 1 social media account):
‣ To create an image area link, choose an image area in your design.Remember: 1 link to 1 image area. This means you can only assign 1 link to 1 social media outlet within 1 image area.‣ Click the "Add Link" button from the Style section of the sidebar. ‣ Then, just enter your URL. ‣ The entire image area will be “hot” and can be clicked in your final message.
‣ A little link icon will show you for which image areas links has been embedded. ‣ Note: It is not possible to add a link to individual components of a single image area.
How to assign multiple links (Great for linking multiple social media accounts):
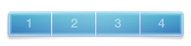
We’ve included several layout blocks that contain several image areas next to each other.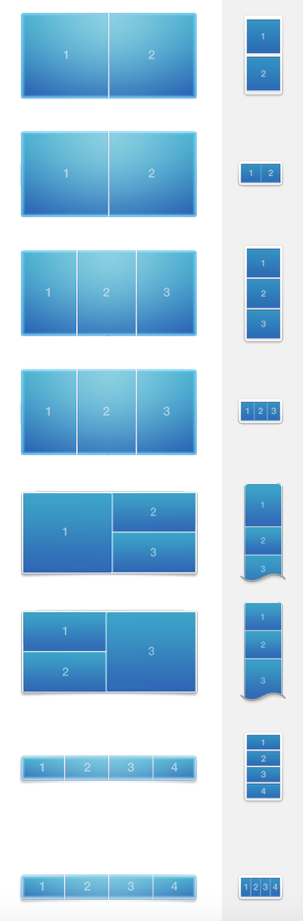 You can use these blocks to create multiple image area links. For instance, if you use a layout block with 4 image areas, you can add 4 buttons with different links to 4 social media sites.
 Just make sure to add one icon per one image area. Assign one link per one icon.
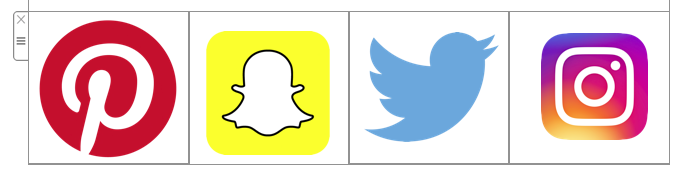
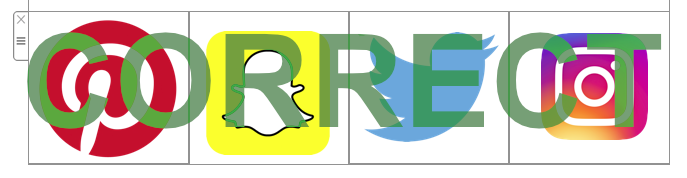
Correct vs. Incorrect
Correct because: 4 different icons in 4 different image areas. You can add 1 link per 1 image area. Therefore, you can add 4 different links total.
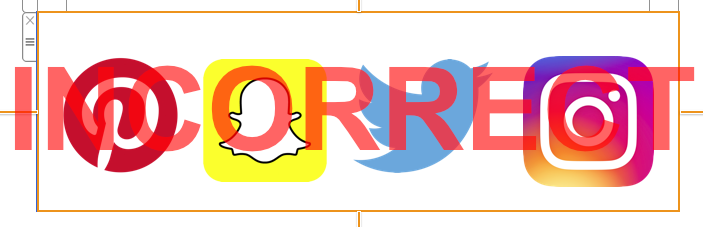 Incorrect because: 4 different icons in 1 image area. You can only add 1 link per 1 image area. Therefore, 4 icons will only lead to 1 landing page.
Please refer to the following page for more information on how to add different buttons with different links to your Mail Designer 365 email design:
Incorrect because: 4 different icons in 1 image area. You can only add 1 link per 1 image area. Therefore, 4 icons will only lead to 1 landing page.
Please refer to the following page for more information on how to add different buttons with different links to your Mail Designer 365 email design:For a video tutorial:
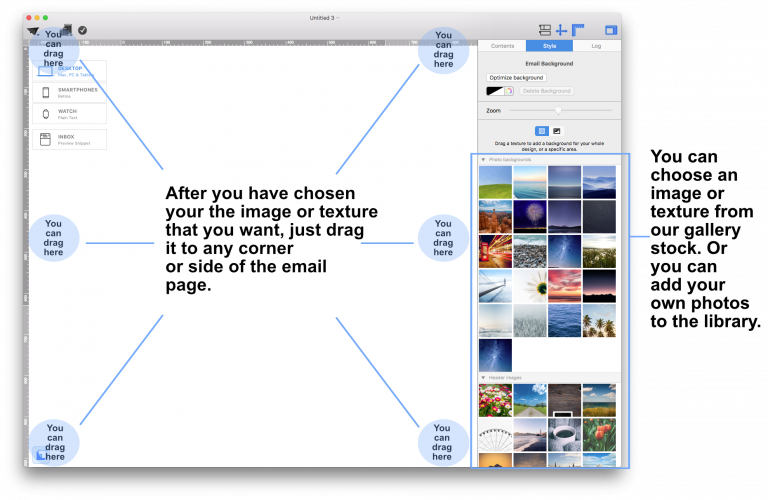
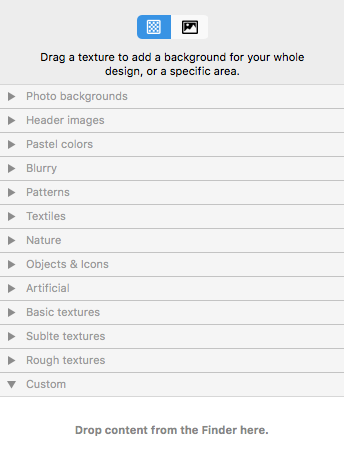
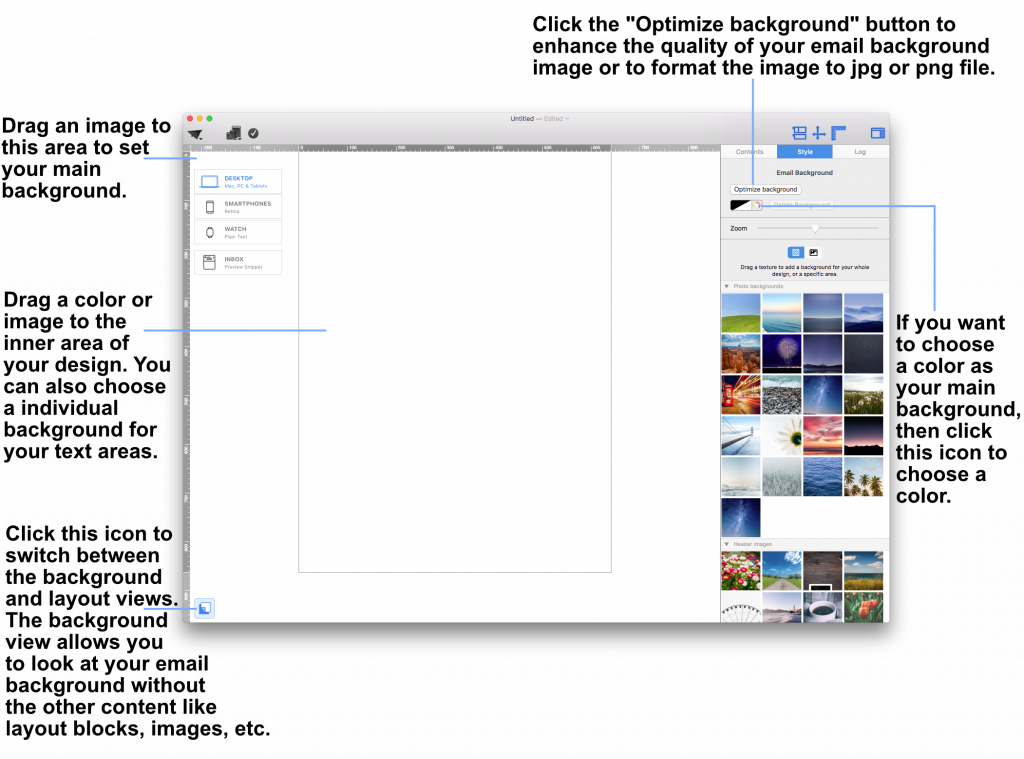 Drag a photo background, image, or texture into the surrounding background area to apply it.
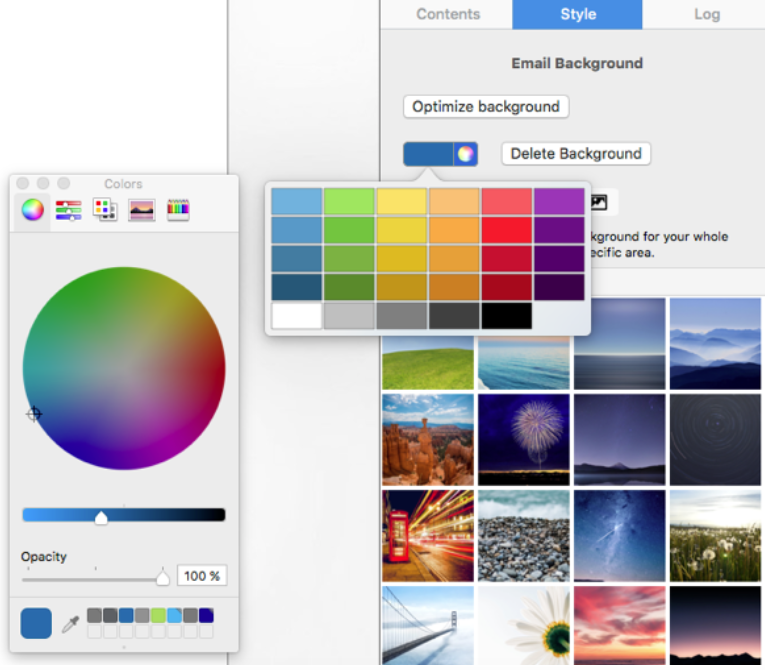
 This will apply your choice of background to the mail email background. You can also open the colors window and choose a color as your design background.
 If you would like to set a background for your text areas, then drag an image to the middle area of your email design.
Please refer to the following page for further information on how to change the background of your email template with Mail Designer Pro:
If you would like to set a background for your text areas, then drag an image to the middle area of your email design.
Please refer to the following page for further information on how to change the background of your email template with Mail Designer Pro:
 You are also welcome to use any photos, textures, or patterns from Mail Designer's stock library. We included many different categories. Simply drag and drop the thumbnails from the design sidebar into your background.
 You can even use your own photos, textures, and patterns. Just simply drag it to your template from your desktop or the Finder. If you are using a third party's photo, texture, or pattern, make sure that you have permission to use it for commercial projects. Also, don't forget to give credit to the designer/artist.
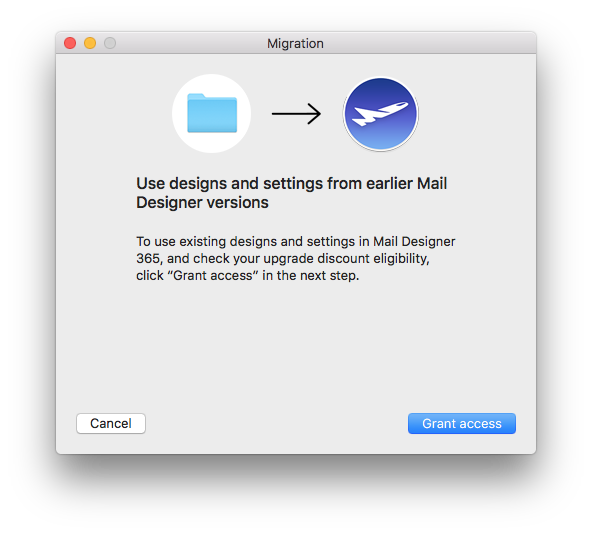
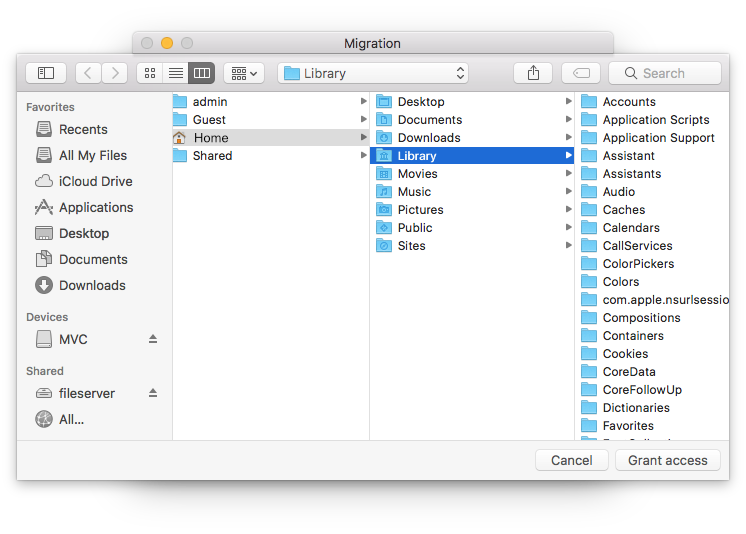
‣ Go to the "File" menu ‣ Choose “Import settings and designs…”This will let you import all your existing data from earlier Mail Designer versions.‣ Click "Grant access" when you are ready

- The username is wrong/incomplete. For example, iCloud accounts sometimes work with "username" but most times need the whole email address as a log in.
- The password is wrong.
- If you're trying TLS, try STARTTLS instead.
- Maybe your server is using a custom port - though this is unlikely.
Server name: securesmtp.t-online.de
Port: Standard ports
Security: STARTTLS
Authentication: Password
Username: max.mustermann@t-online.de (your full T-Online email address)
Password: You must create a separate email password for Mail Designer 365 in the T-Online Customer Center.
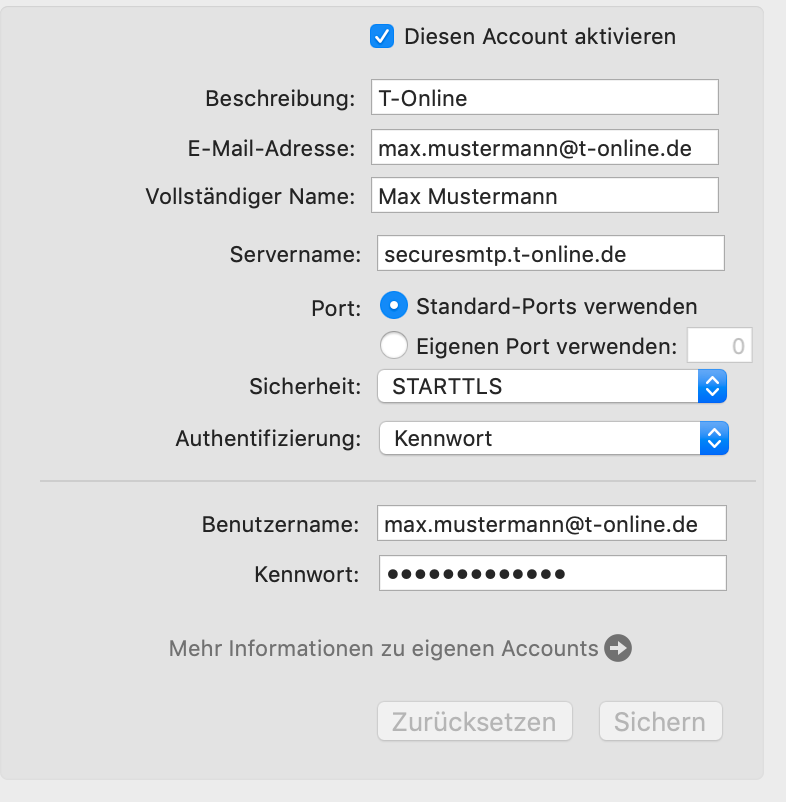 Password note: As described above, a separate password for email programs must be used. Sending will not work with the regular online login password.
- Head to our website to view all plan options.
- Choose your preferred plan and click "Buy"
- Log in to my.maildesigner365 with your equinux ID to complete your purchase (this is the login you use for Mail Designer)
- Once you've purchased a plan, download the app and move it to your Applications folder.
- Find Mail Designer 365 on the App Store
- Choose your plan and complete your purchase to download the Mail Designer 365 app to your Mac.
- Open the app and log in with your equinux ID
How to access TextScout AI
TextScout AI is available to try out in all Mail Designer 365 plans in the latest Mail Designer 365 version. The number of AI credits available to you for generating subject lines varies depending on your plan tier. Check your status using the credits indicator within the TextScout AI window.MailChimp offers visual "WYSIWYG" and code-based template editing.
However, as every HTML engine works a little bit differently, we recommend that you stick to Mail Designer for editing, as changes made with MailChimp may cause issues with the look or layout of your designs.
If you need to make any changes, simply re-upload a new version of your design and select it for your MailChimp campaign.
On the other hand if you are a HTML code pro, just edit the HTML code with the MailChimp editor untill it fits your needs. We ask for you understanding that we can't offer support for this.
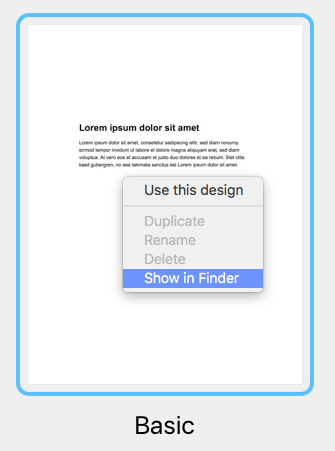
You can find your original template files in the Finder by following these steps:
‣ Right click the template in the Design Chooser
‣ Choose "Show in Finder"
How to find your designs in a Time Machine backup
If you've had a hardware failure and need to find your templates in a backup of your Mac, you can find your templates in this location:
/user/Library/Group Containers/C3HCD5RMD7.net.tower-one.MailDesigner
Note: there will be multiple "Library" folders on your harddrive, but you need the hidden one inside your Home folder.
Here is one way to get there:
- Navigate to your user's home folder in the Time Machine backup (e.g. "John")
- Right-click on your user's home folder ("John"), hold down the Alt/Option key (⌥) and select "Copy “john” as Pathname"
- Select the menu item "Go > Go to Folder…" and a dialog will open
- Press Cmd+V to paste the path you've just copied and add "/Library" to the end of the path and press enter
Now here on, go to "Group Containers/C3HCD5RMD7.Mail Designer/Documents/MD365" to find your documents. You'll find folders corresponding to your categories and each will have subfolders "Contents/Resources" that have the actual documents.
You can drag & drop them onto your Mail Designer 365 icon in the dock to copy them to your Mail Designer 365 library.
With Mail Designer 365 you can create responsive newsletters which look different depending on which device your recipient opens your email.
On an iPhone your recipient will see the mobile version of your newsletter.
As an iPad has a much bigger screen than an iPhone, an iPad will display the desktop version of your newsletter.
‣ Drag and drop a text area into your email template. ‣ Double-click on the text area. ‣ Type your list. Highlight the text where you want the list to appear.Please refer to the following page for further information on how to create a list:‣ On the right side of the screen, you will find a side bar in which you can choose the list style under "Lists." ‣ Choose the list style you want.
‣ It will automatically transform your words into a list with your chosen bullet point.
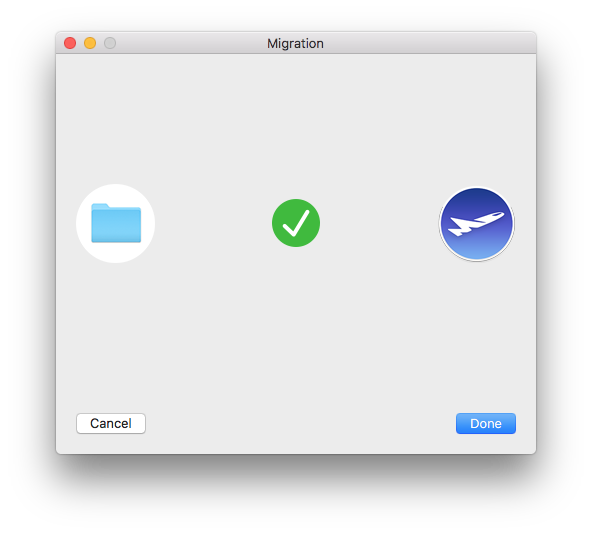
- Click on "File" > "Import settings and designs."

- When the migration window pops up, select "Grant access" to continue.
- In the next window, simply select "Grant access" again to allow Mail Designer 365 access to the design files in your Library. You do not need to select a different folder.

- Select from the list which settings you would like to copy over to Mail Designer 365 and then click "Import selected."
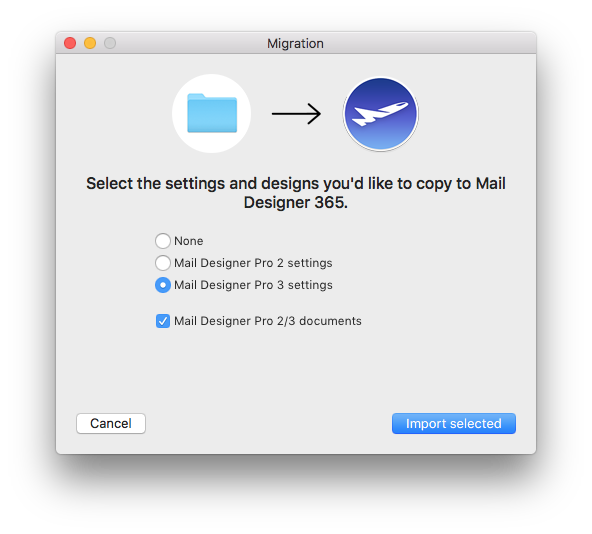
- Your designs and in-app preferences will then be quickly imported into Mail Designer 365.
- Image optimisation
- Subject line preview
- Built in spelling & grammar checker
- Mobile optimisation tools
Emails that contain only images are often flagged as spam because spam filters rely on text to evaluate the content's legitimacy. Without text, the filters may assume the email is hiding suspicious or harmful content, a tactic commonly used by spammers. Additionally, image-only emails can load slowly, frustrating recipients and increasing the likelihood that they will mark your email as spam.
To improve your email's chances of landing in the inbox, follow these best practices:
- Avoid image-only layout blocks: Instead of using layout blocks that consist only of images, opt for blocks that combine text and images. This ensures your text gets displayed as actual text, not as part of a large image, which helps filters and recipients better understand your content.
- Include relevant text: Clearly explain the purpose of the email using text. This gives spam filters context to analyze and helps your audience engage with your message.
- Use alt text for images: Add descriptive alt text to each image. This ensures that even if the images don’t load, recipients (and spam filters) can still understand the email’s content.
- Maintain a good text-to-image ratio: A balanced approach, where there’s more text than images, can reduce the chances of your email being flagged as spam. The text gives spam filters more material to evaluate.
- Use a combination of image and text blocks: Combining both elements not only enhances readability and engagement but also prevents spam filters from interpreting your email as an attempt to hide important information in images.
- Use a reputable email service provider like Mail Designer 365 Campaigns: Many email service providers such as Mail Designer 365 Campaigns help optimize email structure and offer authentication protocols like SPF, DKIM, and DMARC to enhance deliverability.
By following these guidelines and ensuring your email contains a mix of well-placed text and images, you can improve its deliverability and reduce the risk of it being sent to the spam folder.
‣ Choose "File" > "Design Options..."Then, you will be able to export your email design or send via your method of choice (through Apple Mail, Campaign Monitor, MailChimp, etc).‣ Uncheck "Create version for mobile devices."
‣ Click "OK" when you are ready.
Renewals can be canceled up until 10 days before their renewal date. The cancelation will take effect on the next possible renewal date. You can continue to use the software until the end of your term, at which point your subscription will end.
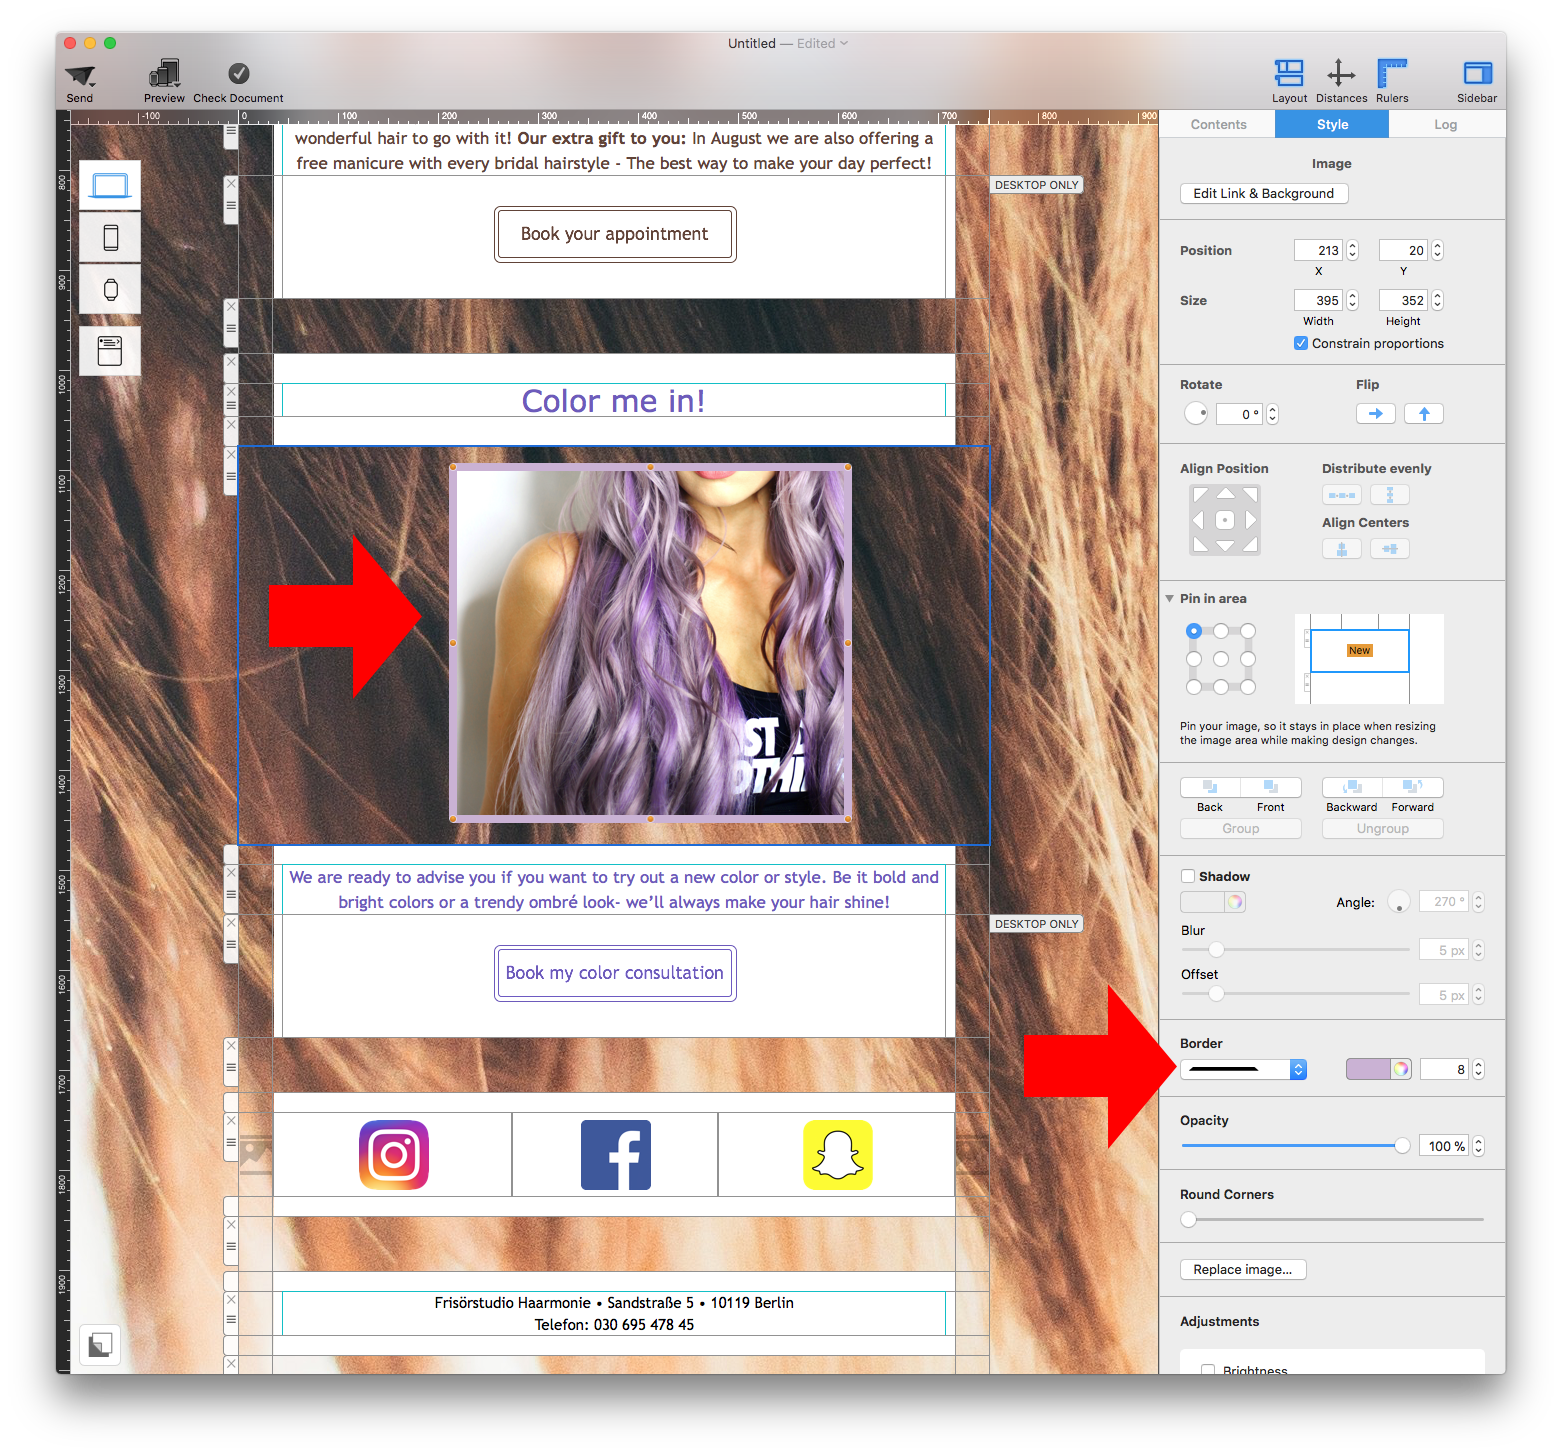
‣ Select the photo that you want to add a border to
‣ This will automatically prompt Mail Designer 365 to open the "Style" tab on the right side of the screen
‣ At the bottom, find the "Border" section
‣ Select the type of border that you want to use
‣ Click on the color wheel icon and choose the color of your border
‣ Change the pixel size to adjust the thickness of the border
Note: You can also add borders to shapes.
‣ Go to "File" > "Design Options."Please refer to the following page for further information on how to turn on and off text hyphenation:‣ Remove the check mark from the "Force hyphenation."
‣ Click "Ok."
‣ Drag a layout block with an image area into your newsletter
‣ Drag the GIF that you want to use into an image area
‣ Make sure to only add 1 GIF per 1 image area
‣ If you add multiple GIFs into 1 image area, only the last GIF added will work
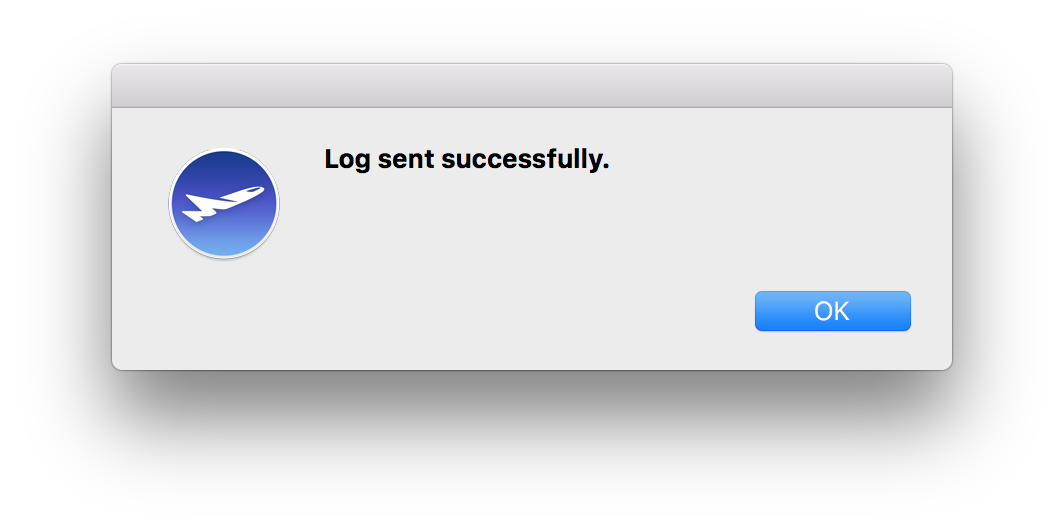
‣ Hold the alt ⌥ key or option key on your keyboard ‣ Select "Help" > "Send Debug Logs..." from the menu‣ Note: If you do not hold the alt/option ⌥ key, the Help drop-down menu will say "Provide Mail Designer Feedback..." instead of "Send Debug Logs..."
‣ Once you have sent your debug log, Mail Designer 365 will notify you that the log has been sent successfully
- Automatic unsubscribe handling (Delivery Hub will remove unsubscribed contacts for you)
- Clean email list – your campaigns are only being sent to engaged subscribers
- Fewer spam complaints
- Campaign-based unsubscribe rate tracking
When you send your campaign via Delivery Hub, recipients will see the unsubscribe option in the footer of your email:
Learn more about Delivery Hub →
 This should give you a better and more accurate view of how great your design will actually look!
Please refer to the following page for further information on how to accurately view your Mail Designer 365's email design once uploaded on MailChimp:
This should give you a better and more accurate view of how great your design will actually look!
Please refer to the following page for further information on how to accurately view your Mail Designer 365's email design once uploaded on MailChimp:
You can also check out our video for tips on animated GIFs here:
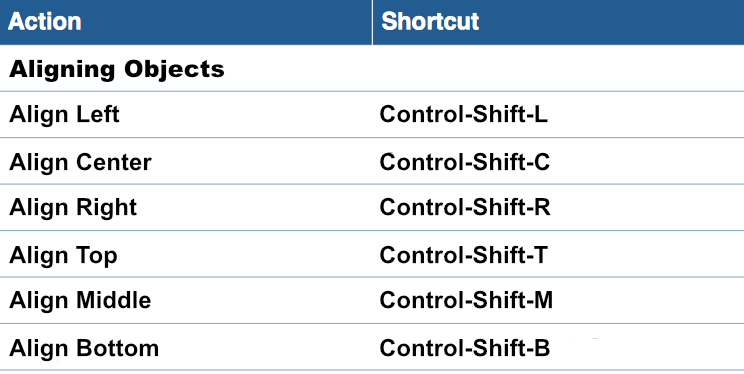 Please refer to the following page for keyboard shortcuts for aligning different objects in Mail Designer 365:
Our best practice recommendation when it comes to videos:
We recommend linking out to the videos on another site such as YouTube or Vimeo. These videos will then open in Safari or the relevant video app. For example, if it's a YouTube video and the YouTube app is installed on the device, then the video will play right in the YouTube app on the recipient's device.There are a couple of things that you need to check.
‣ First, are you using MailChimp as your email service provider? If yes, make sure that you are not viewing your design on the "Edit" preview within MailChimp's website.‣ Click "Preview and Test" on the top right corner of your screen.‣ If not, try changing the default line height of your text. The default is set at 1.5. Adjust the line height to fit your needs. Try to set the spacing to 1.0 height. Your text should no longer look jumbled up.
‣ Then, choose "Enter preview mode."
- Click on "File" > "Import settings and designs."

- When the migration window pops up, select "Grant access" to continue.

- In the next window, simply select "Grant access" again to allow Mail Designer 365 access to the design files in your Library. You do not need to select a different folder.
- Select from the list which settings you would like to copy over to Mail Designer 365 (i.e. from which version) and then click "Import selected."

- Your designs and in-app preferences will then be quickly imported into Mail Designer 365 exactly as they were when you last used them.

As part of the free Campaigns plan included with your Mail Designer 365 design plan, a Mail Designer 365 banner is displayed in the footer of emails sent via Delivery Hub:
These banners can be removed after switching to any paid Campaigns plan. Log in to your my.maildesigner365 account to explore the Mail Designer Campaigns plan options.
 Important: Mail Designer 365 will warn the user about the missing font when the user opens the document.
 If you want to make sure that the font that you use will appear on a different person's device, then we suggest using one of the email-safe fonts in your email newsletter.

- The Mail Designer 365 free download only allows you to view the app and open and edit email templates.
- Without an active demo, you will be unable to save or send created templates.
- The free trial version is valid for 7 days.
- You can save templates for a period of 7 days.
- You can send yourself test emails using the integrated Mail Designer 365 Testmail service
- You can explore all Campaigns features, including TeamCloud, Crew Chat and Delivery Hub, with the free Campaigns plan included in your demo
- Export HTML templates
- Send/export templates using an external email marketing service
Mail Designer- Support ended: September 2014

Mail Designer 2 - Support ended: February 2015

Mail Designer Pro - Support ended: May 2016

Mail Designer Pro 2 - Support ended: May 2017

Mail Designer Pro 3 - Support ended: October 2018

Mail Designer Pro HS - Support ended: January 2019
What this means: While some of these versions of Mail Designer may still work on your current Mac, should you need to get a new Mac, or upgrade to a new macOS, they will no longer be supported. What to do: If you are still using an older version, we strongly suggest you upgrade to a modern Mail Designer 365 plan to guarantee regular updates and consistent support throughout the lifetime of your plan.
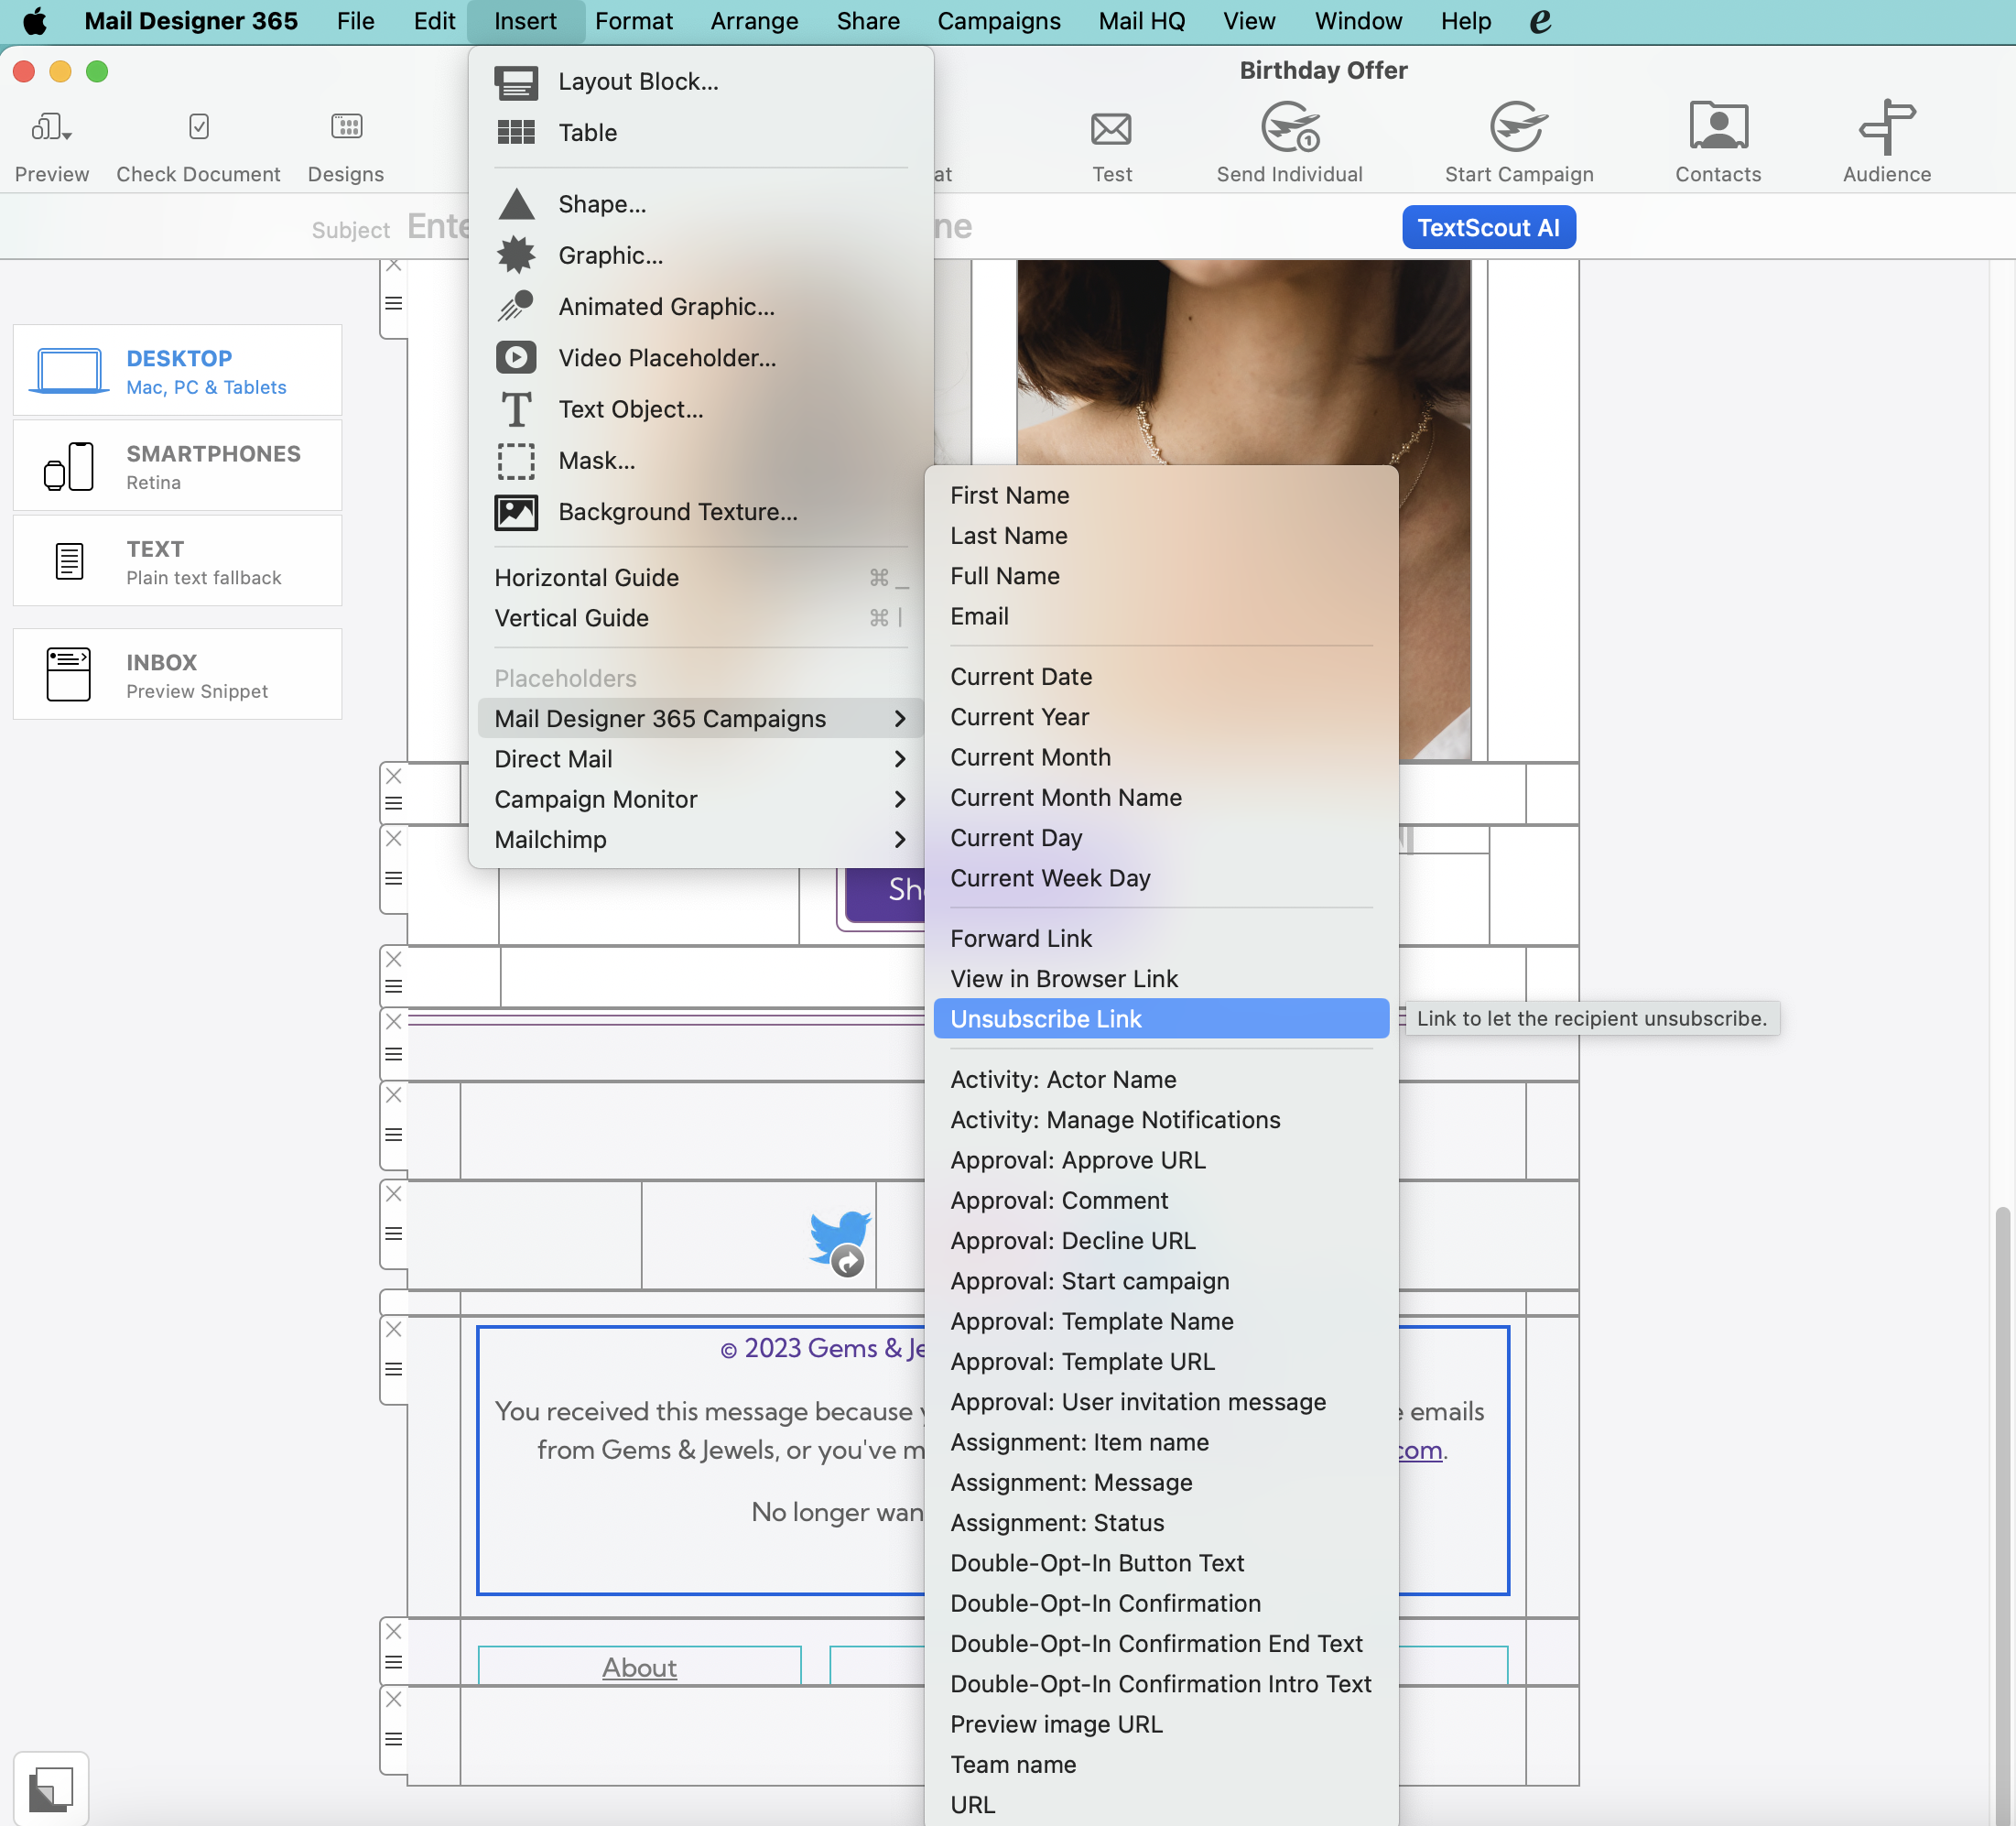
All templates you want to upload to Campaign Monitor have to contain an unsubscribe link.
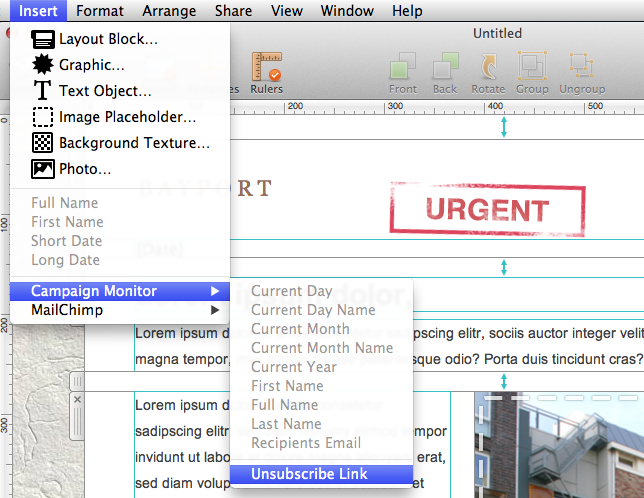
To add an unsubscribe link to your template, please follow these steps:‣ Choose the text area you want to insert the unsubscribe link to. ‣ Please choose "Insert" > "Campaign Monitor" > "Unsubscribe Link" from the top menu bar.
You can now upload your design to Campaign Monitor.
- External
Ideal for: clients, external employees, and managers who want to contribute content and approve or launch campaigns. Can use TeamCloud, Crew Chat, Direct Mail, and campaigns. Cannot purchase plans or stamps for the team. - Member
Ideal for: employees who work closely on emails. Can use TeamCloud, Crew Chat, Direct Mail, and campaigns. Can purchase plans or stamps for the team. - Project Manager
Ideal for: administrators of your team, who don’t necessarily have to be involved in design. Can manage team members, purchase, and assign plans and licenses.
Visit my.maildesigner365.com, log in to your account, and go to the "Billing" tab to change your payment method. Click on your current payment method in the top right corner and select "Choose another way to pay." You can now add a new credit card or alternatively, add a PayPal account. This will be used as your new default payment method for your Mail Designer 365 plan.
 Mail Designer 365 uses the second HEAD tag to improve your design's compatibility with Yahoo Mail, however some email services think this is an error and are therefore unable to process the HTML.
For example, if you are using Constant Contact and experiencing compatibility issues, please try this option.
Mail Designer 365 uses the second HEAD tag to improve your design's compatibility with Yahoo Mail, however some email services think this is an error and are therefore unable to process the HTML.
For example, if you are using Constant Contact and experiencing compatibility issues, please try this option.
In our online store we accept a variety of payment methods:
- Visa
- Mastercard
- American Express
- PayPal*
- Personal/Business Checks* (US Orders Only)
- Bank Transfers* (European Union Only)
* License will be emailed to you once your payment has cleared.
When paying my check or bank transfer, you will receive an email with additional payment details once you have placed your order. Bank Transfer and Check orders are currently not available for Mail Designer Purchases
~/Library/Group Containers/C3HCD5RMD7.net.tower-one.MailDesigner
You can access this folder by opening Finder, going to "Go" > "Go to folder" and copying and pasting in the above path.
‣ You can do a complete manual backup by going to "My Designs." Then, press ⌘ + a to select all the designs and then drag them to a folder on your desktop. You can then also save this folder on an external hard drive.
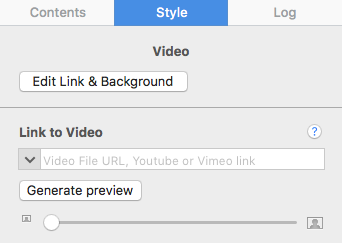
‣ Add a layout block with an image area. ‣ In the "Contents" tab, click on the "Video Placeholder" icon. You can also press Command-5.‣ Drag a video placeholder into an image area.
‣ Paste your WeVideo link into the "Link to Video" field.
Keep in mind:
Unlike YouTube or Vimeo videos, generating preview images from WeVideo videos is not directly supported by Mail Designer365. You will have to provide your own preview image by taking a screenshot of the video frame you want to use as the preview image. Then drag that image onto the video placeholder. Or you can choose an image of your choice as the preview image. In the email newsletter, the videos that you add are treated as images with a link to the video page. Direct inline playback is no longer supported by Mail Designer 365 because most email clients do not support it. Note: Please remember that Mail Designer 365 does not support embedding videos directly within your email designs.- 24h priority support
- Tables tool
- Blend Modes
- Duotone Filters
- Vibrancy effects
There are 3 ways you can duplicate layout blocks:
Option 1: "Edit" > "Duplicate"
‣ Click the selection tab at the side of a layout block.
‣ Choose "Edit" > "Duplicate"  from the menu bar.

Option 2: Using the layout handle
‣ Click on the layout handle on the left side of the layout block.
‣ Hold down the option key or the alt⌥ key on your keyboard.
‣ Drag the layout block that you want to duplicate.
Now, you can drop it into position to create a copy. Afterwards, you can edit your text and choose other options accordingly.

Option 3: Command⌘ D
‣ Click on the layout handle on the left side of the layout block.
‣ Press Command⌘-D on your keyboard
Please refer to the following page for a guide on how you can duplicate layout blocks:
Email,First Name,Last Name,Favorite Color,Location
miller@example.com,Peter,Miller,blue,New York
smith@example.com,Jody,Smith,red,San Francisco
Good to know: You can re-import the CSV at any time with additional columns to enhance your contacts. All new placeholders will then be attached to your contacts. Need help? Download an example CSV file here for reference: Mail_Designer_365_Campaigns_Email_Import_Example.csv
 If you want to add multiple buttons with different links, the use layout blocks with multiple image areas. That way, you can add one button with its own link per one image area.
 Please refer to the following page for more information on text areas why a link is being applied to the entire image area instead of a graphic element:
‣ Within the "Contents" section of Mail Designer 365, you can click on the triangle icon or press Command⌘-2 to show shapes. ‣ You will have many different button options under the "Buttons" subsection.‣ Drag your chosen button to an image area. ‣ You can edit the message by double-clicking the text of the button.
Adding a link to your button:
‣ Make sure to add a link to your desired landing page by double-click the button shape. ‣ When you double-click the shape, the "Style" section will open on the left side. ‣ Click on "Edit Link & Background."Please refer to the following page for how to add CTA buttons: Please refer to the following page for a brief overview of the Contents: Please refer to the following page for tips on how to strategically position your call-to-action buttons:‣ Under the "Link" subsection, you will be able to click "Add Link" to add the link to your landing page.
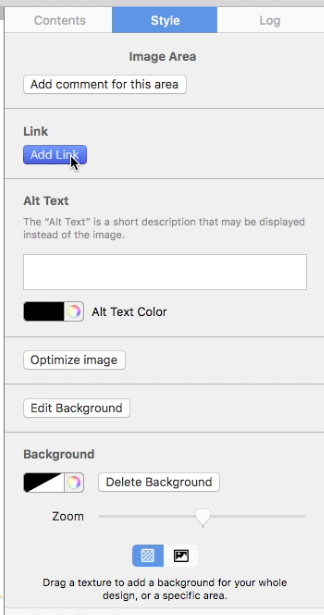
‣ Hold the alt ⌥ key or option key on your keyboard
‣ Select "Help" > "Send Debug Logs..." from the menu
‣ Open "System Preferences." ‣ Click "Language & Region."‣ Change to your preferred language by dragging your selected language to the top of the list.
‣ Close your software. For example, with VPN Tracker, you can do so by choosing "VPN Tracker" > "Quit VPN Tracker."
‣ Reopen the software.
Image areas can contain both text and images:
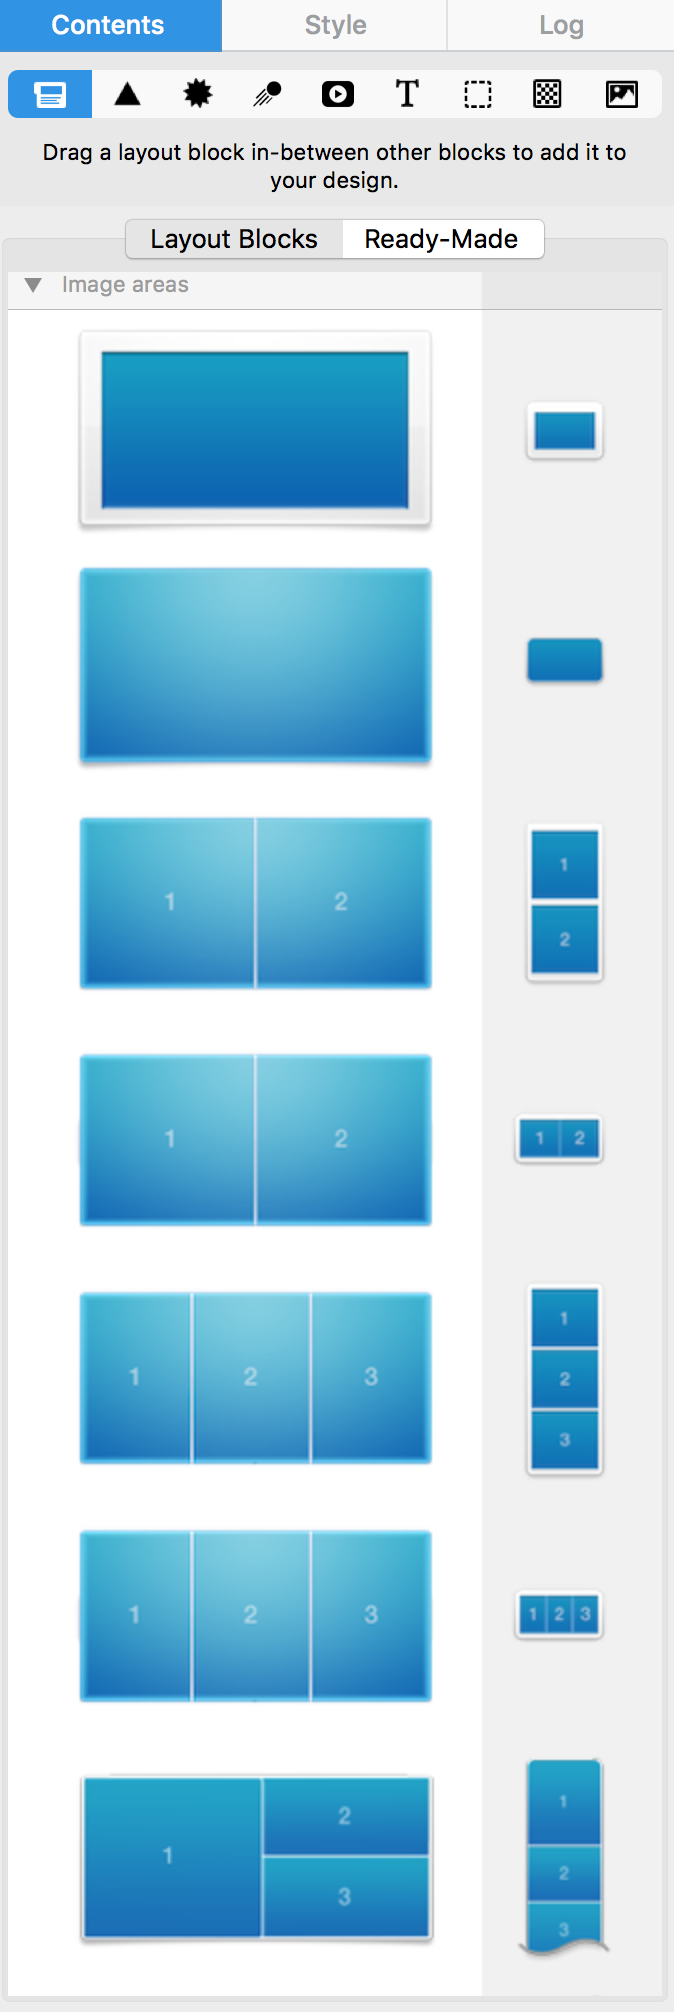
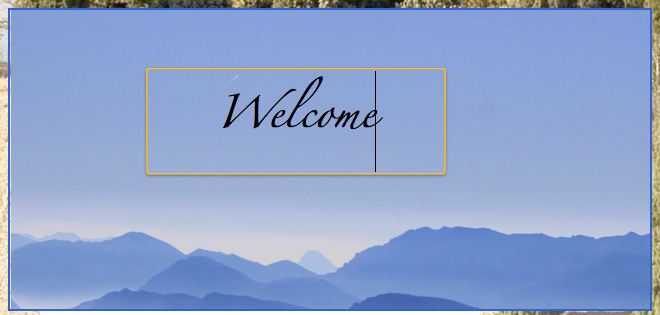
Text areas can only hold text:
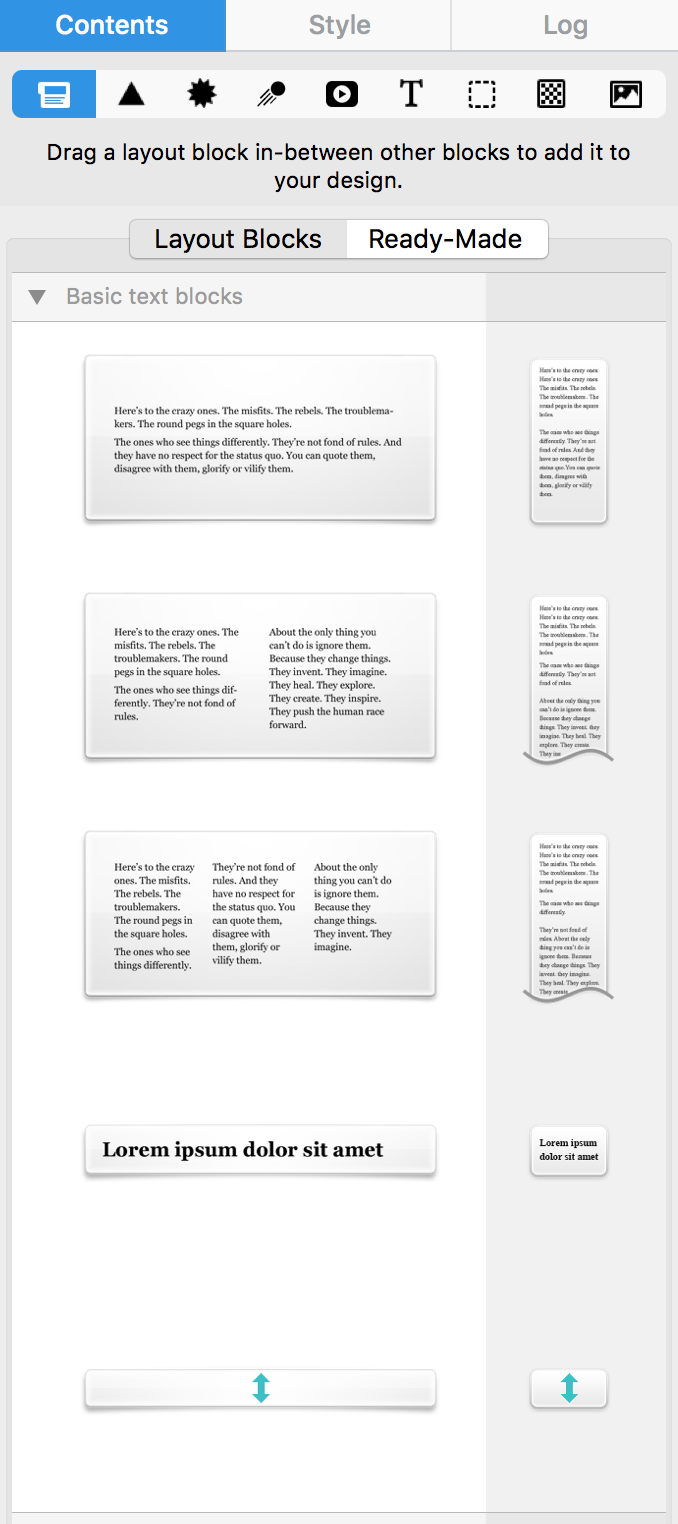
 Please refer to the following pages for more information on text areas:
Please refer to the following pages for more information on image areas:
Please refer to the following pages for more information on text areas:
Please refer to the following pages for more information on image areas:
‣ Open Mail Designer 365 on your Mac. ‣ Choose "Mail Designer 365" > "Preferences."‣ Make sure to click the "Updates" tab.
‣ Check the "Get Early Access to beta versions" box.
‣ Since Beta versions are meant to test features and compatibility, Mail Designer 365 will remind you to have a backup of your app and designs:
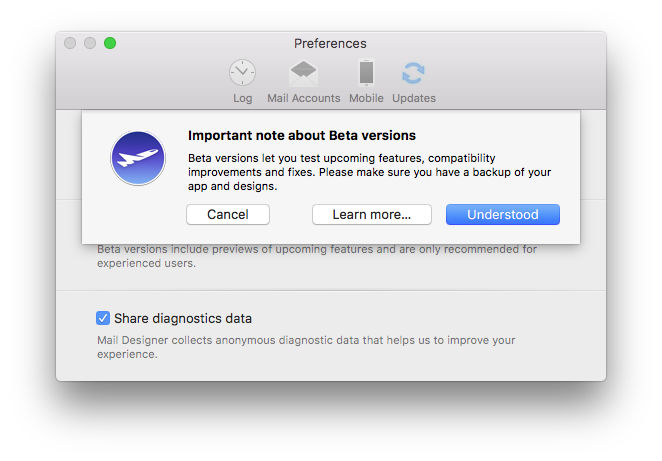
For checking updates, Mail Designer 365 will check for new versions on app start or you can:
‣ Go to "Mail Designer 365" > "Check for Updates…"Please refer to the following page for further information:
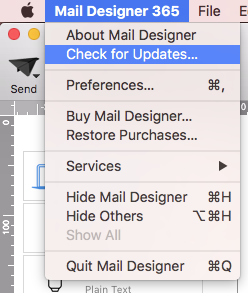
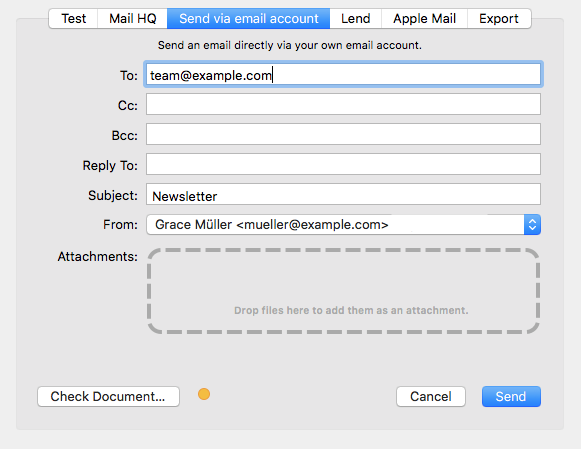 Sending via Delivery Hub:
When you send your email design via Delivery Hub, Mail Designer 365 behaves the same way as all other email clients and embeds your images in the email. In this case, your image will not need to be hosted elsewhere.
Sending via Delivery Hub:
When you send your email design via Delivery Hub, Mail Designer 365 behaves the same way as all other email clients and embeds your images in the email. In this case, your image will not need to be hosted elsewhere.
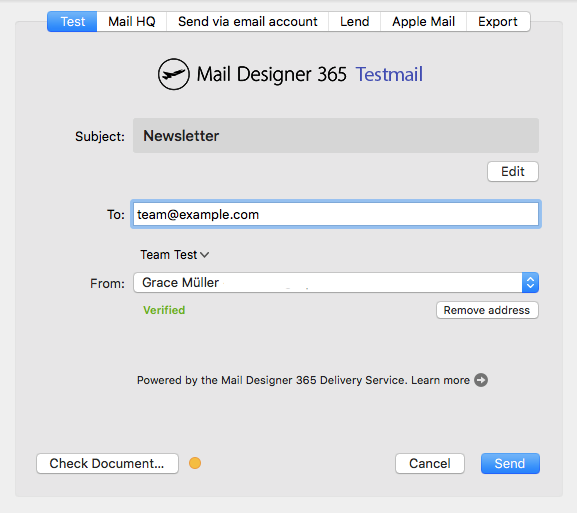 Exporting to Mailchimp, Campaign Monitor or Direct Mail
When you use one of Mail Designer 365's direct integrations, your images will be exported together with the email design and hosted by the respective platform.
Sending via another external service:
The way images are handled by external services such as email service providers varies based on the provider. Some providers will host your images for you; however, many others will require you to host your images yourself.
Mail Designer 365 has an option to enter your web server's URL during HTML export that lets you reference images that way. Learn more.
Exporting to Mailchimp, Campaign Monitor or Direct Mail
When you use one of Mail Designer 365's direct integrations, your images will be exported together with the email design and hosted by the respective platform.
Sending via another external service:
The way images are handled by external services such as email service providers varies based on the provider. Some providers will host your images for you; however, many others will require you to host your images yourself.
Mail Designer 365 has an option to enter your web server's URL during HTML export that lets you reference images that way. Learn more.
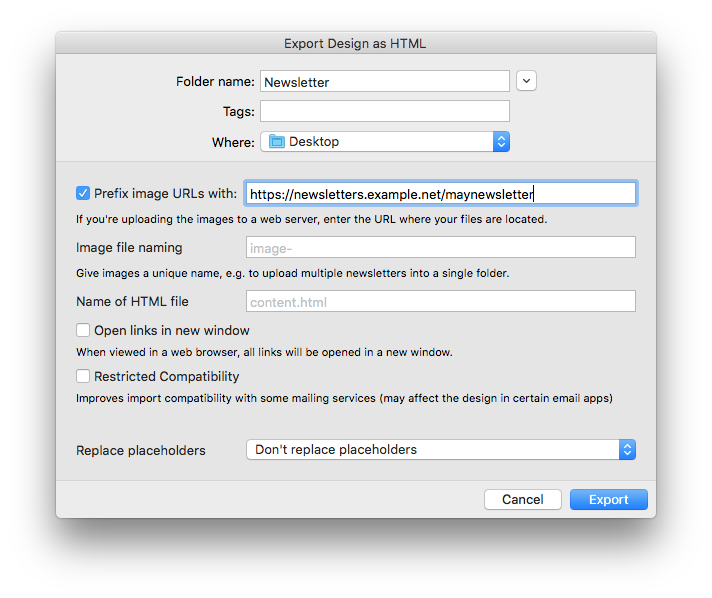 Refer to the documentation provided by your ESP for more information on what is required.
- Enter a text of your choice, e.g. "Manage your preferences", highlight this text and go to "Add Link" in the Style menu. Here you can choose "Placeholder" from the dropdown menu and enter the relevant placeholder (i.e. "unsubscribe".)
- Alternatively, you can insert a placeholder via the "Insert" menu and manually overwrite the default text. With this option, make sure the placeholder link is still attached to the text (you can check this by clicking on the text and going to "Link" in the sidebar.)
If you're sure that your time with us is at an end then we've made it nice and easy to remove all your info from our database so that you don't need to wait for us to do it.
Just log in at your Privacy Manager, click 'Delete your Account' near the bottom of the page.
Please note that this action is irreversible and you will loose access to any previously bought products and service!
‣ First, choose a graphic element that you want to use from the "Contents" section.Please refer to the following page for how to combine different graphic elements:‣ Then, drag the element into an image area. ‣ Repeat these steps with other graphic elements that you want to use for the combination. ‣ After you have dragged in all of the graphic elements you want to combine, then start arranging them to create the look that you want. ‣ You can move different elements forward or backward, depending on what kind of look you want. ‣ Just click on the graphic element that you want to move backwards or forwards. ‣ Click the appropriate button found on the left side of your screen.

‣ Open your email template if it is not already opened. ‣ From the menu bar, choose "Mail Designer 365" > "Preferences."Please refer to the following page for more information on how to create custom preview displays in Mail Designer 365:‣ A popup window will appear. ‣ Click on the smartphone icon, labeled "Mobile."
‣ Click on the "+" icon at the bottom left of the window. ‣ Enter the resolution you want to use.
‣ Give this display option a name so you can easily find it in the preview options menu
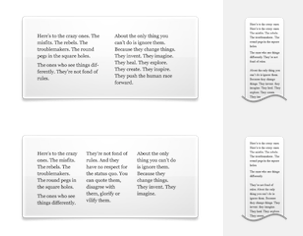 You cannot switch automatically from 2 columns to 3 columns or vice versa. However, you can just add another layout block with the correct number of columns. Afterwards, just copy the text from your original layout block and then paste the text onto the new layout block.
If you want more than 3 columns for text areas, you will need to work with a single text area and space your message accordingly. In this scenario, you will basically be simulating your own table with multiple columns.
Compared to layout blocks with text areas, you have more options when it comes to layout blocks with image areas. You can use a layout block with up to 6 image areas in a column style.
You cannot switch automatically from 2 columns to 3 columns or vice versa. However, you can just add another layout block with the correct number of columns. Afterwards, just copy the text from your original layout block and then paste the text onto the new layout block.
If you want more than 3 columns for text areas, you will need to work with a single text area and space your message accordingly. In this scenario, you will basically be simulating your own table with multiple columns.
Compared to layout blocks with text areas, you have more options when it comes to layout blocks with image areas. You can use a layout block with up to 6 image areas in a column style.
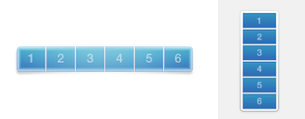 With this layout block, the image areas are displayed next to each other in the desktop view. However, please note that the image areas will be displayed on top of each other in the mobile view. This was designed so that recipients will easily be able to click on the images if they are linked to a landing page and so that the images are still clearly visible when the email is opened with a mobile device.
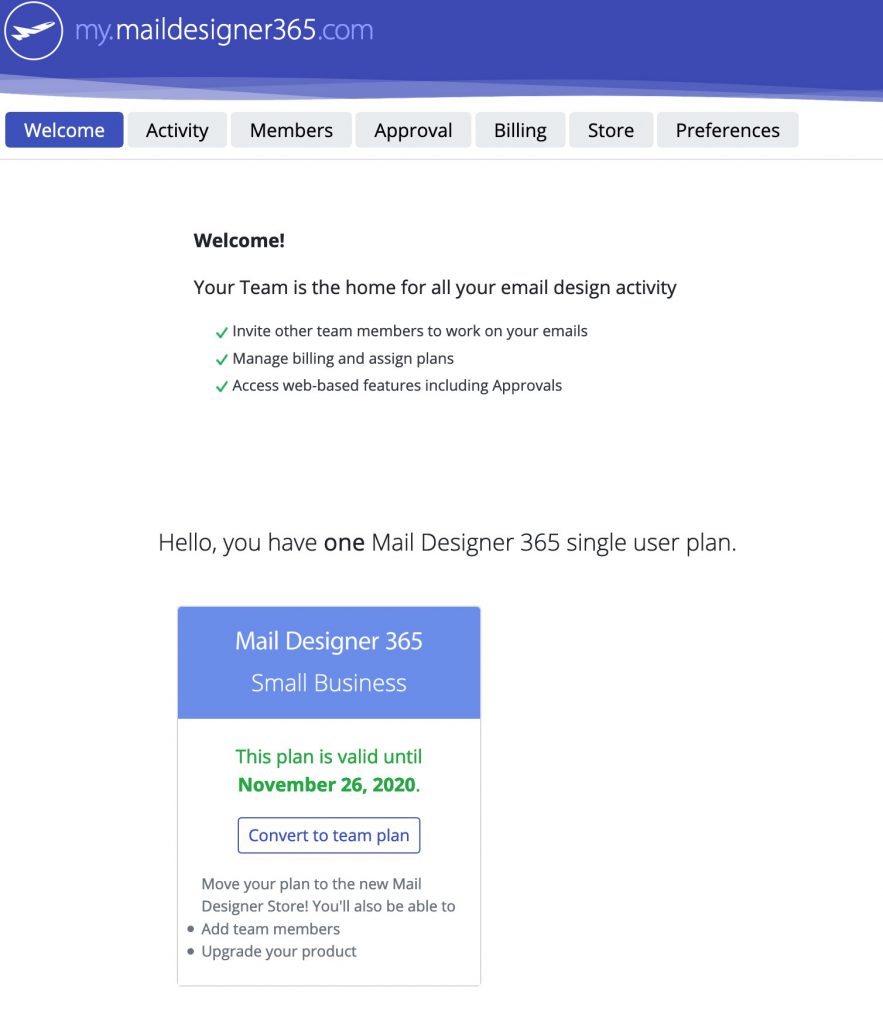 Once you've completed your purchase, your plan will be available for you to use or to assign to a team member.
- The Mail Designer 365 free download only allows you to view the app and open and edit email templates.
- Without an active demo, you will be unable to save or send created templates.
Activating your Mail Designer 365 demo
To activate your free demo, please carry out the following steps:- Start the Mail Designer 365 app on your Mac.
- Log in with your equinux ID and password or create an account.
- If you are starting the app for the first time, you will see a list of plan options. Here you can choose to activate your free trial.
- If you have previously logged in to the app, you can find the option to start your free trial in the top left corner under your name.
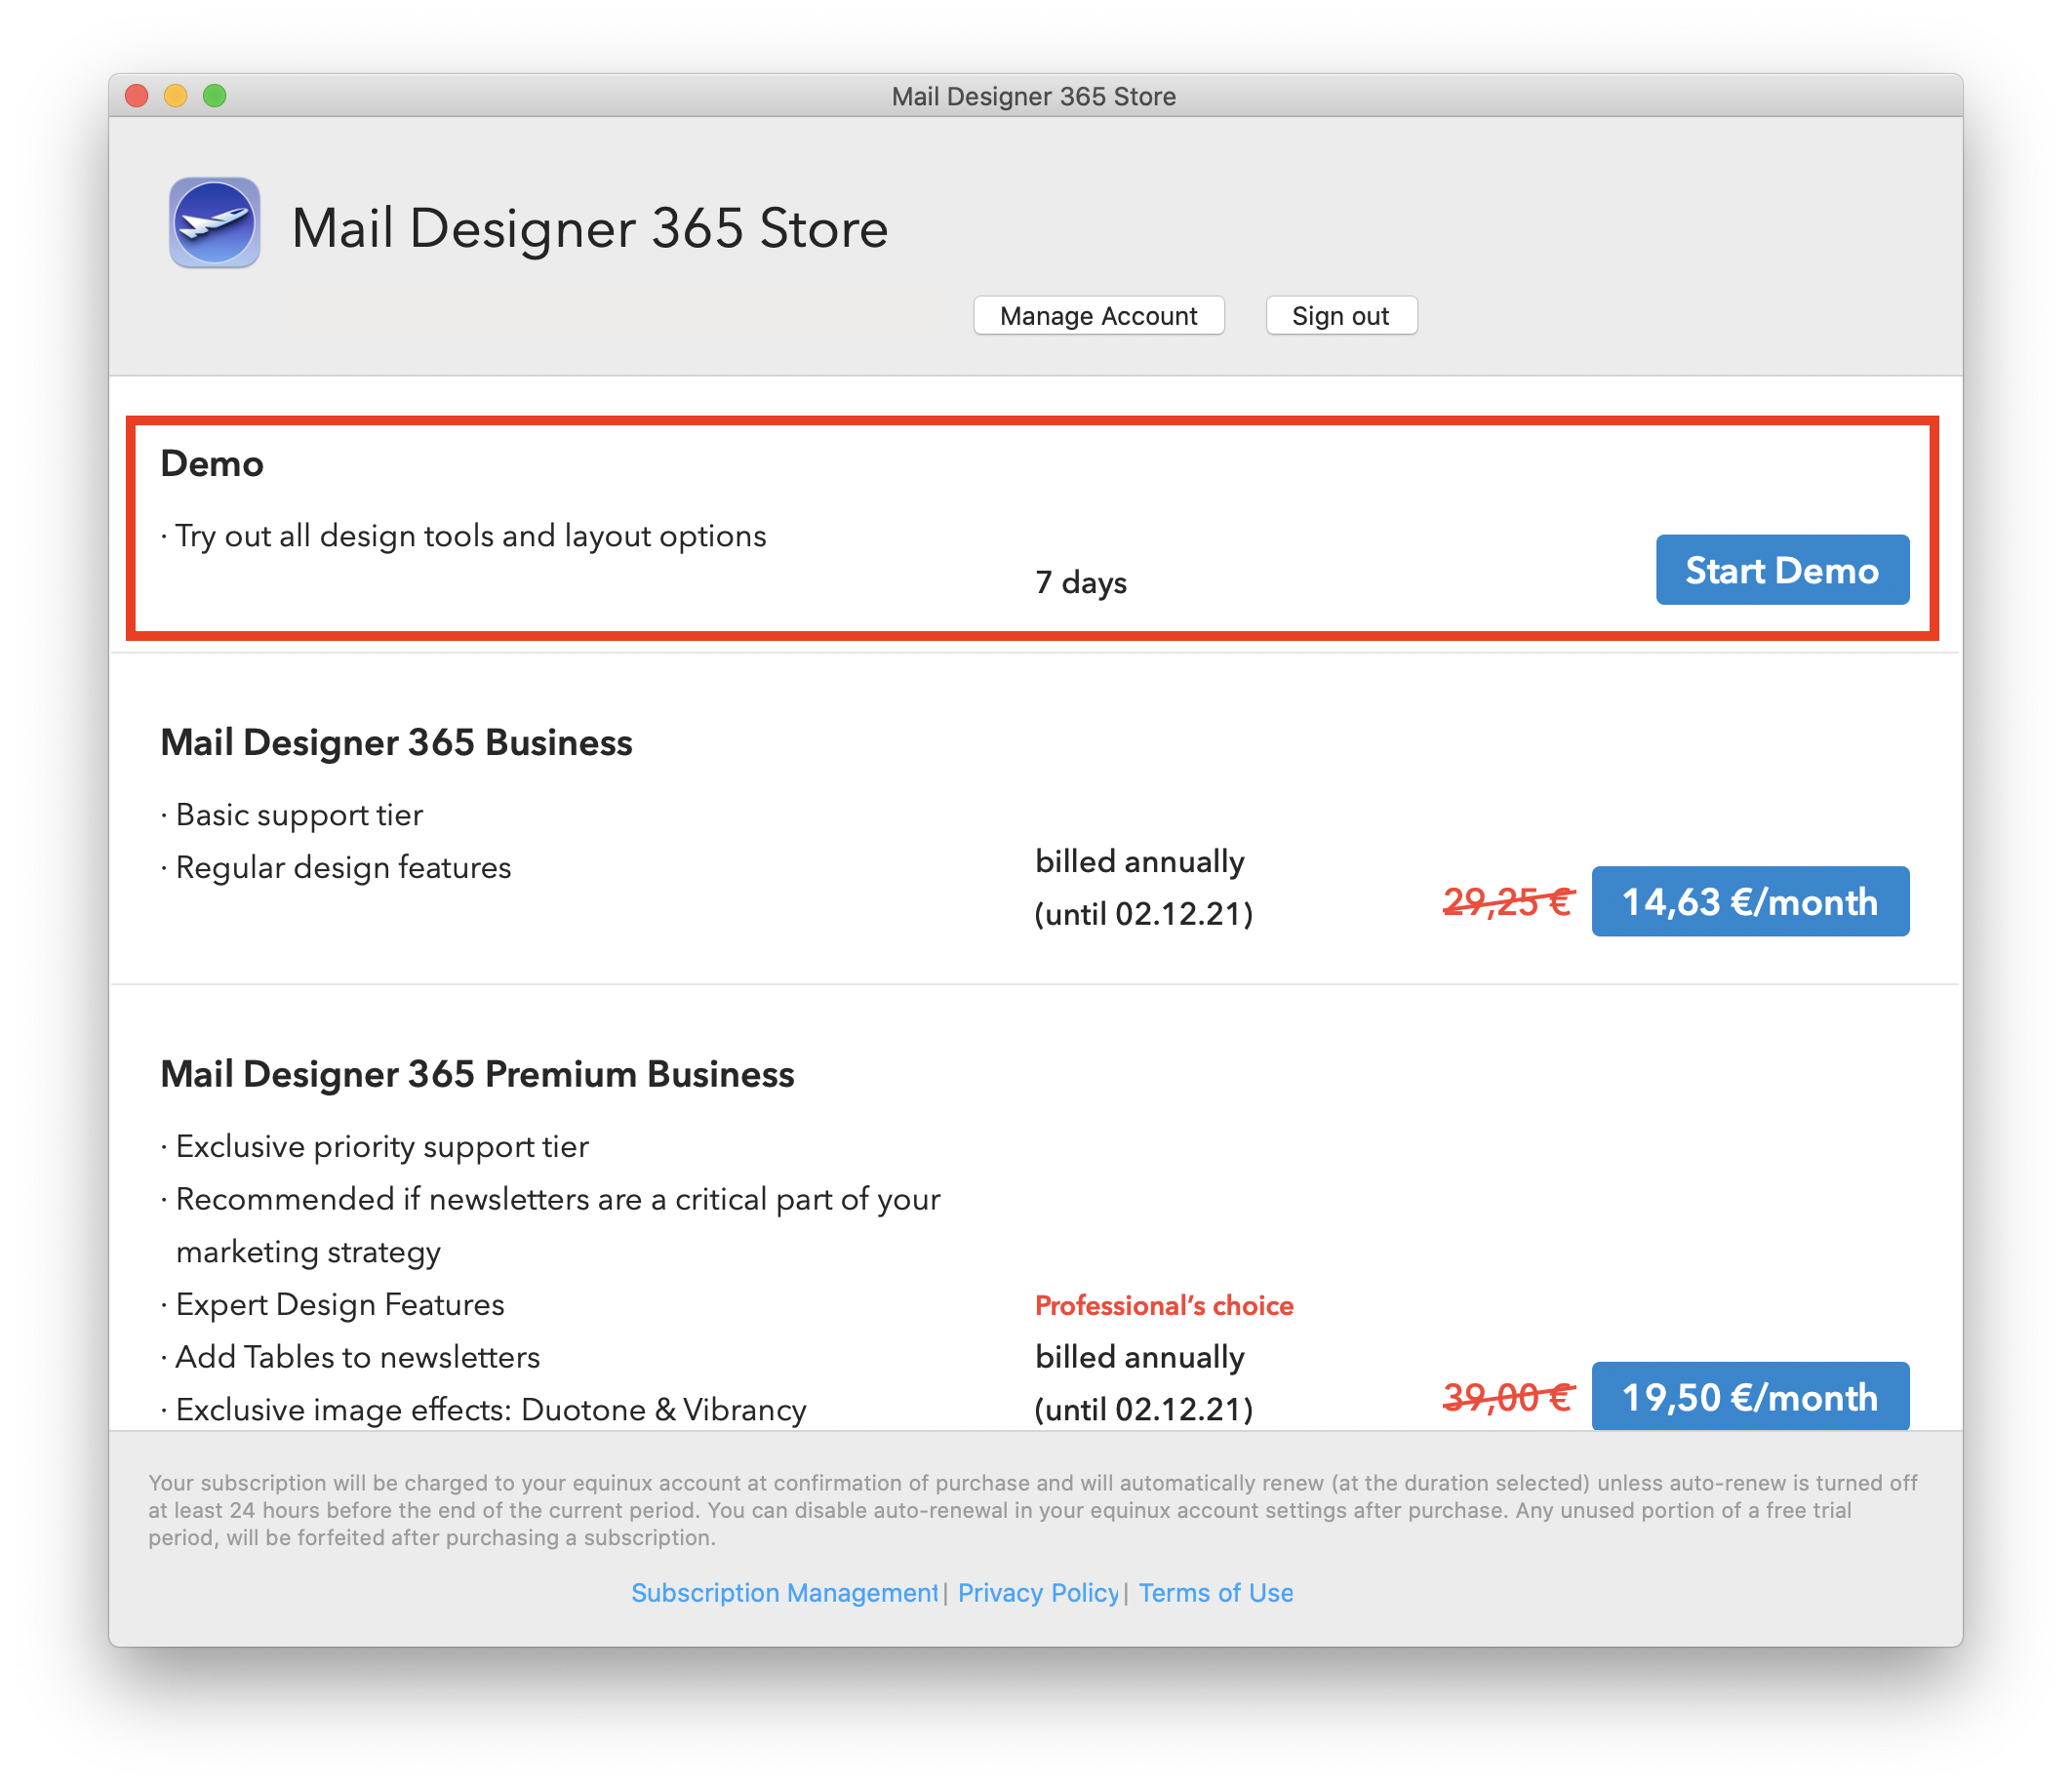
- 1. Please ensure that you are using the download version from the Mac App Store. The download version from the equinux website will not be able to recognize your license.
- 2. In the Mail Designer 365 menu please select "Restore Purchases..."
- 3. In case your license is still not being recognized, please delete the App and reinstall it from the Mac App Store. (Don't worry, your templates and settings won't be lost)
In order to upload templates to your MailChimp account on your behalf, Mail Designer needs your MailChimp API key (a special kind of password).
You can find your API key on your MailChimp. The MailChimp support pages have more information.
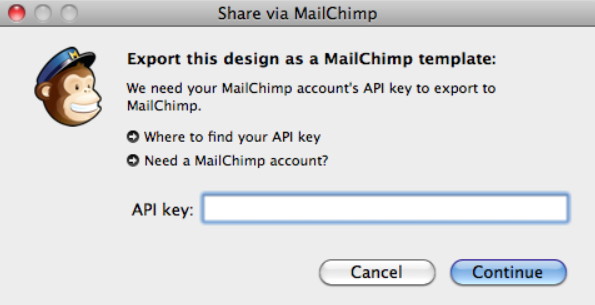
 To activate the mobile version of your email designs, please do the following:
‣ In the Menu, please select "File" > "Design options."Once you have done this, you should be able to see the mobile modified Desktop version and you will be able to edit the layout blocks of the mobile view.‣ Remove the checkmark next to "Create version for mobile devices." ‣ Press "OK." ‣ Then please repeat the same steps and activate the Checkbox again.
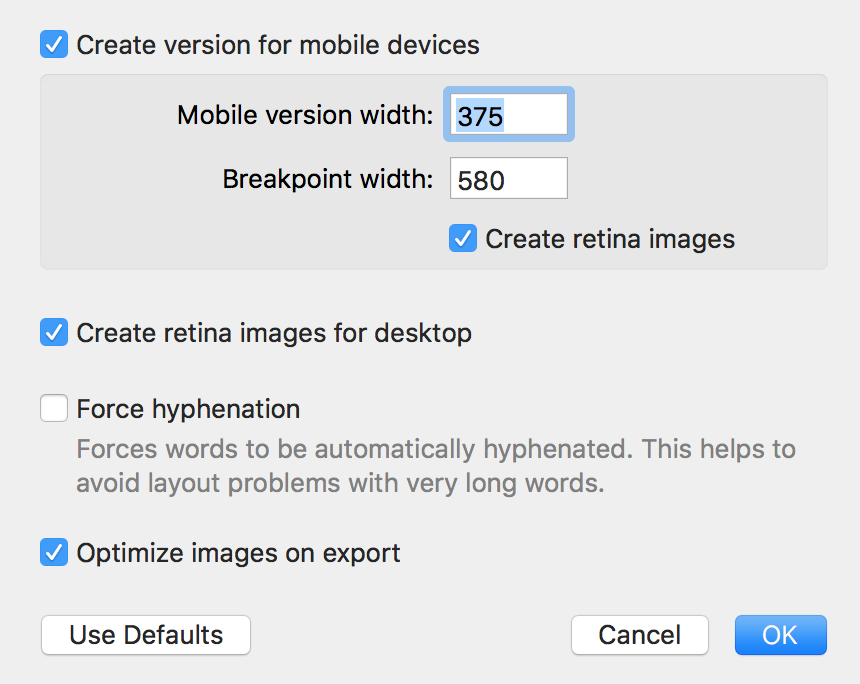

‣ Open your design ‣ Choose “Share" > "Website /HTML...” from the menu bar.Please refer to the following page for more information on how to export your email design as a webpage:‣ Choose a location to save your design. ‣ Optional: Enter a custom name for the exported .HTML file ‣ Optional: If you plan on uploading your images to a separate web server, you can enter an absolute URL prefix for the images.
Check out our video tutorial for more font inspiration:
Also, please refer to the following page for a step-by-step guide on how to download more fonts in Mail Designer 365:
‣ Make sure the "layout" is visible (Choose "View" > Show Layout") so you can see the drag handle on the layout blocks ‣ Then you select the "Contents" tab on the right side ‣ Select the "Layout blocks" section ‣ Click "Ready-Made"Note: You have the ability to save multiple layout blocks together or to save only a single layout block.‣ Select the layout blocks that you want to save ‣ To select multiple layout blocks, you will need to click on a layout block, hold the shift key, and then select the other layout blocks ‣ Drag your layout blocks into the "My Instant Blocks" section"
Oftentimes, this padding will appear more noticeable if a background color has not been set. In order to create the illusion of a full-width design, you can set the outer background to a different shade to create a subtle contrast between your email content and design background.
For best results, typing your email copy directly into the text layout blocks in Mail Designer 365 is most effective. Where this is not possible and you need to copy in text from elsewhere, we would recommend first copying and pasting your text into a plain text editor (such as TextEdit on the Mac) to strip any formatting before entering it into Mail Designer 365.
If you have text styles set up already, you can use the "Paste and Match Style" option and you won't need to reformat anything.
Yes there is! Mail Designer 365 is our brand new and updated version of Mail Designer - only available on an annual subscription basis. Subscribers have access to our best new features and benefit from regular updates.
Most importantly, Mail Designer 365 will always be optimized for the latest mac OS version, so as long as you are subscribed, you will never have to worry about paying for an upgrade again!
Visit our website today to purchase Mail Designer 365.
‣ Make sure to click on the padding area of a text block.Please refer to the following page for more information on how to create transparent effects:‣ Click "Delete Background" on the right side.
‣ Afterwards, click on the outer area of the same text block. ‣ Then, click "Delete Background."
‣ Your text block should now have a transparent effect.
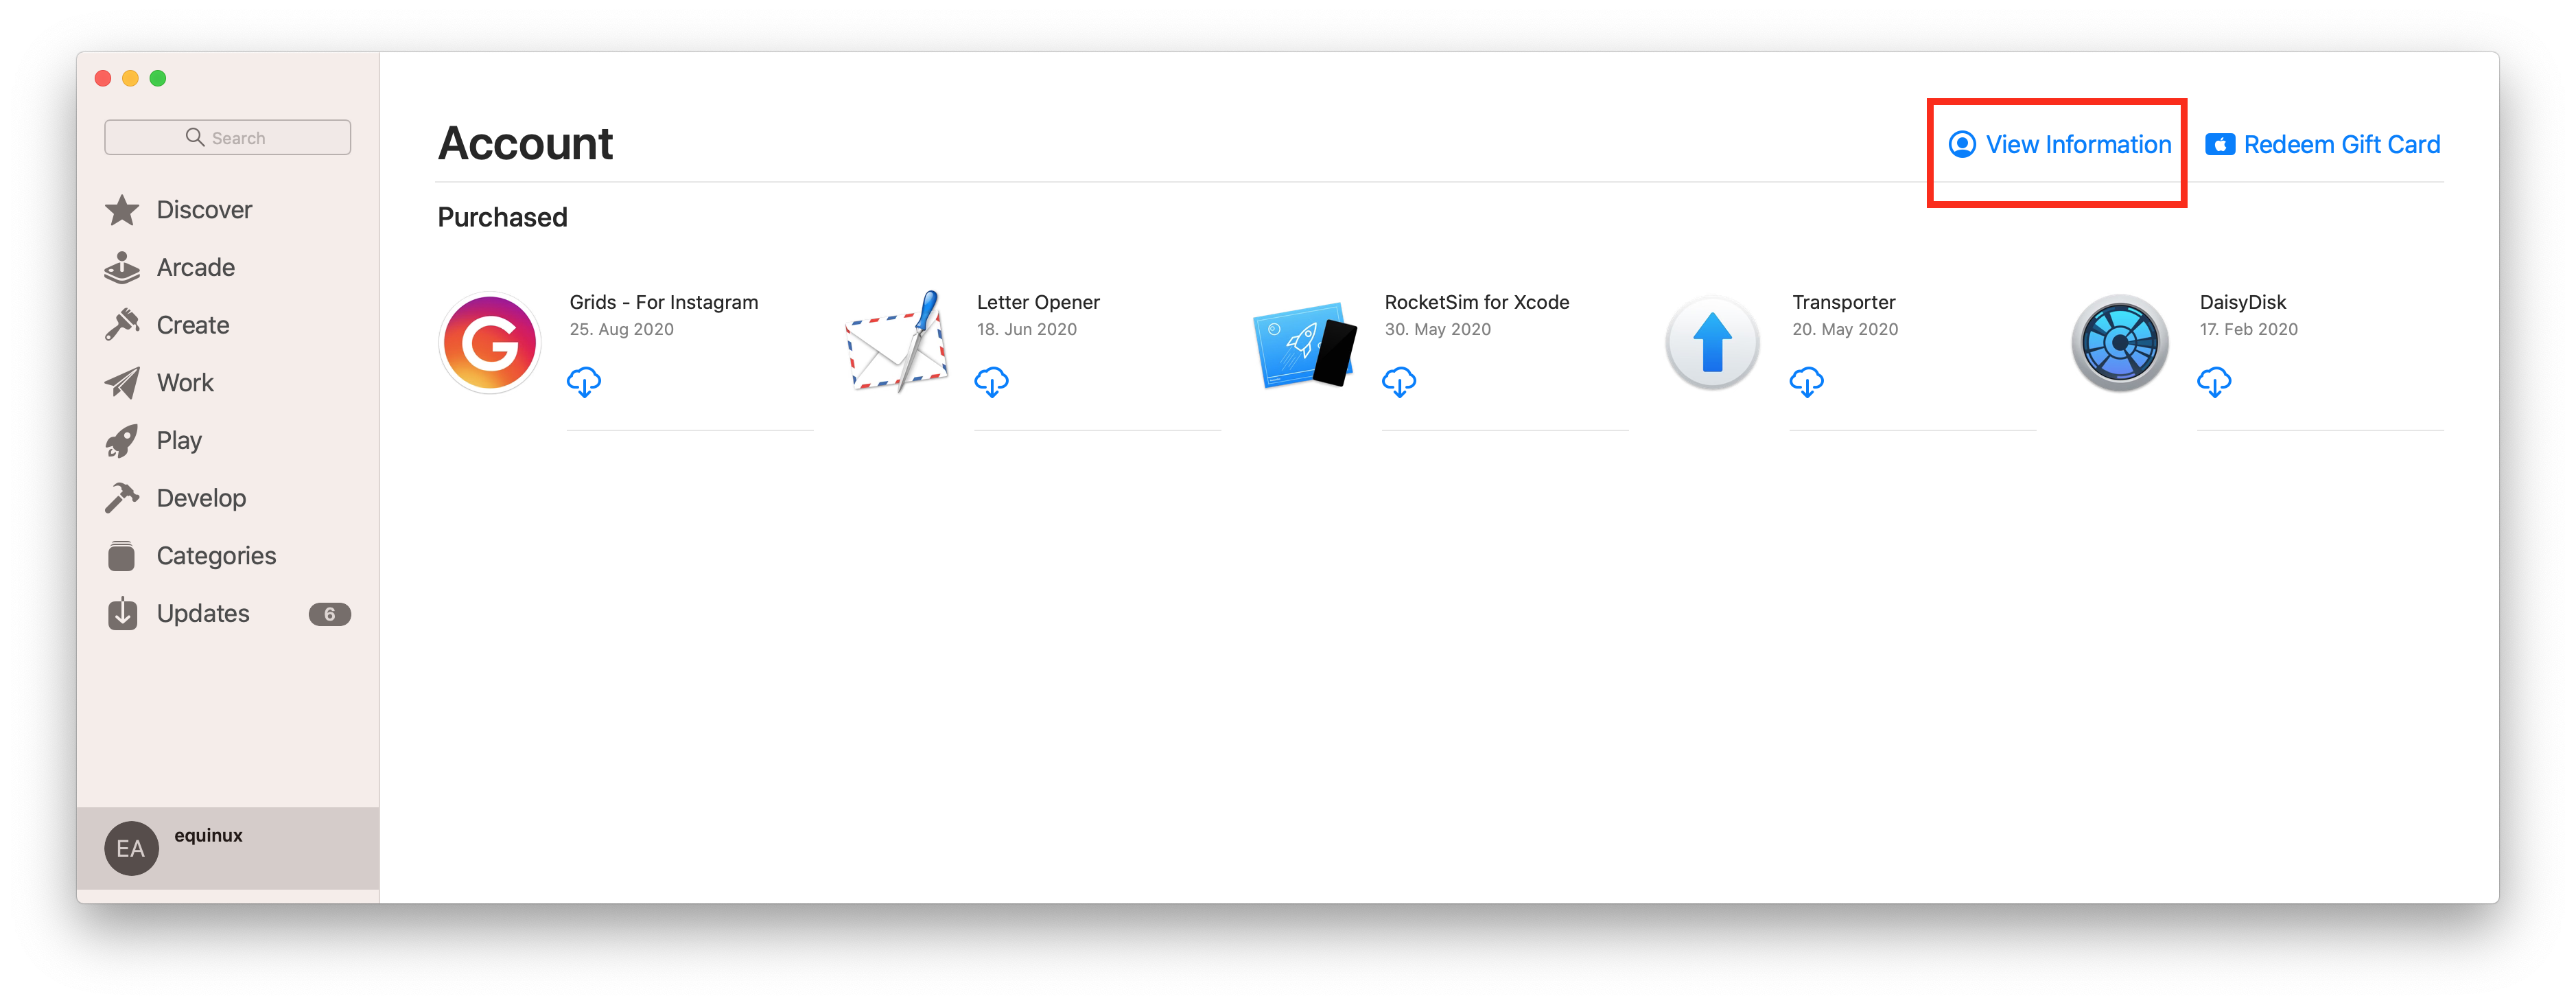 Click on "Manage" to view and edit your subscriptions on your Mac.
You can find out more information from the Apple Support website.
Click on "Manage" to view and edit your subscriptions on your Mac.
You can find out more information from the Apple Support website.
Mail Designer 365 offers multiple options for sending your email designs to your audience.
Testmail
Mail Designer 365's Testmail service is designed for sending internal test emails to yourself or to your team – i.e. to preview how your finished email design will look in the inbox.
Test emails will be sent from the Mail Designer 365 Testmail service via our secure servers.
Sending external emails
You also have the option to send your email design to external email addresses (i.e. contacts who are not part of your Mail Designer 365 team) via Delivery Hub. These emails will be sent from your own email address.
Choose between an email campaign: Send to a list of contacts or an individual mailing: Send to individual email contacts.
Check out this guide for more information on sending email campaigns via Delivery Hub.
If you're struggling with email deliverability—especially with Gmail users—there are proven strategies to improve sender reputation and ensure your emails land in inboxes rather than spam folders. Follow these steps to get back on track:
Steps to Improve Email Deliverability:
-
Warm Up Your Email Lists Gradually
- Treat the process as if warming up a completely new account.
- Divide your mailing into smaller batches and send them on different days. For example, start with 500 emails on Monday, 1,000 on Tuesday, 2,000 on Wednesday, and so on.
-
Focus on Engaged Recipients First
- Begin by sending emails only to contacts who have opened your emails recently (e.g., within the last 30 days for weekly senders).
- Gradually increase this timeframe as your deliverability improves.
-
Leverage Google Postmaster Tools
- Set up Google Postmaster Tools to monitor spam rates, domain reputation, and other deliverability metrics.
-
Create Test Gmail Accounts
- Subscribe a test Gmail account to your email campaigns.
- Monitor where emails land. If emails go to spam, interact with them (e.g., open, click, and reply) but do not move them out of the spam folder. This helps train Gmail’s algorithms.
-
Adjust Based on Metrics
- Use Google Postmaster Tools to track your spam rates. If spam rates are too high, reduce the timeframe of your engaged recipients or maintain the current level of sending until the rates stabilize.
-
Monitor Progress
- As Gmail deliverability improves and emails stop landing in spam, expand your email list incrementally to include less recently engaged recipients.
How Mail Designer Campaigns Can Help:
Mail Designer Campaigns provides several built-in features to optimize email deliverability and improve your sender reputation:
- Professional Email Authentication: Ensure your emails are authenticated with SPF, DKIM, and DMARC, reducing the likelihood of being flagged as spam.
- Engagement Tracking: Identify active and inactive recipients in your mailing list, allowing you focus on your most engaged contacts first.
- Custom Domain Support: Addd your own domain to Mail Designer Campaigns to reinforce trust with email providers like Gmail.
- Clean and Optimized Designs: Mail Designer 365 helps you to create email content that is visually appealing while avoiding spam-triggering elements, increasing inbox placement rates.
- Advanced Segmentation: Mail Designer Campaigns allows for advanced segmentation, such as creating lists of only people who have opened the email in the past X days, and options for sending to only a portion of your subscriber list. This ensures that your emails reach the most engaged recipients first, improving overall deliverability.
By following these best practices and leveraging Mail Designer Campaigns' tools, you can rebuild your sender reputation, enhance Gmail deliverability, and achieve more successful email marketing campaigns.
 With Mail Designer 365, you can create responsive newsletters. By editing images; graphics; and text objects for the mobile version, you can optimize your template for mobile devices.
- Open team management and invite another member.
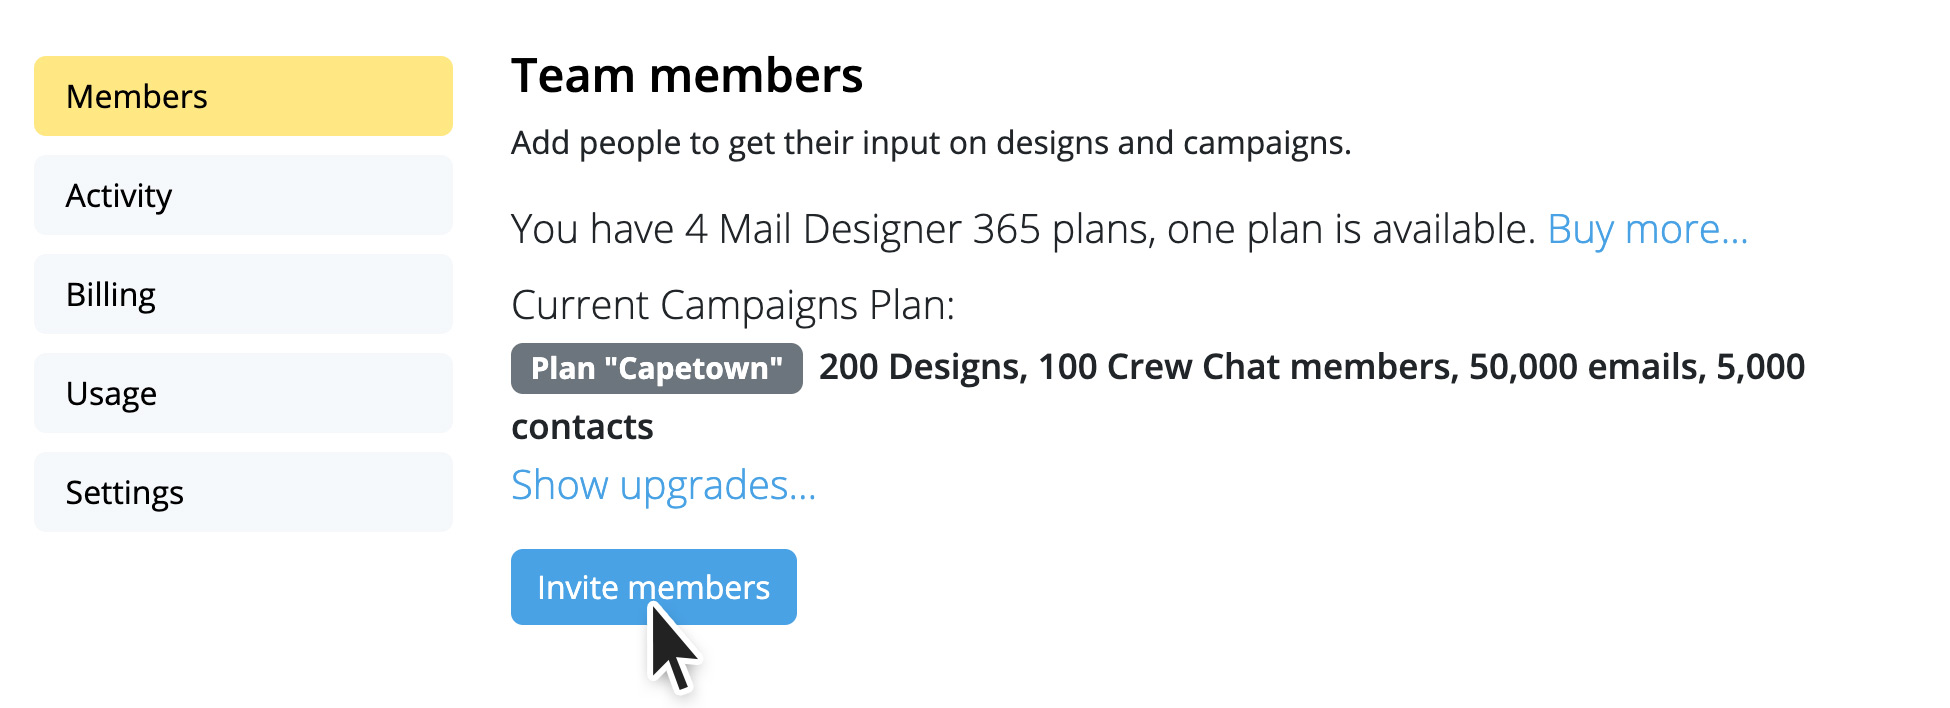
- Then log out of your current Mail Designer account (top right)
- Now open the invitation link from the email from your second email address.
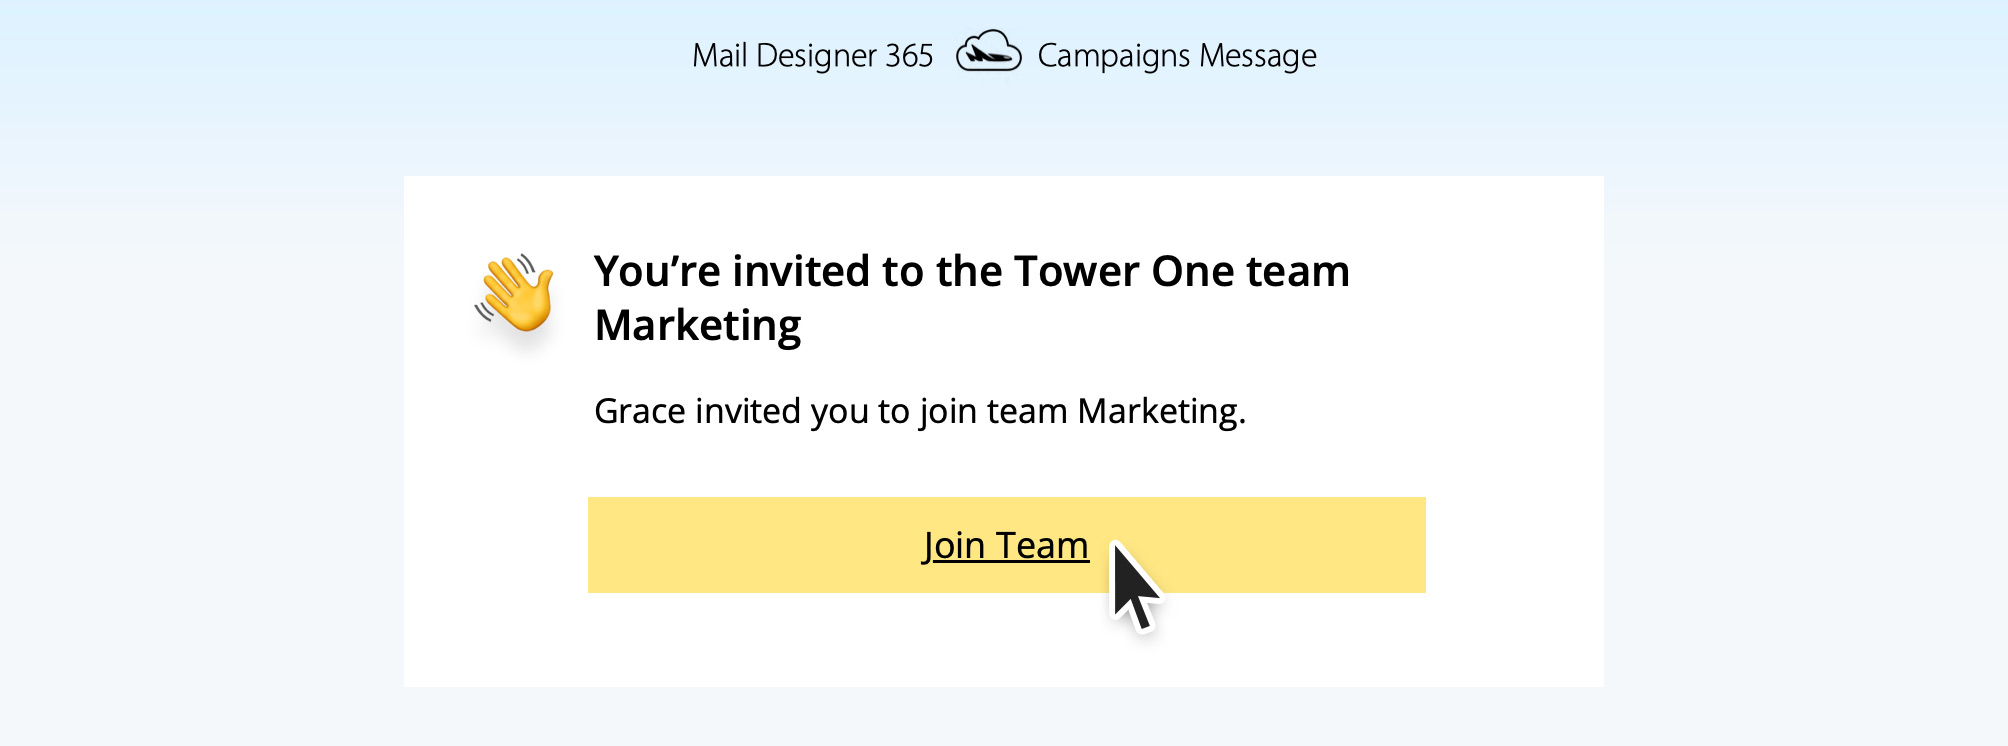
- Create a new account with the second email address.

- When you start the test send now, select the bottom option “Team”.
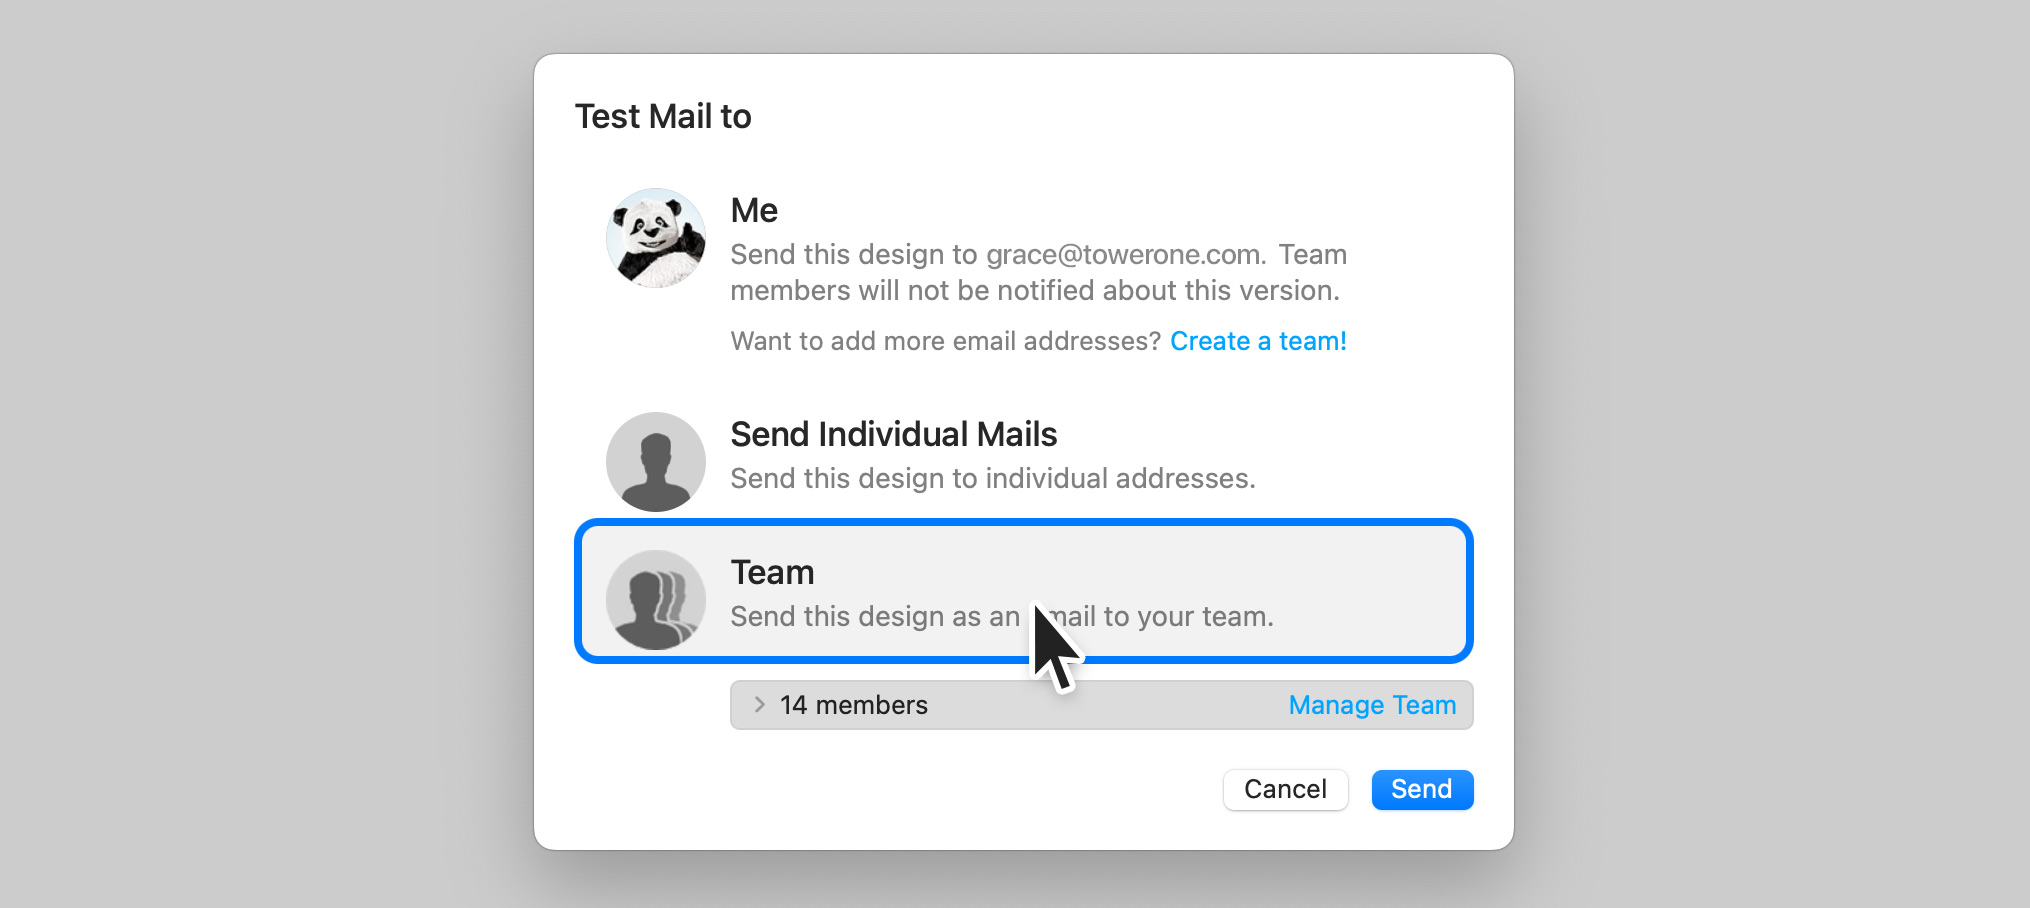
This will send the test email to all members of the team, including your second email address.
You can repeat these steps for other email addresses. Up to 10 team members or additional email addresses can be added.
‣ Open your Mac's System Preferences
‣ Open the "General" tab
‣ Untick the option "Ask to keep changes when closing documents"
‣ Afterwards, you need to restart your Mail Designer 365 app
- View, comment on and approve email design drafts
- Receive test emails
- Manage email contacts and audiences
- Schedule and send email campaigns
- Access post campaign analytics
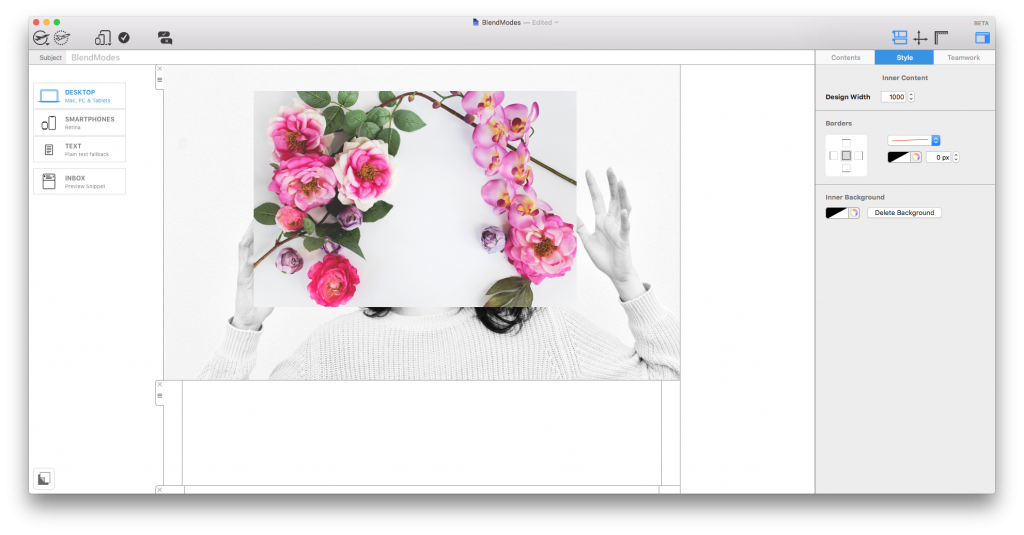 However, there are in fact multiple ways in which you can layer image elements. You can control this by applying various Blend Modes to modify the way two layers blend with each other.
Access Blend Modes under the "Style" menu after clicking on a design element. Here you can scroll through the different modes to find the effect which works best for your design.
However, there are in fact multiple ways in which you can layer image elements. You can control this by applying various Blend Modes to modify the way two layers blend with each other.
Access Blend Modes under the "Style" menu after clicking on a design element. Here you can scroll through the different modes to find the effect which works best for your design.
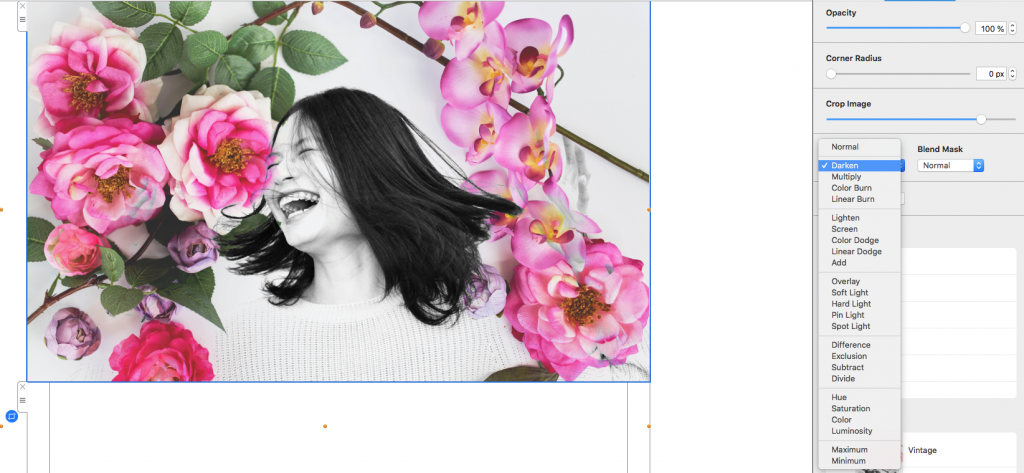 You can find more detailed information about the different Blend Modes available in Mail Designer 365 in this guide.
- Non-usage of the app or service
- Failure to cancel your account within the cancelation period
- Lack of features or functionality on your subscribed plan
- Purchases made in error
- Exceptional circumstances beyond our control
- Violations to our Terms of Use
‣ Mark the text that you would like to turn into a link. ‣ Click "Add Link" from the left sidebar.Note: You can change the color and text options of your link using the regular font options.‣ You can now choose what type of link you want to add:
‣ Then enter your URL in the Link destination dialog box:
- id.equinux.com
- my.maildesigner365.com
- data.maildesigner365.com
- my.featurenotes.com
- polyfill.io
- www.gravatar.com
- wp.com
- api.rudderlabs.com
 While you are designing and creating your newsletter, Mail Designer 365 continuously scans your email template for any issues as they occur. You will notice a number appear on the checking button in cases when Mail Designer 365 has found issues or potential errors in your email design.
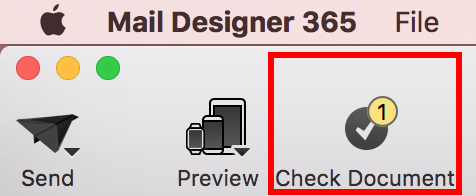 You can also click on the checking button whenever you want to check for design issues.
Please refer to the following page for more information on the Checking feature in Mail Designer 365:
You can also click on the checking button whenever you want to check for design issues.
Please refer to the following page for more information on the Checking feature in Mail Designer 365:
- Press "Shift" (⇧) + "Cmd" (⌘) + "4" then click and drag the mouse cursor to capture a specific area of your screen.
- Press "Shift" (⇧) + "Cmd" (⌘) + "4" and then the space bar to capture a specific window or element on your screen.
- Alternatively, press "Shift" (⇧) + "Cmd" (⌘) + "3" to capture your full screen.
MailChimp has free and paid plans. Please visit the MailChimp website for more details and exact pricing information.
‣ Choose "Message" > "Redirect"For more information, please read Apple's support page here. Note: We always recommend that you use the "redirect" feature rather than to forward your Mail Designer 365 email design.‣ Type the recipient's email address ‣ Click the "Send" button
‣ Select the photo that you want to turn semi-transparent
‣ This will prompt Mail Designer 365 to open the "Style" section on the right side
‣ At the bottom, you will find the "Opacity" section
‣ Adjust the opacity slider to adjust the opacity of the photo you selected

 Enter this path into the search box:
~/Library/Containers/net.tower-one.MailDesigner to locate and then delete. Following this, enter this path into the search box:
~/Library/Group Containers and delete the Mail Designer folder. Finally, to uninstall Mail Designer from your Mac, go to the Applications folder (or wherever you stored the app) and move it to the trash. This will completely remove the app and all files from your Mac. To also remove its settings, open Terminal.app (from Applications > Utilities) and enter the following command:
defaults delete net.tower-one.MailDesigner
If you don’t have a warmed domain or custom email address, Mail Designer 365 offers a professional solution for sending email campaigns without the need for your own domain.
How does it work?
Mail Designer 365 uses its Mail Designer Delivery service, which ensures that your campaigns are sent reliably and securely from a trusted, pre-configured email domain. This avoids potential issues like deliverability problems caused by an unprepared domain or emails landing in spam folders.
Why choose Mail Designer Delivery?
- No Setup Hassle: You don’t need to purchase, warm up, or configure your own domain.
- Trusted Reputation: Mail Designer’s sending infrastructure is optimized to ensure high deliverability.
- Professional Appearance: Your emails are sent with an authenticated domain, giving a polished and professional look to your campaigns.
- GDPR-Compliant Sending: All data is handled in compliance with GDPR, ensuring the privacy of your recipients.
What’s the catch?
While using a shared domain is a quick solution, a custom email domain (e.g., yourname@yourbusiness.com) is always recommended in the long term. This gives you full control and enhances your brand image. Mail Designer 365 supports this setup with tools to configure SPF, DKIM, and DMARC authentication for maximum deliverability.
Ready to get started?
Mail Designer 365 is perfect for sending individual emails or thousands of recipients quickly and professionally. Start your campaign with our delivery service today and reach your audience without worrying about technical setup or deliverability!
‣ Select a text area
‣ Please choose "Insert" > "MailChimp" or "Campaign Monitor"
‣ Choose a placeholder
Note: A placeholder cannot be used on text within an image area, you'll need to place your cursor in a text area to use placeholders.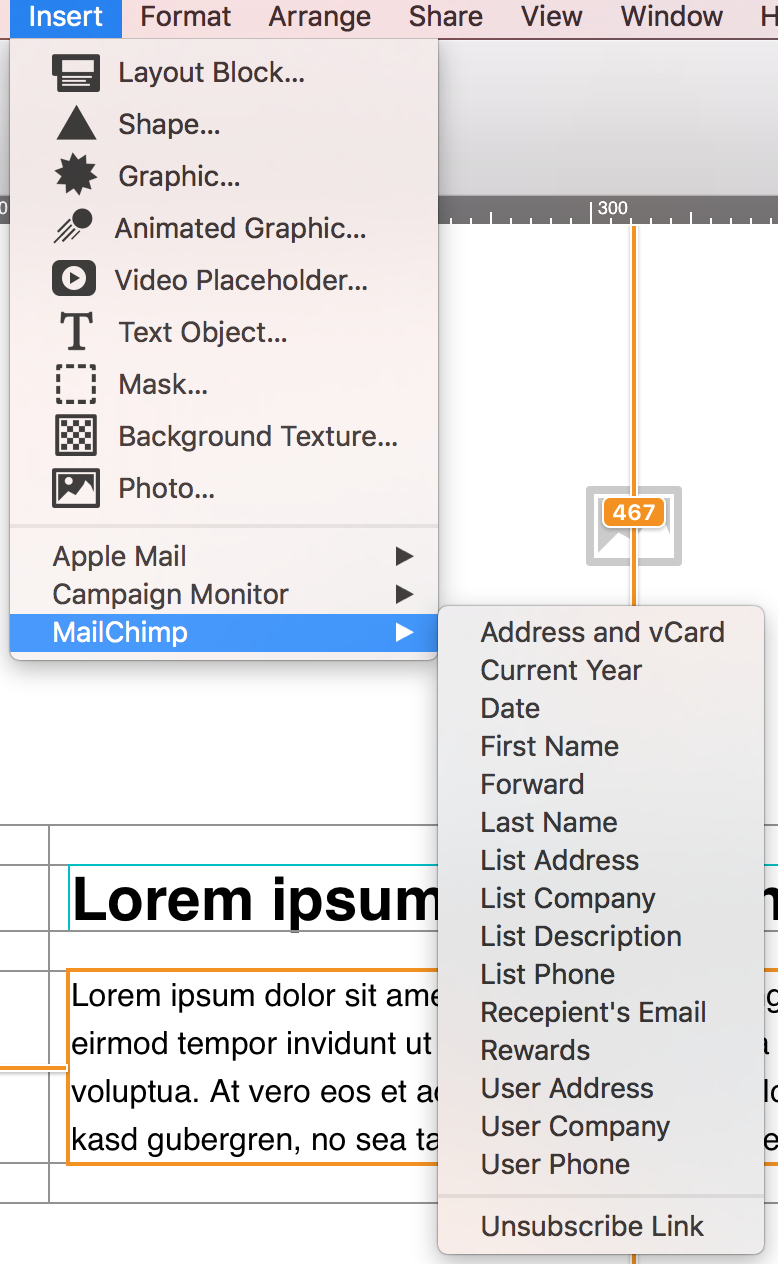
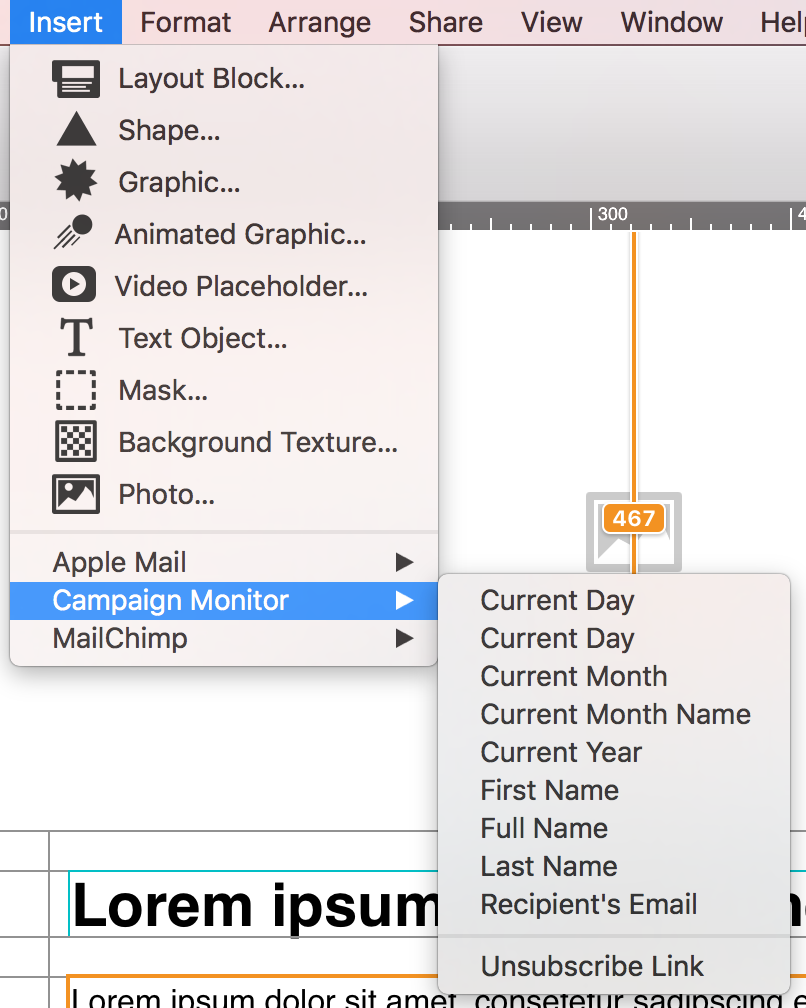
You can easily turn off the automatic renewal for your Mail Designer 365 plan in your my.maildesigner365 account.
- Log in to your account.
- Go to “Purchases & Plans” under Settings.
- Disable the automatic renewal for your plan.
Important:
By turning off automatic renewal, you may lose any existing price advantages.
Once your current plan expires, it can’t be reactivated — however, you can purchase a new plan at the then-current price at any time.
~/Library/Group Containers/C3HCD5RMD7.net.tower-one.MailDesigner/DocumentsThe tilde (~) represents your home directory. This exception is only necessary for read operations; write operations can still be monitored.
- Open up your template in Mail Designer 365 and make the changes in your design
- Go to Delivery Hub and open your scheduled campaign
- The new version of your template will be picked automatically.
- Press Save to save your campaign with the new design
- Repeat for other scheduled campaigns using the same design
‣ Please go to the MailChimp website and log in. When you are ready, upload your design to MailChimp by creating a new campaign.
‣ Select the email design you just uploaded and click "Preview and Test."
‣ Next, click "Enter preview mode."
‣ Click the button for "Enable live merge tag info". You will now see your information for the placeholder you have entered.
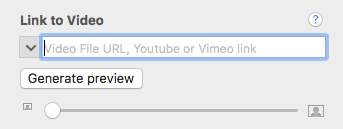 Please note: Email clients are picky when it comes to the HTML they will support - things that you can safely use in almost any web-browser won't necessarily work for emails.
Some kinds of software may cause issues with Mail Designer 365:
- Personal Firewalls
- Protection Software (e.g Virus Scanners, Malware Protection)
Personal Firewalls usually ask the user, if an app should be allowed to send network traffic. It’s important to grant Mail Designer full network access. If you have already added rules for Mail Desinger, please whitelist Mail Designer.
Protection Software often sees authentication traffic as a potential source of threat, as it isn’t able to analyze that traffic because of its very strong encryption. Please ensure Mail Designer is ignored by any protection software running on your Mac and allow this traffic to pass through.
Here are some common examples of the types of apps mentioned above. If you are uncertain whether any of these applications may be installed on your system, try the following:
- Open the app “Terminal”
- Copy and paste the following command:
kextstat | grep -v com.apple
You’ll get a list of all kernel extensions that are not from Apple. Just compare that list with the identifiers in parenthesis below:
- Little Snitch
(at.obdev.nke.LittleSnitch)
- Sophos Anti Virus
(com.sophos.kext.oas, com.sophos.nke.swi)
- Symantec Endpoint Protection / Norton AntiVirus
(com.symantec.kext.SymAPComm, com.symantec.kext.internetSecurity, com.symantec.kext.ips, com.symantec.kext.ndcengine, com.symantec.SymXIPS)
iOS recognizes phone numbers and other information like addresses and dates automatically, as these information can be used in different Apps.
You can for example tap a phone numer in order to call it or tap an address to add it to your address book.
Because of this, these information get highlighted in emails.
 After you have added a video placeholder from the Contents panel, copy the link to the video into the link field.
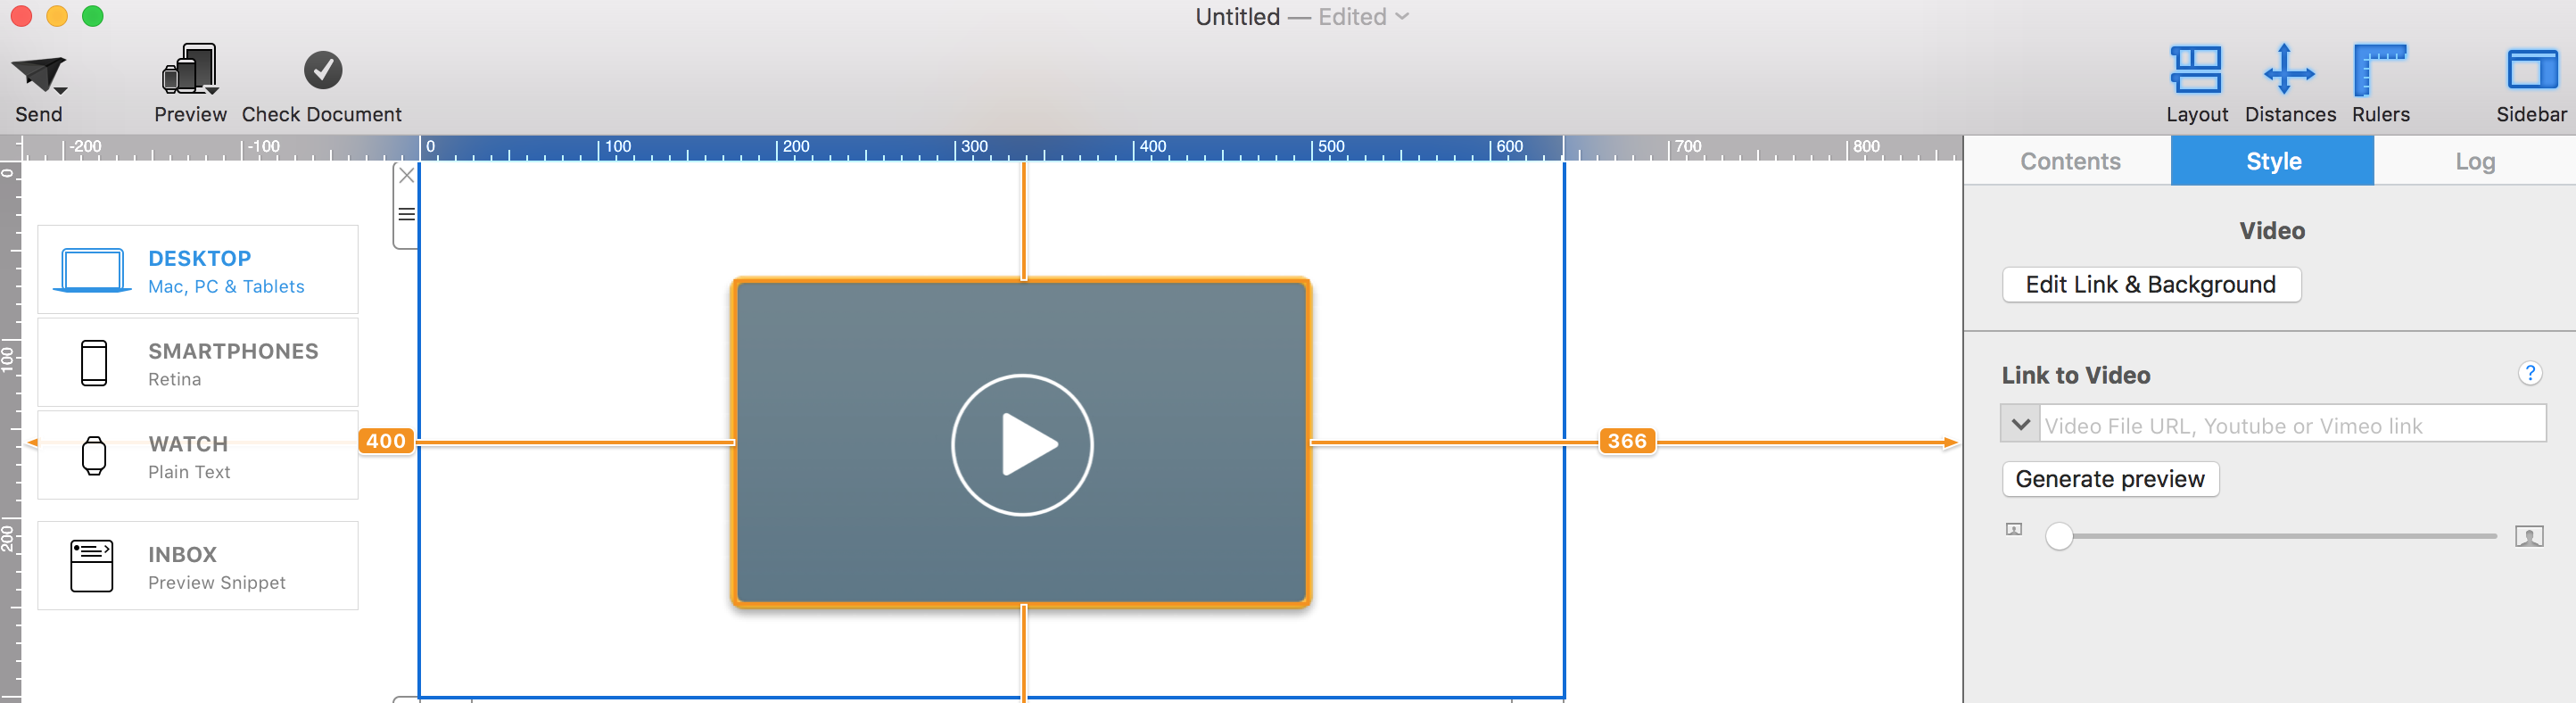 Mail Designer 365 allows you to use links from Youtube and Vimeo. In addition, you can upload your own MP4 files to your server or Dropbox account and copy the public link to this file into the video placeholder.
If you are using your own MP4 files, the video will be played directly in the email application. However, this is only true if this functionality is supported by the email client. Videos will not be played directly in the email. Instead, your subscribers will be led to the online video.
Please note that video clips you want to use in video placeholders must be uploaded to a third-party hosting website like YouTube or Vimeo. Video files that are only available on your Mac cannot be used in your email design.
Mail Designer 365 allows you to use links from Youtube and Vimeo. In addition, you can upload your own MP4 files to your server or Dropbox account and copy the public link to this file into the video placeholder.
If you are using your own MP4 files, the video will be played directly in the email application. However, this is only true if this functionality is supported by the email client. Videos will not be played directly in the email. Instead, your subscribers will be led to the online video.
Please note that video clips you want to use in video placeholders must be uploaded to a third-party hosting website like YouTube or Vimeo. Video files that are only available on your Mac cannot be used in your email design.
Email marketing isn’t dead—it has simply evolved. While it’s true that inboxes are busier than ever, email marketing remains one of the most effective ways to connect with audiences when done right. Here’s why:
- People value quality over quantity: Subscribers are more selective about the emails they sign up for, so it’s crucial to offer valuable, engaging, and relevant content that stands out. Generic or repetitive emails won’t cut it anymore.
- It’s a personal choice: Unlike unsolicited messages on platforms like WhatsApp, email gives recipients control—they’ve opted in to hear from you. For many people this makes emails far more welcome than intrusive messages on other channels.
- Still an ROI powerhouse: Email marketing continues to deliver one of the highest returns on investment (ROI) in digital marketing. When you focus on personalization and value, email can drive conversions better than almost any other medium.
While automation and messaging apps like WhatsApp are growing, they serve different purposes. Instead of replacing email, they complement a well-rounded marketing strategy. So, no—email marketing isn’t dead. It’s just more competitive, and that’s a good thing because it pushes brands to be better.
 With Mail Designer 365, you can create responsive newsletters. By editing images, graphics and text objects for the mobile version you can optimize your template for mobile devices.
‣ Select a text area. ‣ Choose "Edit" > "Spelling and Grammar" > "Show Spelling and Grammar" from the menu bar.Please refer to the following page for more information on how to choose your spell check language:‣ A pop up will appear that will let you choose a language. ‣ Just click on the "Automatic by Language." ‣ You can choose your preferred language from the different options from the drop down menu.
‣ Click the "Inbox" button to open the optimization window.Please refer to the following page for more information on the Inbox Optimization tool:‣ Then, you can enter the subject line for your email, as well as the preview text that your recipient will see. ‣ On the right side, Mail Designer 365 will show you a preview. ‣ This will display how your recipient will see the inbox preview snippet in their inbox before even opening your email.
‣ You can drag and drop the image of your choice to the outer border of your contents. This will set the image as the background of the container of all of your layout blocks.‣ Click the Layout button to hide the layout block outlines in order to get a better view of your background.
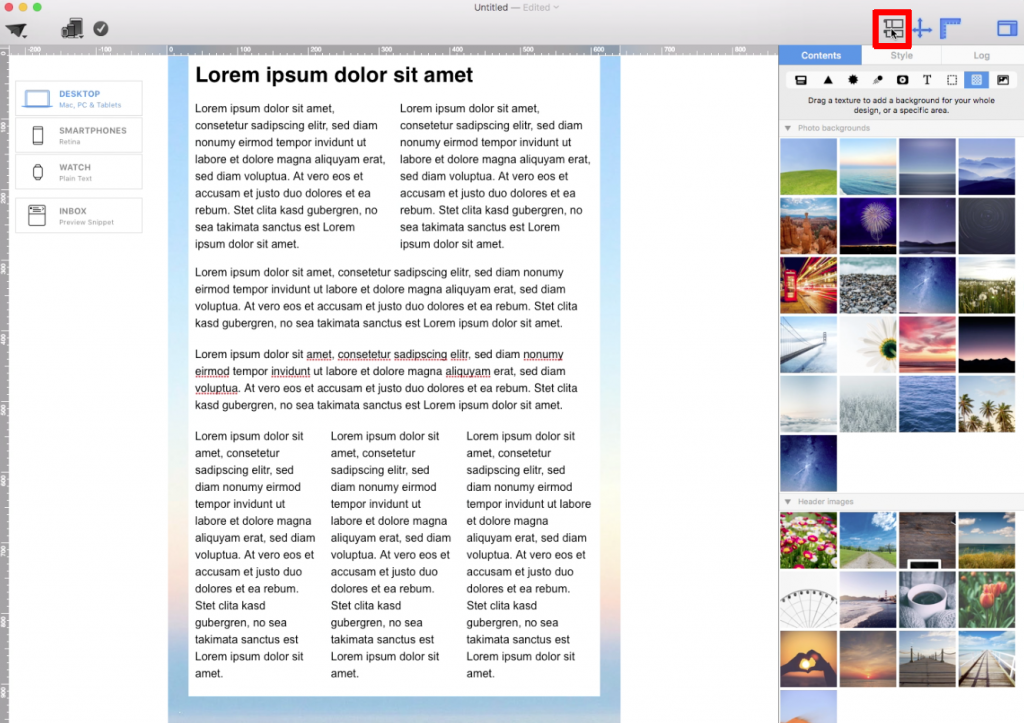
Let's say you want a main email background and a border:
‣ First, choose an image that you want to set as your main email background. ‣ Drag and drop this image into the outskirts of your email design. To show you the area where you can drag and drop your choice of image to set the main background of your email template, we colored the appropriate area in light red:‣ Then, choose an image that you want to set as your background for your border. ‣ Drag and drop the image of your choice into the outline of the container of all of your layout blocks, similar to this:

Did you want to add the same background image in your text areas and your main email background but want a different background effect in between the two? (Kind of like sandwich.)
‣ Set the background of your text areas by dragging and dropping an image of your choice to the middle area of your layout blocks.‣ Make sure to repeat the process to all of your layout blocks:
‣ Set your main email background by dragging and dropping an image to the outskirts of your entire email design:
‣ Then, set a background for the border that is a different image/color/texture as the other two previous backgrounds you used. Make sure you drag and drop the new image within the bounds of the appropriate area (In this case, you want to drag it to the outline of the container of all of your layout blocks):
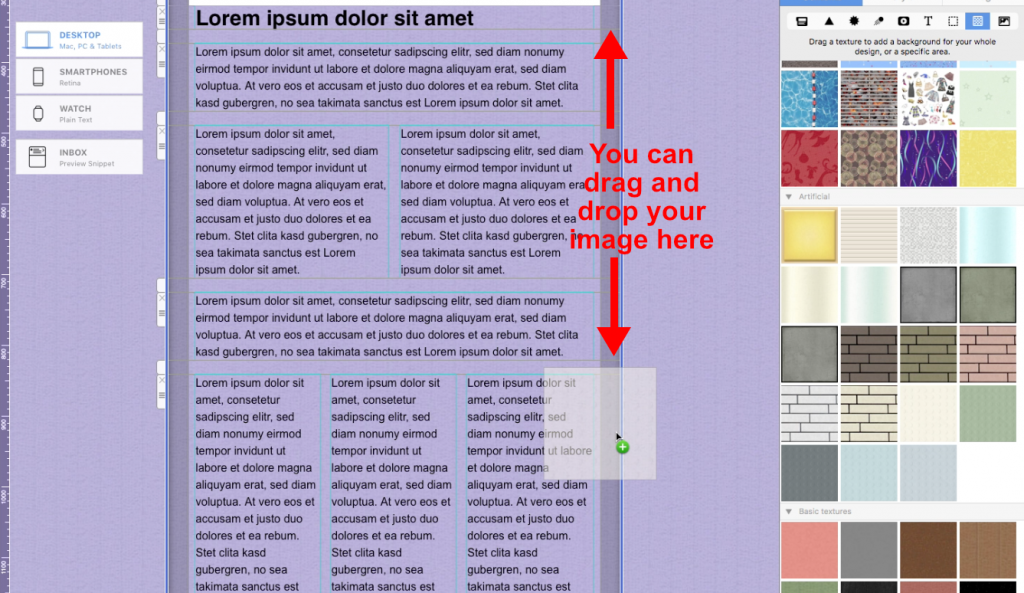
There you have it! A sandwich-like border effect:
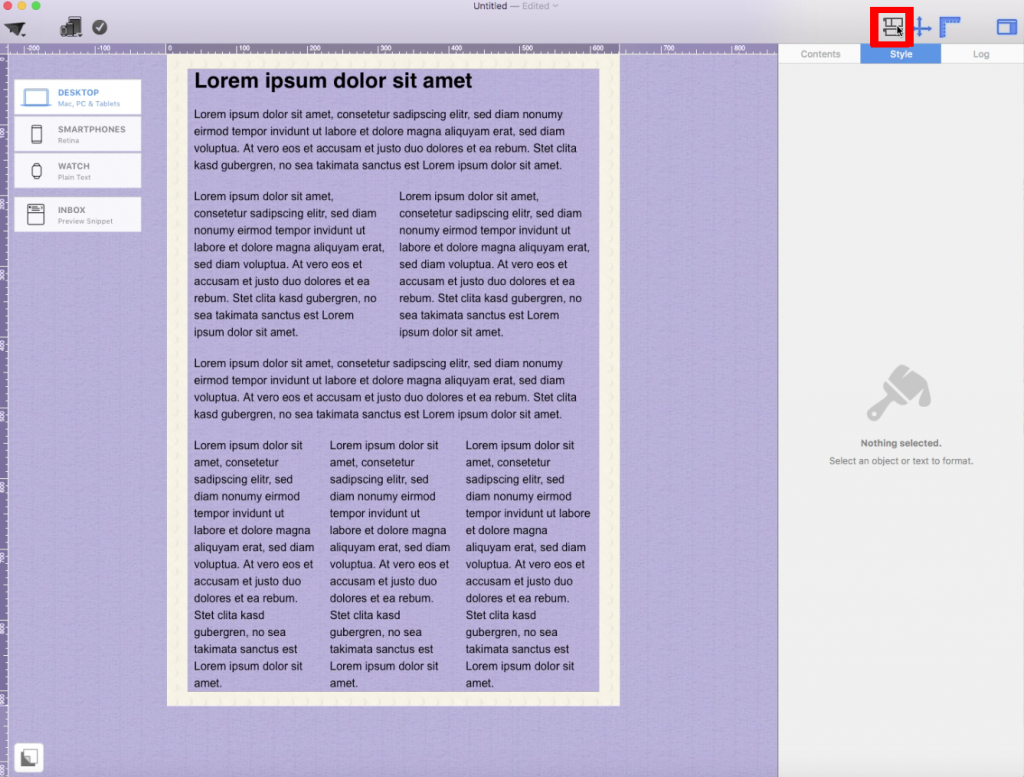 Please refer to the following page for further information on how to create a border for my email design:
‣ Open one of your Mail Designer 365 email design
‣ Choose "File" > "Revert To"
‣ Select a version or click "Browse all versions"
- If the app you want to quit is in your dock, hold the "Option" (⌥) key and right-click on the app icon, then, select "Force Quit" from the menu.
- You can also hold down "Option" (⌥) + "Cmd" (⌘) + "Esc" which will trigger a window with a list of apps you have running. To force quit one or more of these apps, simply select it from the list and click the "Force Quit" button.
‣ Go to "File" > "Design Options."Please refer to the following page for further information on how to turn on and off text hyphenation:‣ Add a check mark from the "Force hyphenation."
‣ Click "Ok."
If you have a charge from equinux on your credit card that you do not recognize, it may be for one of the following products offered through the equinux Online Store:
- VPN Tracker (VPN software for Mac, iPhone and iPad)
- Mail Designer 365 (email newsletter design software for Macs)
- tizi (iPhone and iPad accessories)
Common scenarios
Auto-renewing products
VPN Tracker and Mail Designer 365 are offered as subscriptions. When a plan has been configured to auto-renew, the associated payment method will automatically be charged.
Additional team-members added
If multiple employees are using one of our products, they may have configured team billing. This means the associated credit card may have been charged, in order to add a new team member to an account.
Invoices and other questions
You can download your invoices from our website:
If you have checked with your team and still have additional questions regarding a charge, please contact our support team. Be sure to include the details from your credit card statement and the last 4 digits of your card.
 Note: All of our apps are digitally signed and verified for security, so you can download with confidence.
‣ Choose "File" > "Save"
‣ A pop up will appear.
‣ Give your email design a name.
‣ Choose a category or create a new category by choosing "Custom" from the drop-down menu. Then, type in the name of your new category.
Once you save your email design, it will be saved in Mail Designer app. You can access it from the Design Chooser. You can click on "My Designs" or search for it in "My Library."

 Note: In the demo version of Mail Designer Pro 3, saving of designs is only possible after your purchase.
 Please refer to the following page for further information on plain text:
‣ Click on the smartphone icon on the left side to open the mobile version of your template.Please refer to the following pages for further information on how to add video links into the mobile version:‣ Drag a border line of an image area or text area. ‣ Mail Designer 365 will then give you the option to detach your mobile and desktop versions from each other.
‣ You can add a preview picture for your video adding a video placeholder within an image area by clicking "Contents." ‣ Then click the video placeholder icon:
‣ You will be able to add preview images with our video icons or with your own player overlays.
‣ Visit our  upgrade page.
‣ Purchase your Mail Designer 365 plan.
‣ Log in to your account
‣ Click on the button "Buying for a business?"
‣ Add a VAT ID
‣ Enter your full VAT number
‣ Click on "Validate VAT ID"
‣ In Apple Pages, double the size of your graphic. For example, if you had a shape that has the dimensions 100x100, please increase that to 200x200.
‣ Copy and paste it into an image area in Mail Designer.
‣  Then, select the image.
‣  Right-click (or Ctrl+click) on the image.
‣  Choose "Original Size (Retina)" from the drop-down menu. This automatically shrinks the image but becomes retina quality.
‣To print a document, choose ”File" > "Print…” from the top menu bar.Please refer to the following page for more information on how to print:
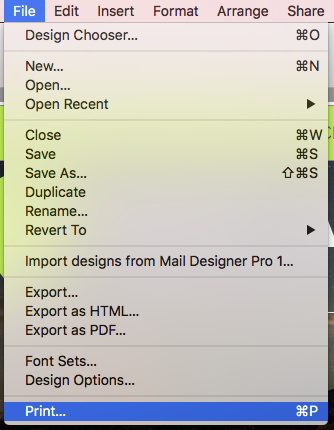
‣ First, open your email design in Mail Designer 365. ‣ Choose "File" > "Export as HTML..."Whether you are using Filezilla or another FTP service, it is important to make sure that the location path URL of the folder is correct. Mail Designer 365 will rewrite all image paths and insert this URL in front of the image URL. This happens automatically for each image.‣ Give your folder a specific name ‣ Connect to your server
‣ Upload your folder on your FTP account. With Filezilla, you can type the location of your folder within your Mac under "Local site."
‣ Or you can find the specific folder within the Filezilla window and then right click the folder. Choose upload from the drop down menu.
‣ Make sure all of the files are added to the folder, including the images used for the email design. ‣ Find the specific location path of your folder. With Filezilla, you will need to click on where your folder is within the server. The specific location path of your folder will be found under "Remote site:"
‣ Click the paper airplane icon on the top right of Mail Designer 365
‣ Choose "Website / HTML..."
‣ Check the box where it says "Prefix image URLS with:" ‣ Add the specific location path URL of your folder
‣ Click "Export"
‣ First, export your Mail Designer 365 template as a PDF file. ‣ Choose “File" > "Export as PDF…”Please refer to the following page for more information on how to convert your email design as a JPG or PNG file:‣ Save your document as a PDF file. ‣ Now, open your PDF file.
‣ Go to your menu bar at the top. ‣ Choose “File" > "Save As…”
‣ A popup window will appears, and you can choose the format you want. You can decide if you want to convert the PDF into a JPG or PNG file.
‣ Open the template you want to export.
‣ Choose ”Share" > "Share design document via Email...“ from the top menu bar.
Please refer to the following page for more information on how to share your email design as an attachment:
Using guide lines
Guide lines act as a visual guide to help you align different elements within your design. To insert a guideline, go to "Insert" > "Horizontal/Vertical guideline": Drag guidelines across your design to position them where you want to align objects, then use the line as a guide to align images, shapes, text, graphics, etc. throughout your design or just in one layout block:
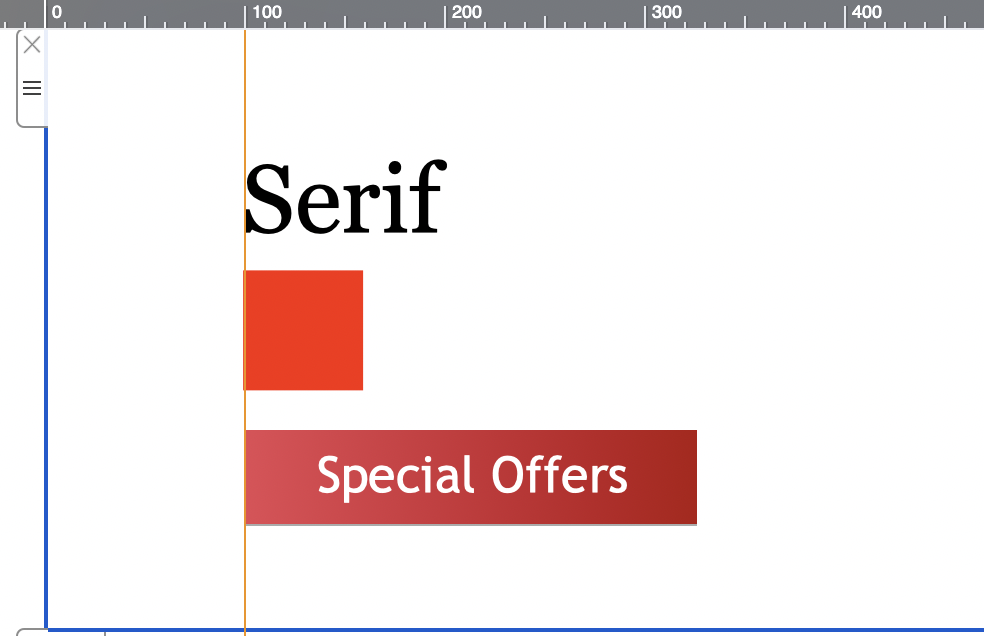 To hide the guidelines once you are done aligning, click on the "Hide layout outline" icon at the top right of the page:
Add a MailChimp unsubscribe link
To add an unsubscribe link to your template, please follow these steps:
Add a MailChimp Rewards badge
You have a free MailChimp account and want to send a MailChimp campaign without the grey MailChimp Footer?
Simply add the additional "Rewards" placeholder to your design together with the unsubscribe link and your campaign will be send without the MailChimp footer.
You can add the "Rewards" placeholder by choosing "Insert" > "MailChimp" > "Rewards" from the top menu bar.
Do you have a paid MailChimp account?
In this case you don't have to add a MailChimp Rewards badge to your Mail Designer Pro document.
You can view a copy of all your invoices in our Online Store:
You will find the invoices for your VPN Tracker 365 purchases in the section "Invoices", here:
http://my.vpntracker.com
You work in accounting and need access to the VPN Tracker invoices for your company? Please ask your VPN Tracker Team manager to invite you to you company's team with the role "Accounting". Afterwards you will receive emails as soon as a new invoice is available and you can dowload this from the web portal
You will find the invoices for your Mail Designer 365 purchases in the section "Orders", here:
https://my.maildesigner365.com
You will find the invoices for your tizi products in the section "Orders", here:
http://my.tizi.tv
Other invoices can be found at http://www.equinux.com/goto/invoice
‣ If you would like to save a PDF copy of your invoice, then do the following:
     Press "Command + P"
     Choose "PDF" > "Save as PDF"
We don’t offer partial refunds. All of our 365 plans are valid for one year and you can cancel up to 10 days before the end of your term; however, if you do cancel, you will be able to continue using the software the expiration date of your plan.
The Mail Designer manual has information on how to create your design and export it to MailChimp. Once you have sent your design to the big monkey in the sky, you can create campaigns, manage subscribers, track clicks and more with MailChimp's tools.
There are so many different MailChimp features, that we can't describe them all in the Mail Designer manual. But don't worry: the MailChimp team have created webinars, how-to manuals, guides and tips to help you get started.
How can I verify that my copy of VPN Tracker 365 or Mail Designer has not been modified?
All our apps are properly code-signed by Apple, so macOS can verify that the app has not been tampered with. You can check the integrity by opening Terminal.app and entering the following command:spctl --assess "/Applications/VPN Tracker 365.app"Please note that double quotes around the path are required because the path contains spaces. If your copy is in a different location, please replace "/Applications/VPN Tracker 365.app" with the proper path to the app. The output may look like this:
/Applications/VPN Tracker 365.app: accepted
    source=Notarized Developer ID
If the app has been modified, an error message like this is printed:
Mail Designer 365.app: invalid signature (code or signature have been modified)Please contact us if your copy of VPN Tracker 365 or Mail Designer 365 has an invalid signature.
How can I verify that my copy of VPN Tracker 365 or Mail Designer 365 was signed by equinux?
All our apps are properly code-signed by Apple, so macOS can verify that the app has not been tampered with. You can review this signature by opening Terminal.app and entering the following command:codesign -d -vv "/Applications/VPN Tracker 365.app"Please note that double quotes around the path are required because the path contains spaces. If your copy is in a different location, please replace "/Applications/VPN Tracker 365.app" with the proper path to the app. The output may look like this:
Executable=/Applications/VPN Tracker 365.app/Contents/MacOS/VPN Tracker 365
    Identifier=com.vpntracker.365mac
    Format=app bundle with Mach-O universal (x86_64 arm64)
    CodeDirectory v=20500 size=81953 flags=0x10000(runtime) hashes=2550+7 location=embedded
    Signature size=9071
    Authority=Developer ID Application: equinux AG (MJMRT6WJ8S)
    Authority=Developer ID Certification Authority
    Authority=Apple Root CA
    Timestamp=1. Jun 2021 at 17:22:51
    Info.plist entries=42
    TeamIdentifier=MJMRT6WJ8S
    Runtime Version=11.1.0
    Sealed Resources version=2 rules=13 files=684
    Internal requirements count=1 size=216
The important parts to look out for here are the lines starting with "Authority": They list the chain of trust. The last entry must always be "Apple Root CA", the entry above must either be "Developer ID Certification Authority" or "Apple Worldwide Developer Relations Certification Authority" for App Store versions. The first entry must either be "Developer ID Application: equinux AG" (VPN Tracker 365), "Developer ID Application: Tower One GmbH" (Mail Designer 365 non-App Store), or "Apple Mac OS Application Signing" (Mail Designer 365 App Store).
Again, if you see a different entry, please contact us.

equinux 2FA supports all major authentication and password apps, including:
- Google Authenticator
- Microsoft Authenticator
- Twilio Authy
- 1Password
- FreeOTP
- Bitwarden
Mail Designer 365 is licensed per user. That means each person using Mail Designer 365 needs their own license.
To prevent security issues, account sign-ins are checked by an automatic system. There are multiple possible causes that can trigger an account lock:
- Sharing one account with other people
- The account is being used as a "generic" account (e.g. "Lab computer 1"), instead of being personalized for one person
- Go to my.maildesigner365.com
- Sign in with your equinux ID
- Go to "Store" and choose "Add plans…"
- Add additional licenses for each person that needs Mail Designer access and complete your order
- Once you have the correct number of licenses for your team, assign the new licenses to your co-workers – check out our Team Setup Guide for step-by-step instructions
Once you have completed these steps, please contact our support team and include your equinux ID and order confirmation number. A team member will review your details and will be able to lift the restrictions on your account.
For any other questions, please reach out to our Mail Designer Team.
- Regular email with several contacts in the To field
- Regular email with several contacts in the BCC field
- An email to a predefined group, such as an Outlook Group
- Your email service provider or the recipient's email service provider may raise suspicions of SPAM (unsolicited junk emails) sending, potentially leading to your account's suspension or temporary freeze.
- Receiving an email with an extensive list of recipients often diminishes its perceived relevance to individual recipients, making it seem impersonal and more likely to be classified as junk mail.
- Messages sent to a large number of recipients are often flagged by Junk Mail Filtering systems as Spam, increasing the risk of your message being blocked and not reaching its intended recipients.
- Mail Designer Campaigns enables you to fully verify your domain, ensuring optimal verification for your emails to reach recipients' inboxes.
- If you don't have your own domain or prefer not to undergo the verification process, we can provide you with a custom address from a fully authenticated domain, significantly reducing the risk of your emails being marked as Spam.
- We offer intelligent list management for your contact lists, allowing you to either send emails to all contacts or create targeted groups tailored to your audiences.
Yes, with Mail Designer 365 you can track whether an email was opened. The built-in Mail Designer Delivery email tracking features give you detailed statistics for every email and campaign you send.
Whether you're using Direct Send or sending a newsletter campaign: If you send your email using the built-in delivery service in Mail Designer 365, you'll get access to detailed analytics – including open rate, click rate, and many other important metrics.
You can view analytics for your newsletter campaigns here:
https://my.maildesigner365.com/team/deliveries/campaigns/finished
Detailed tracking is also available for Direct Send emails. You can find the relevant statistics here:
https://my.maildesigner365.com/team/deliveries/direct/finished
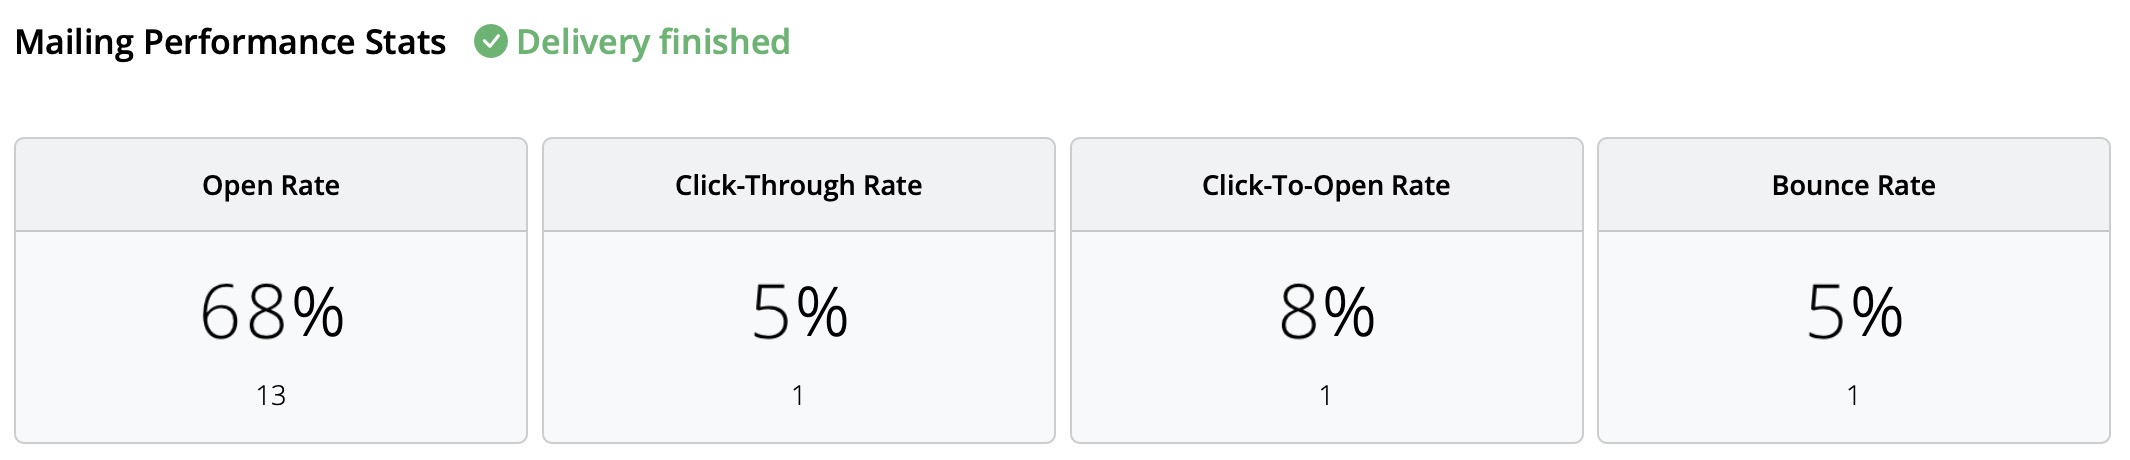
No matter which sending method you choose, Mail Designer 365 provides the following analytics:
- Open rate and total opens
- Click rate and total clicks
- Delivery status and bounces
- Unsubscribes (unsubscribe rate)
- Detailed link click tracking

- Recipient-level statistics
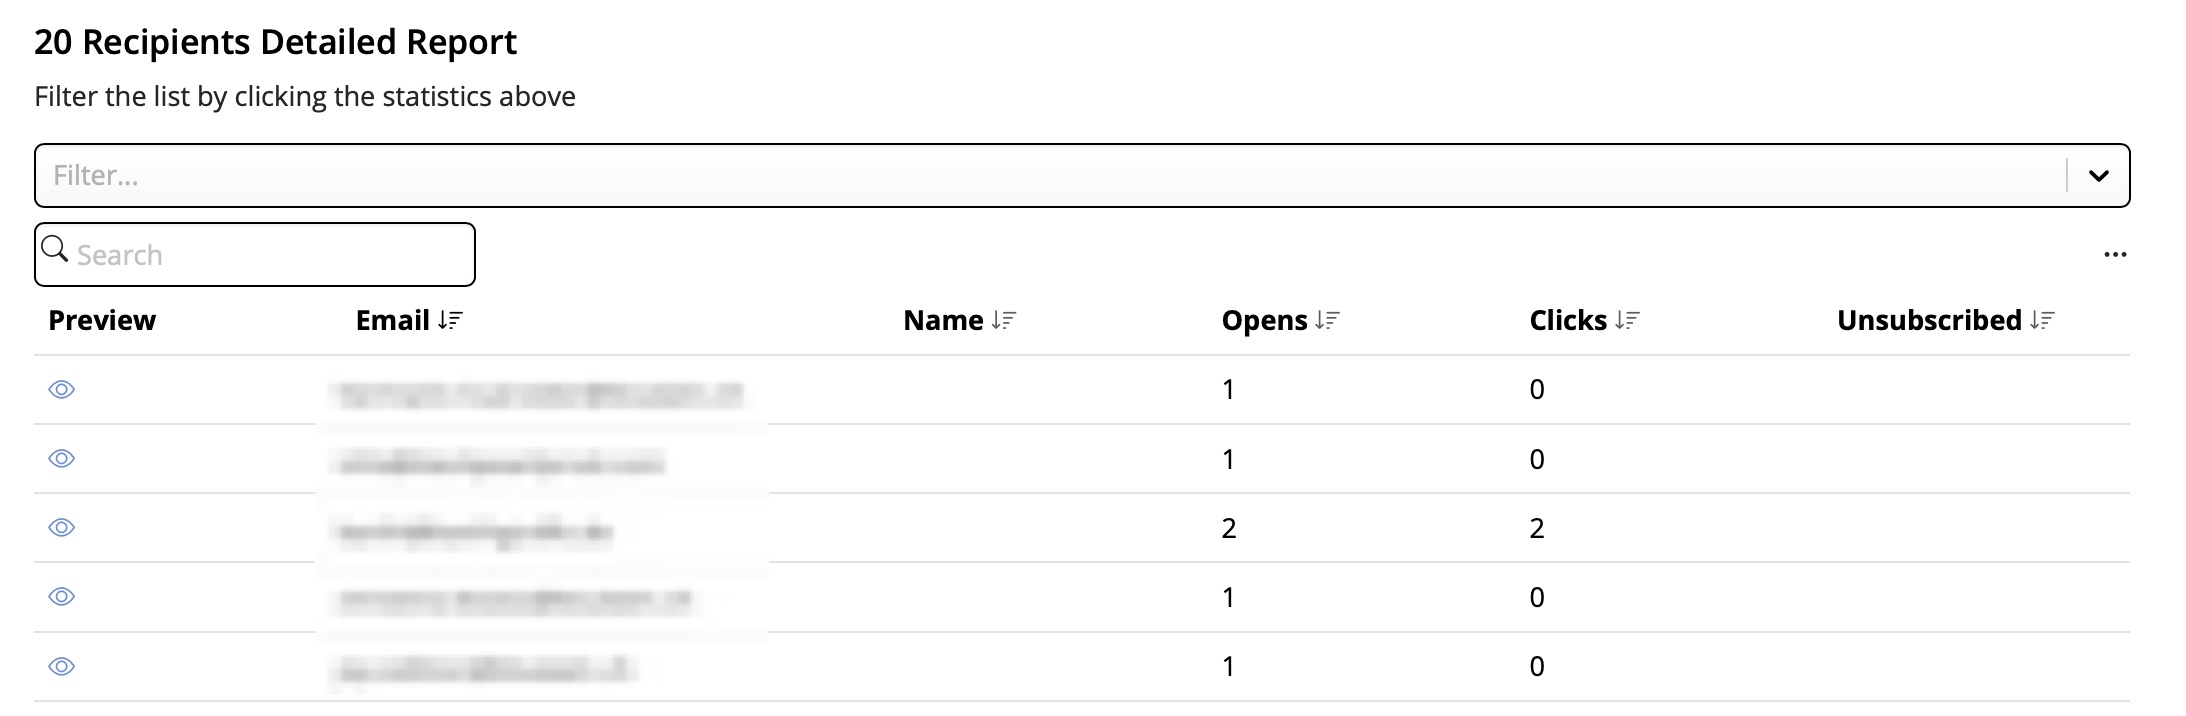
This performance analysis helps you better understand the success of your email campaigns and improve your content accordingly.
Tip: For accurate results, we recommend checking your statistics at least 24 hours after sending. This ensures your recipients had enough time to open and engage with your email.
Step 1: Create the $AttributeFields Variable
Start by creating a variable named $AttributeFieldsThis variable will contain the text string that defines the placeholder content used in your Mail Designer 365 email template. All values must be separated by commas.
Scenario A: FileMaker Field Names Match the Email Placeholders
Method: Use FileMaker field names that directly match the placeholders in your email design. Build the$AttributeFields variable by listing these field names, separated by commas.
In Mail Designer, you simply use the field name as the placeholder.
Format:
$AttributeFields = "Table::Field1,Table::Field2,Table::Field3"
Example Definition of $AttributeFields in FileMaker:
$AttributeFields="CityHotel::GUEST_FIRST_NAME,CityHotel::GUEST_LAST_NAME,CityHotel::GUEST_EMAIL,CityHotel::BOOKING_METHOD"
In Mail Designer 365, you can reference the values later using these placeholders:
GUEST_FIRST_NAME
GUEST_LAST_NAME
GUEST_EMAIL
BOOKING_METHOD
⸻
Scenario B: FileMaker Field Names Do Not Match the Email Placeholders in Mail Designer
Method: Build the$AttributeFields variable by manually mapping each placeholder name to the corresponding field or variable using the format:
$AttributeFields = "PLACEHOLDER_NAME:" & FieldName_or_Variable & "," ...
Example Definition of $AttributeFields in FileMaker:
"BOOKING_DATE:" & RESERVATION_DATE & "," &
"BOOKING_TIME:" & RESERVATION_TIME & "," & ...
⸻
Scenario C: Using FileMaker Variables as Placeholders
Method: If your FileMaker variable has the same name as the placeholder in Mail Designer 365, you can directly assign it like this:$AttributeFields = "$city,$country"
This tells Mail Designer to use the value of $city for the placeholder named “city”.
Example:
The FileMaker variable $city contains “Munich”. If your Mail Designer template includes a placeholder named “city”, then define:
$AttributeFields = "$city"
The script will reveal the content “Munich” and pass it to Mail Designer to populate the “city” placeholder.
⸻
The Best Scenario D: Mixing All Methods
You can combine the approaches above into a single$AttributeFields string.
Method:
Mix matching field names, manually mapped fields, and variables in the $AttributeFields variable.
Example:
$AttributeFields = "BOOKING_DATE:" & RESERVATION_DATE & "," &
"CityHotel::BREAKFAST_TYPE," & "$city"
In Mail Designer 365 you can then reference them with the name BOOKING_DATE, BREAKFAST_TYPE and city
The MailDesignerIntegrationExample file in FileMaker walks you through the required scripts step by step (.fmp12 FileMaker file):
And in the Mail Designer 365 template, you’ll find placeholders that show how your FileMaker fields come to life directly in the design (Mail Designer file):

Open this Mail Designer file and then go directly to File > Save to save it in your project.
Don’t have the Mail Designer app yet?

Visit our Mail Designer 365 Store.
If you have any questions or run into any issues during the trial period, feel free to contact us at any time.

You can resize an image in two easy ways:
Option 1: Resize directly in the design
- Click on the image you want to resize.
- Drag one of the orange corner handles to adjust the size manually.
Tip: Hold Command (Cmd) while dragging to freely scale without keeping proportions (if desired).
Note: The blue handle in the top-left corner adjusts the corner radius of the image, allowing you to create rounded corners.
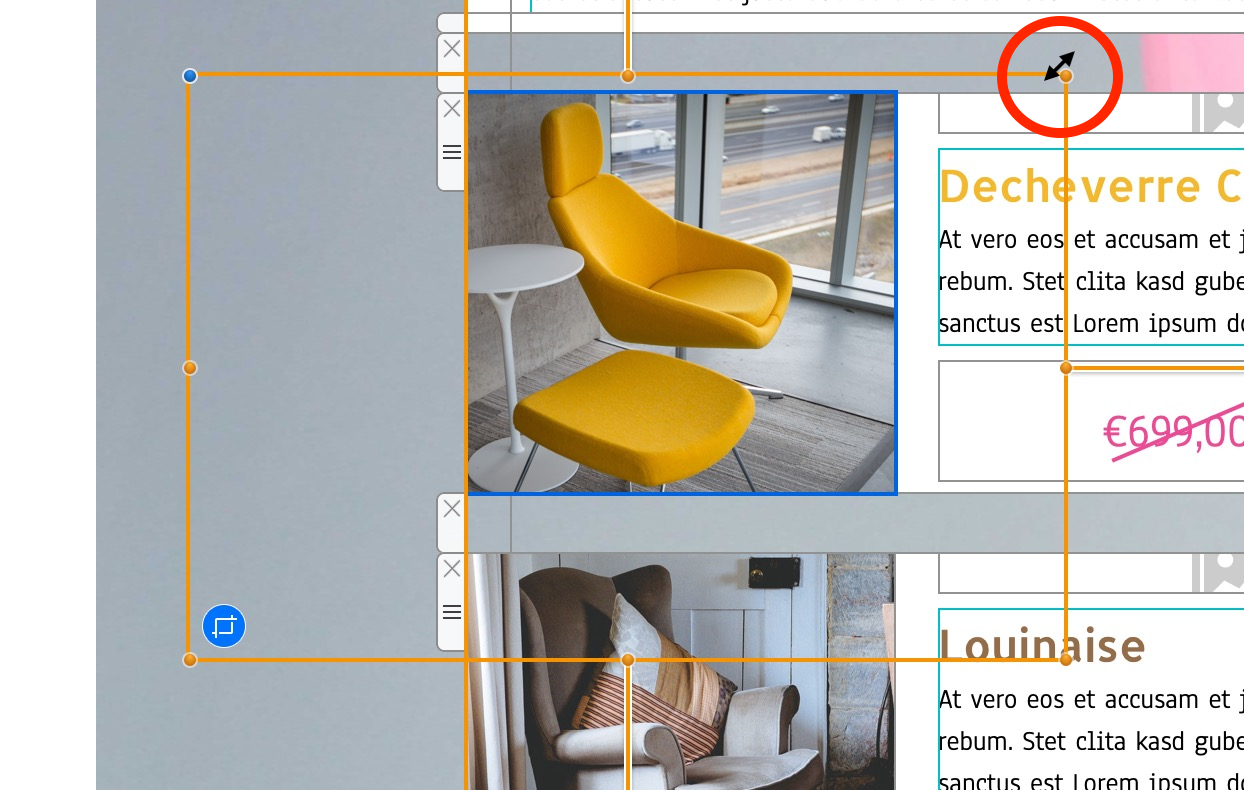
Option 2: Use the Size settings in the sidebar
- Select the image in your design.
- In the right-hand Image panel, under Size, enter a specific Width and Height in pixels.
- Make sure “Constrain proportions” is checked if you want to keep the image’s original aspect ratio.

Want to crop your image instead? Check out our guide on how to crop images in Mail Designer.
There are two main ways to change the background of a text area in Mail Designer 365:
Use Layout Blocks with Backgrounds
Mail Designer 365 offers layout blocks that come with built-in background colors for text areas:
- Go to the sidebar and select the Layout tab.
- Scroll down to the Text with image (sidebar) section.
- Here you will find several layout blocks where the text areas have a colored background (shown as yellow in the preview).
- Simply drag the desired block into your design to add text areas with backgrounds.
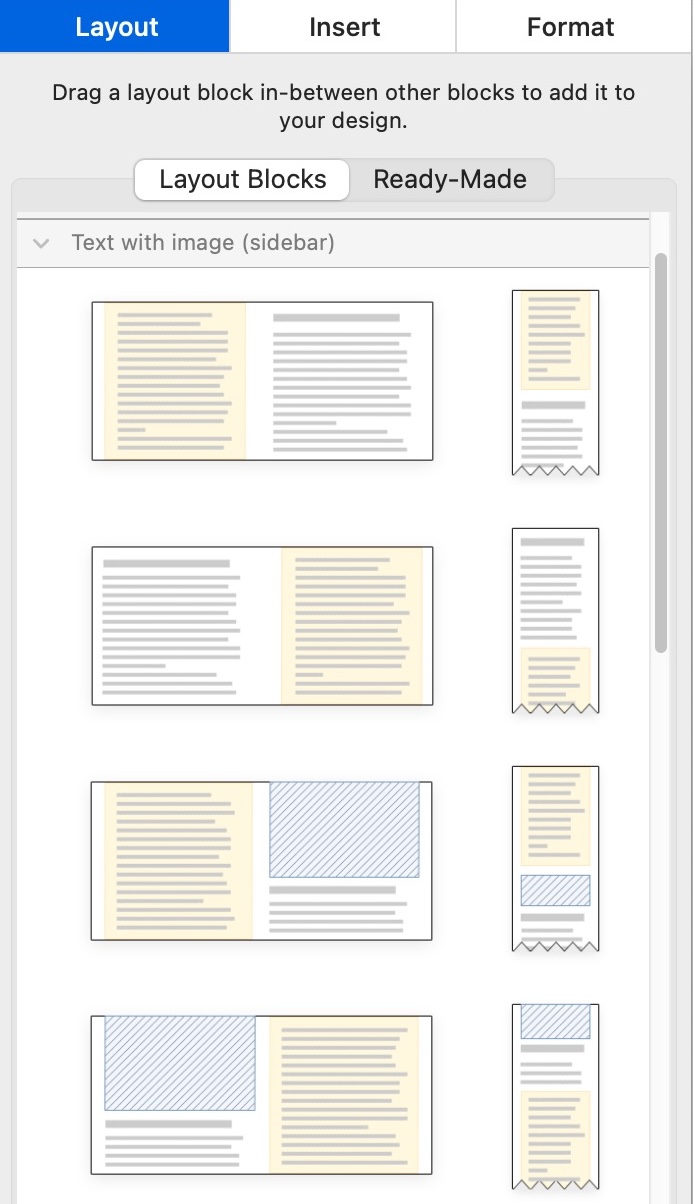
Add and Customize a Badge
If you want to add a background to specific parts of your existing text, you can use the Badge feature:
- Click inside your text area where you want to add the background.
- In the sidebar, select the Insert tab, then choose Badge.
- Browse the badge styles and select one to apply it.
- Once inserted, you can customize the badge’s background color, font style, border, padding, and more under the Format tab.
- Paste or type your text inside the badge and adjust the design to your liking.
![]()
![]()
Both methods let you create visually distinct text areas with backgrounds to enhance your email design.
What does BCC mean in email?
BCC stands for "Blind Carbon Copy." It allows you to send an email to multiple recipients without showing their email addresses to one another. It's a discreet way to include people in a conversation—without letting anyone else know.
What is CC, and how is it different from BCC?
CC stands for "Carbon Copy." Everyone listed in the CC field will receive the email—and everyone else will see that they received it. Use CC when transparency is important, or when you're looping someone in for visibility.
- CC: Recipients are visible to everyone.
- BCC: Recipients are hidden from each other.
- Use CC when visibility and transparency matter.
- Use BCC when privacy is important or to avoid reply-all chaos.
When should I use CC vs. BCC?
- Use CC when:
- You want others to know who’s involved.
- You’re keeping a colleague in the loop.
- You’re sharing info within a team or organization.
- Use BCC when:
- You’re sending to a large group and want to protect privacy.
- You’re sending a cold email and don’t want to expose other leads.
- You’re following up discreetly or avoiding unnecessary reply-alls.
Can I send a newsletter using BCC?
Technically, yes—but it’s not a good idea.
Using BCC for newsletters:
- Can get your email marked as spam.
- Feels impersonal and lacks personalization.
- Offers no way to track engagement or manage subscribers.
- Risks violating GDPR regulations.
Instead, use a purpose-built solution like Mail Designer 365 to send professional emails the right way—with full tracking, personalization, and legal compliance.
Why should I use BCC in emails?
BCC is useful when you:
- Need to keep recipient addresses private.
- Want to send a message quietly to someone else.
- Are emailing a large group without revealing each address.
Pro tip: Always include at least one address in the “To” field when using only BCC—some mail servers require it!
What should I avoid when using BCC?
- Don't send recurring emails to large lists via BCC—use a proper mailing tool.
- Don’t forget to comply with privacy and consent regulations.
- Avoid using BCC in sensitive situations where full transparency is expected.
What's the best way to send emails to many recipients?
Skip the manual CC/BCC and go for a smarter option.
With Mail Designer 365, you can:
- Design eye-catching emails (no coding needed).
- Manage and segment your audience.
- Track performance with open, click, and bounce rates.
- Stay 100% GDPR-compliant.
Is using BCC for email campaigns GDPR-compliant?
No, it’s not.
Under GDPR:
- You must prove consent for each recipient.
- You need to include an unsubscribe option.
- You must securely manage and store contact data.
BCC doesn’t support any of this. Mail Designer 365 does—and is hosted in Germany, offering fully compliant sending infrastructure.
Still unsure?
Looking for a better way to send professional emails? Discover how to design stunning newsletters with Mail Designer 365 for Mac.
Or explore how to send GDPR-compliant newsletters using the professional email features included in every plan.
Definition
A newsletter is a form of written communication, usually distributed via email, that is sent to a group of people with a shared interest. It typically contains updates, news, tips, or promotional content and is a key tool for engagement and communication.
Purpose
The main purpose of a newsletter is to inform, engage, and build a relationship with your audience. Newsletters are commonly used to:
- Share product updates or company news
- Promote special offers and events
- Drive traffic to a website or online store
- Deliver valuable content such as tips or how-tos
With Mail Designer 365, you can easily design beautiful, branded newsletters that fulfill all of these goals.
Common Newsletter Content
Newsletter content can vary, but typical elements include:
- News and announcements about your business or organization
- Promotions such as sales or discount codes
- Educational content like how-tos, guides, or tutorials
- Customer stories or testimonials
Explore design ideas to find inspiration for your next newsletter campaign.
How Newsletters Are Delivered
Most newsletters today are delivered via email using a newsletter platform or email service provider (ESP). With Mail Designer 365, you can:
- Export directly to Mailchimp or Campaign Monitor
- Send via your preferred email platform
- Generate ready-to-send HTML for custom setups
Who Uses Newsletters?
Newsletters are used by a wide range of individuals and organizations:
- Businesses to market products and retain customers
- Non-profits to keep supporters informed and engaged
- Educational institutions to update students, parents, and staff
- Content creators and bloggers to grow and monetize their audience
How Often Should You Send a Newsletter?
There’s no one-size-fits-all answer. Frequency depends on your content strategy and audience expectations. Common cadences include:
- Weekly newsletters for time-sensitive content
- Monthly roundups or company updates
- Quarterly newsletters for less frequent communication
Why Are Newsletters Important?
Newsletters remain one of the most effective communication tools available. Key benefits include:
- High ROI — Email marketing consistently delivers one of the highest returns among digital channels
- Direct connection — Newsletters land in your subscribers’ inboxes, allowing for personalized and targeted communication
- Brand building — Consistent communication strengthens your brand and keeps your audience engaged
How to Start Your First Newsletter
Ready to get started? With Mail Designer 365, you can choose from a wide range of professionally designed templates, customize them to your brand, and export your finished newsletter in just a few clicks.
Conclusion
Newsletters are a powerful and flexible communication tool. Whether you're a small business, large organization, or creative professional, Mail Designer 365 gives you everything you need to create eye-catching, effective newsletters with ease.
Request Mail Designer 365 training from Denkform →
- In Mail Designer, switch to the Desktop view (top left of your design) and click on the outer margin area of your design (usually the white or gray background). The "Format" tab in the right-hand sidebar will now show the "Inner Content" section.
- Now switch to the Smartphone view (top left of your design).
- In the right-hand sidebar, under "Inner Content", increase the value under "Mobile Devices": 420 pixels is a good value for most smartphones.
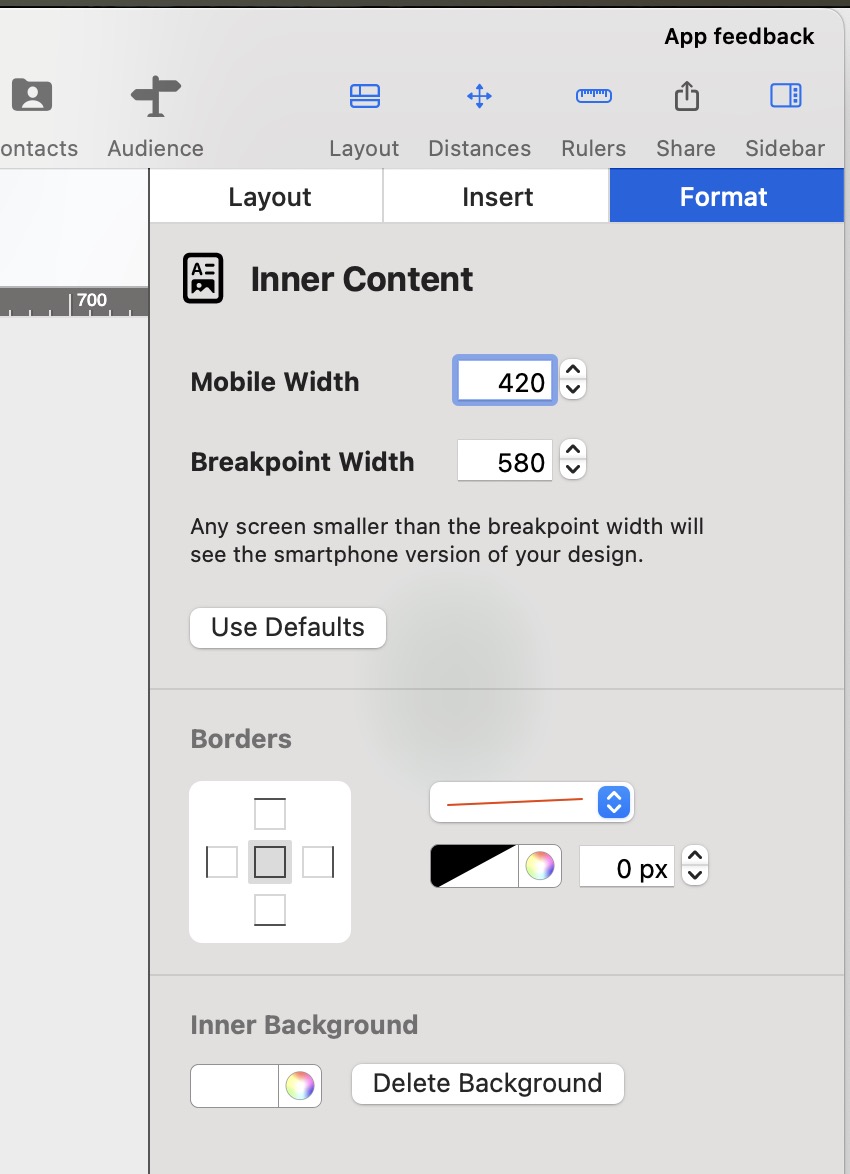
We’re here to help
If you're running into issues with your email design in Mail Designer 365, our support team is happy to assist you. The best way for us to provide fast and effective help is for you to save your design to your TeamCloud and invite us to your team. Follow the steps below:
Step 1: Move your design to TeamCloud
If the design isn't already stored in TeamCloud, move it there like this:
Step 2: Invite our support team
Next, invite us to your team so we can access your design:
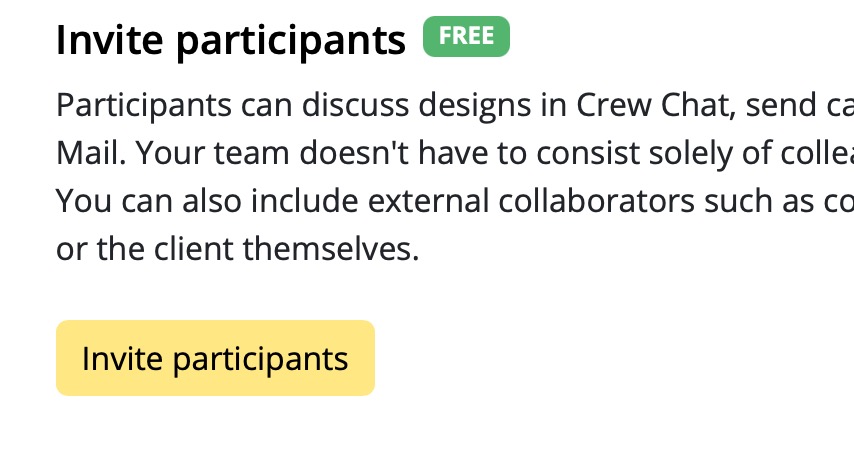
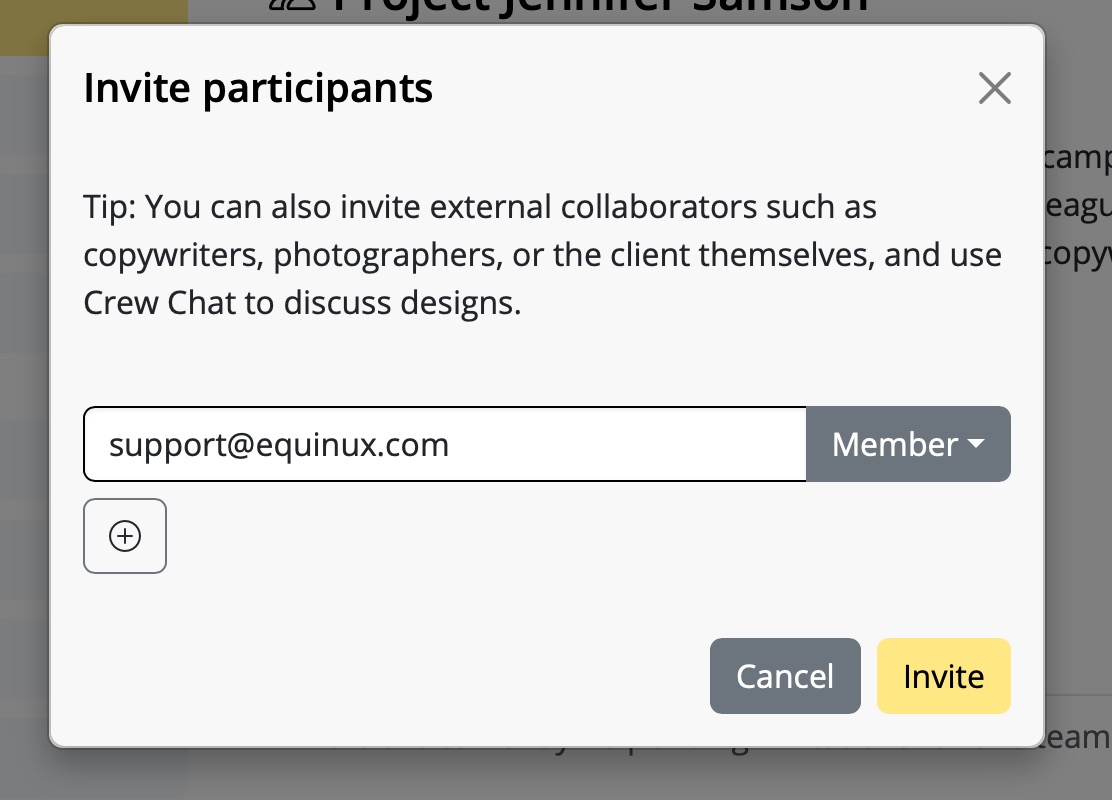
Step 3: Contact support
After inviting us, send us a short support request from inside Mail Designer 365:
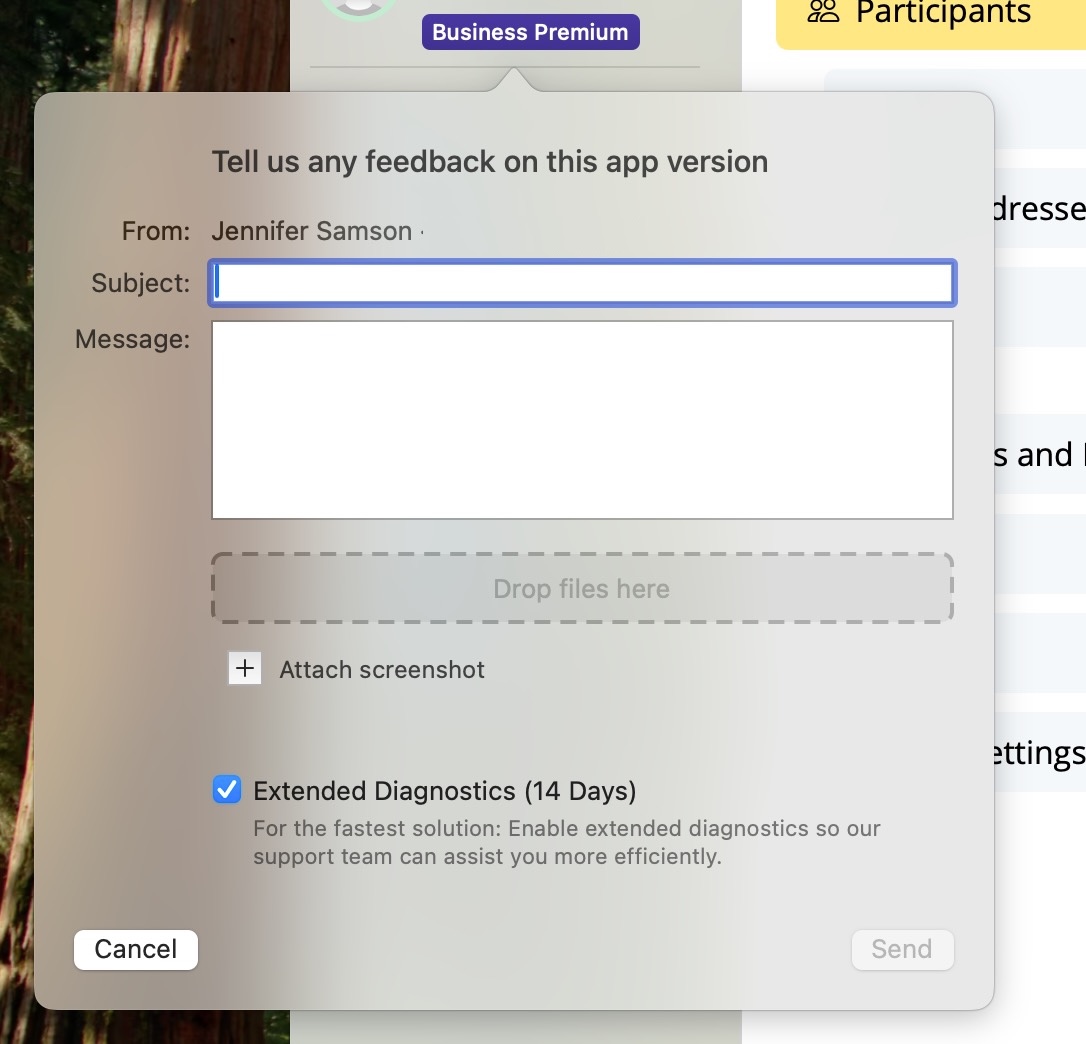
Make sure the box for Extended Diagnostics (14 Days) is checked — this helps us analyze any design-specific problems more thoroughly.
That’s it!
Once we receive your invite and message, we’ll be able to take a closer look and help you resolve your design issue quickly.
Email design refers to the strategic and visual process of crafting emails that not only look good but also drive engagement, deliver key messages clearly, and perform well across all devices. A well-designed email supports your marketing goals by guiding readers toward specific actions—like clicking a link, completing a purchase, or exploring more content.
Why is email design important?
Effective email design impacts open rates, click-throughs, and conversions. With limited time to capture attention, a clean, clear, and engaging layout can make all the difference. Good email design also reinforces your brand and ensures your messages are accessible across platforms and devices.
What does a good email layout include?
A strong email layout is made up of several key elements that work together for clarity and impact. As shown in the infographic below, these elements include:
- Header: Contains your brand logo and optional pre-header text
- Hero image: Visually engages and supports the main message
- Primary headline (H1): Grabs attention and sets the topic
- Body text: Clearly structured content that explains or informs
- CTA (Call to Action): Visually distinct buttons or links that guide readers
- Footer: Includes legal information, social links, and an unsubscribe option
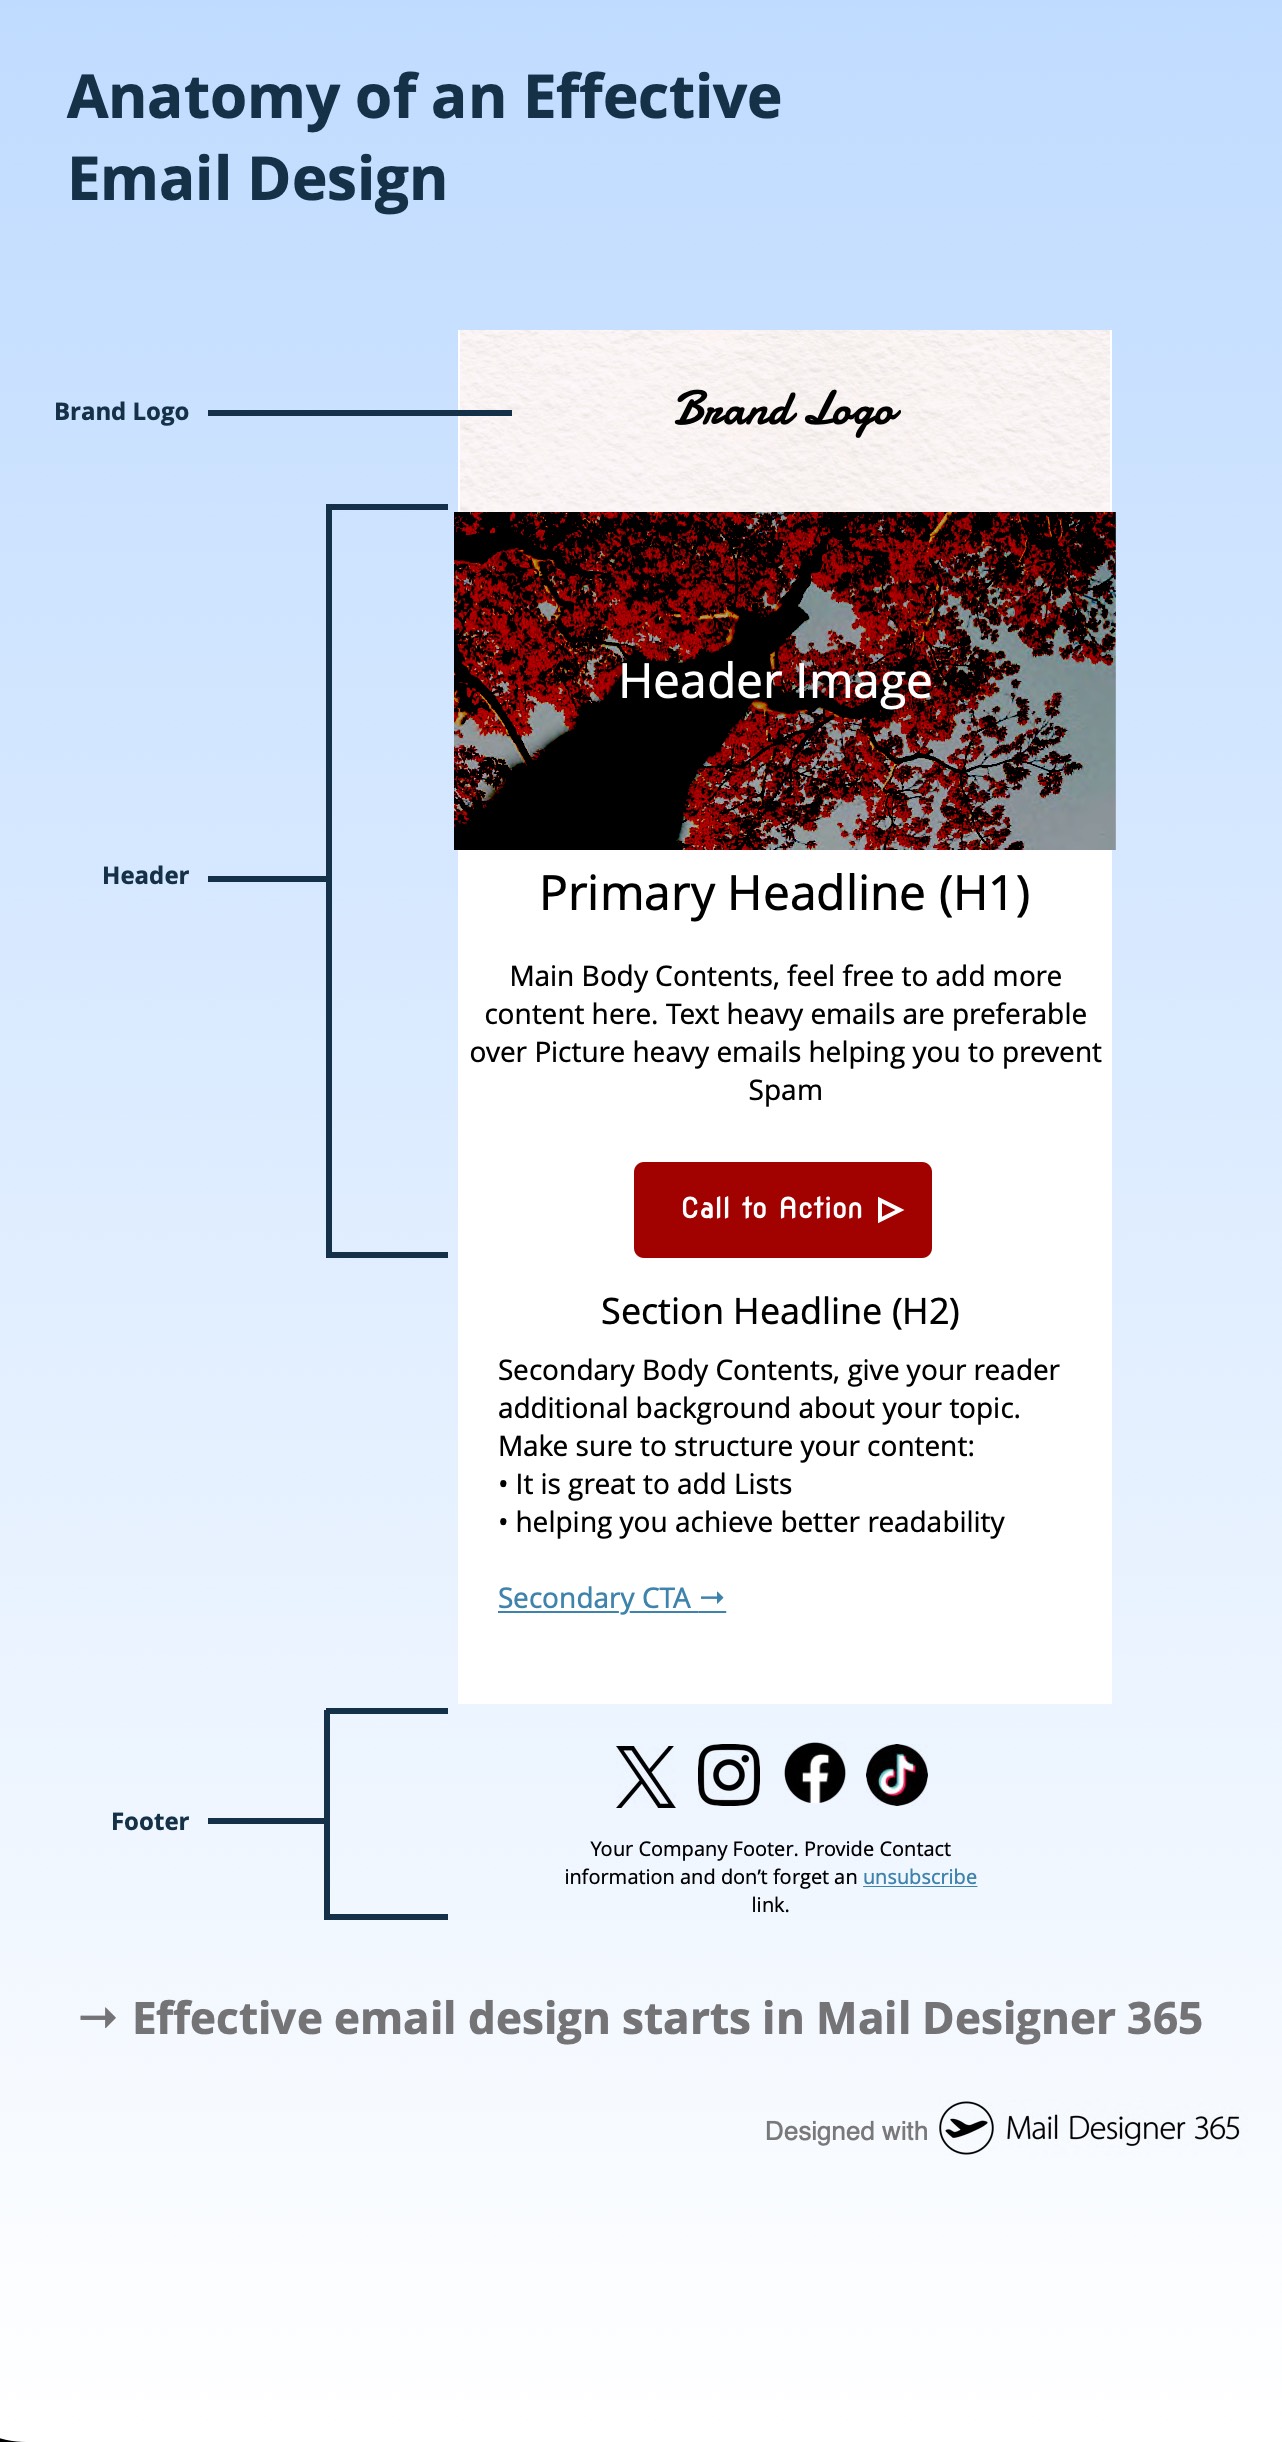
What are the essential elements of email design?
The following checklist highlights five essential components that every email should include:
- Header
- Hero Image
- Text
- CTA
- Footer
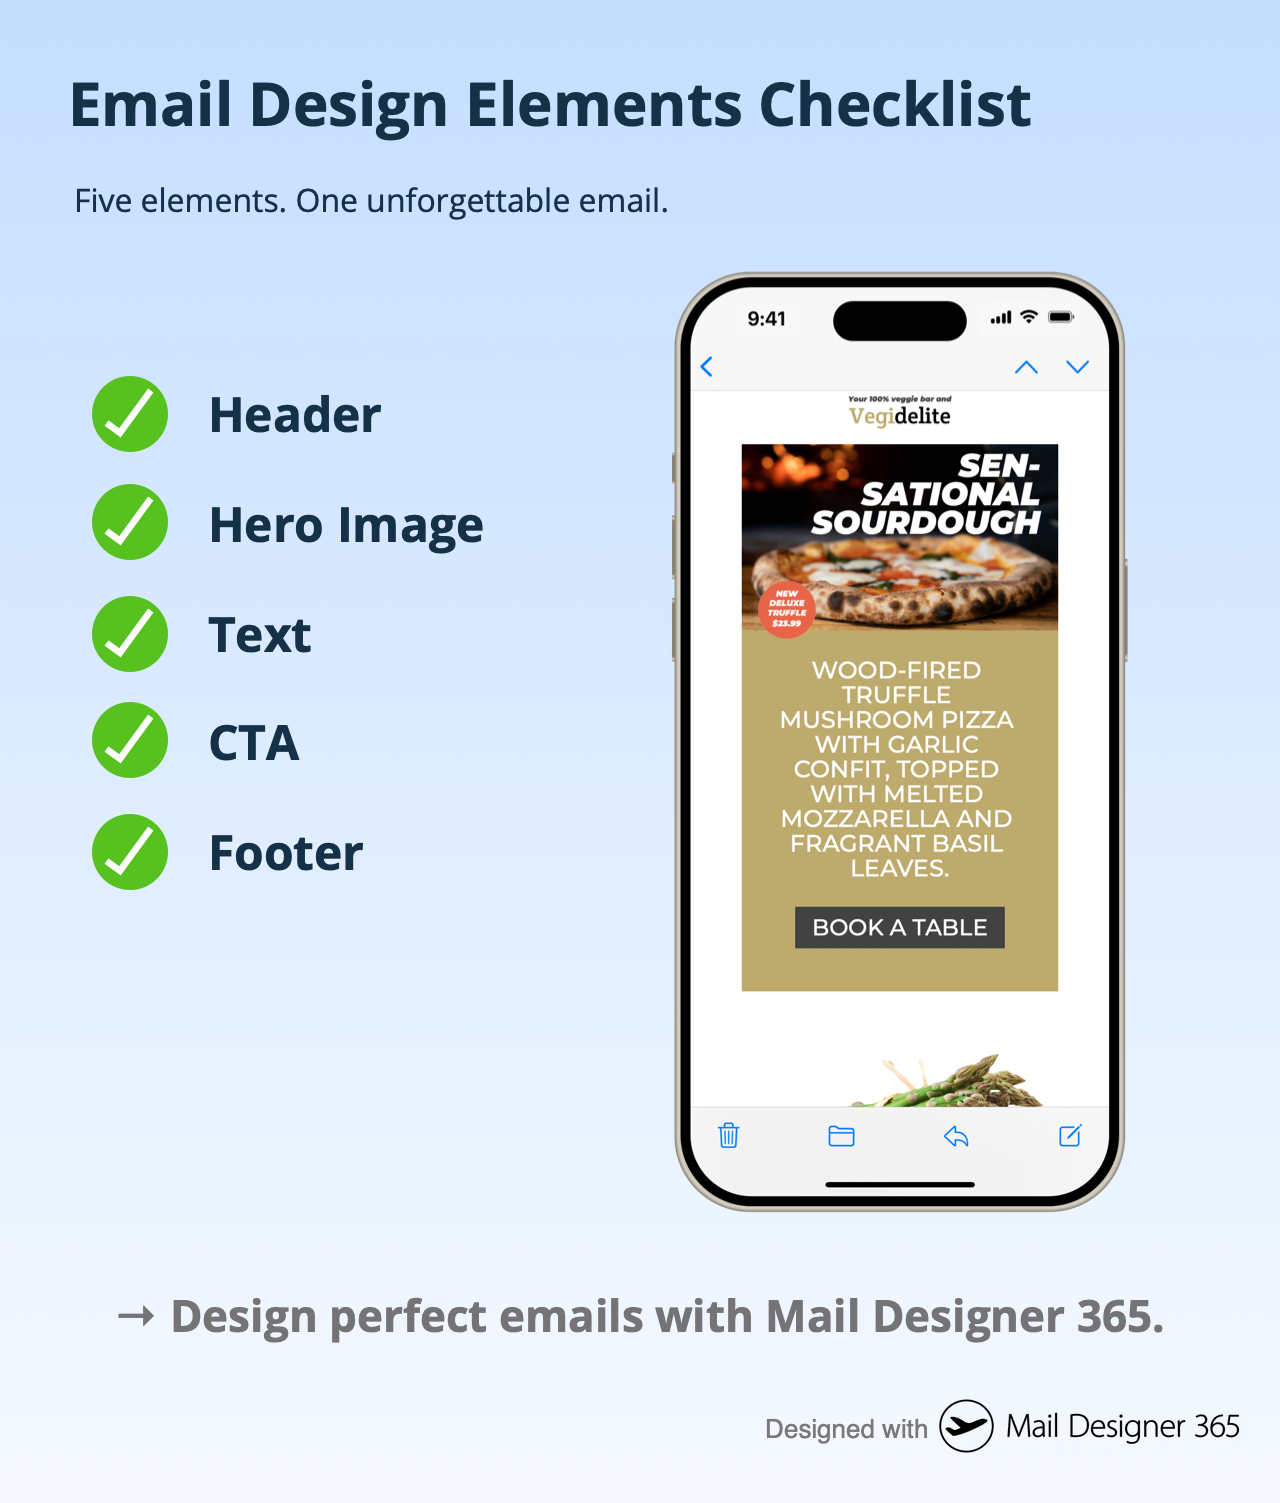
What makes an email design responsive?
Responsive email design means your email adapts fluidly to different screen sizes—whether it’s opened on a desktop, tablet, or smartphone. The side-by-side comparison below shows how a good design maintains structure and readability across formats. Mobile users make up a significant portion of email opens, so responsive layouts are essential.
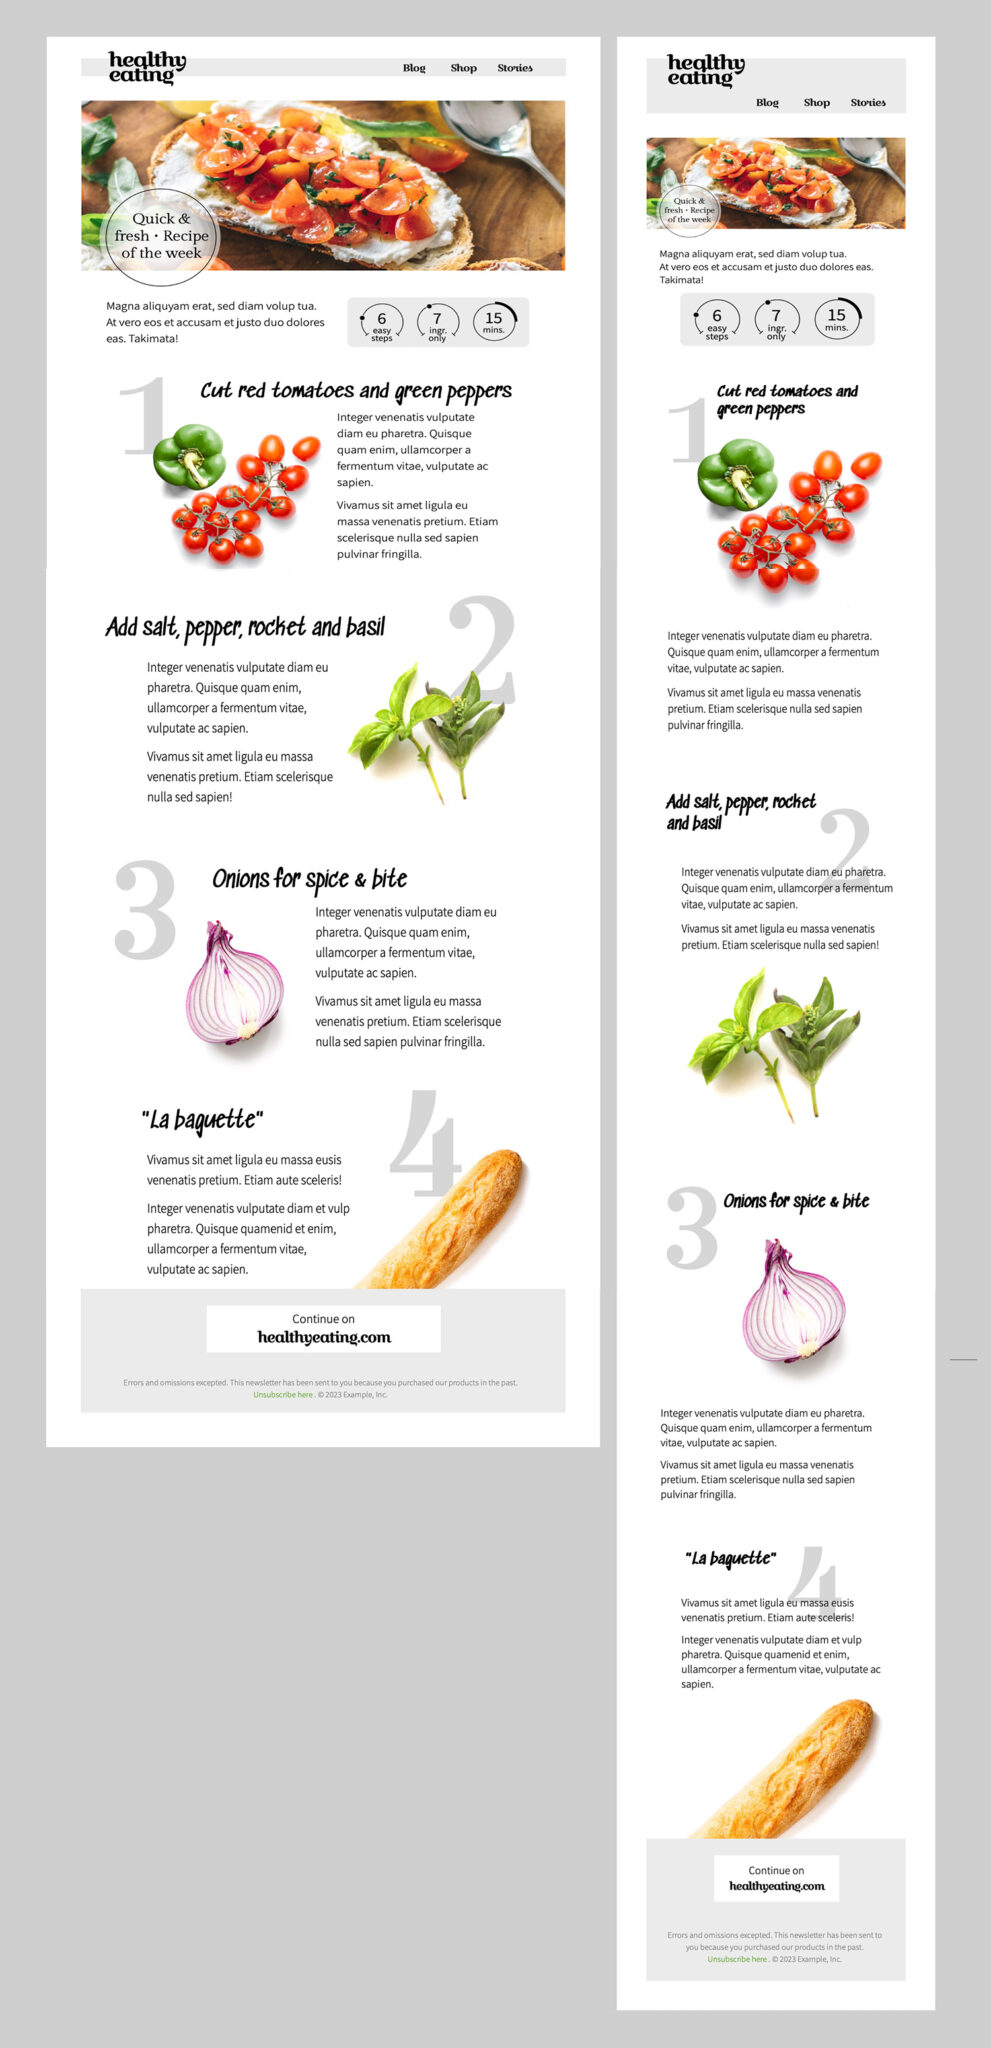
What tools help you design effective emails?
Designing an effective email doesn’t require code. Visual email builders like Mail Designer 365 let you create responsive, professional HTML emails using intuitive drag-and-drop tools, reusable blocks, and built-in preview options. Whether you’re crafting a promotional newsletter or a product announcement, Mail Designer 365 gives you full control over every design element.
Effective email design starts in Mail Designer 365.
Create better, smarter, and more beautiful emails with purpose-built tools. Start Designing your Emails with Mail Designer 365.
Email template design is the process of creating a pre-formatted layout that serves as a reusable foundation for email campaigns. These templates are usually built using HTML and inline CSS and contain structured placeholders for dynamic content—like personalized text, product images, or call-to-action buttons. Instead of starting from scratch each time, marketers and teams can use these templates to maintain consistency, save time, and ensure professional-quality emails every time.
A well-designed email template typically includes:
- Header with logo and navigation
- Hero image or featured content section
- Text areas for messages or offers
- CTA buttons to drive user action
- Footer with unsubscribe links and contact details
Why are email templates important?
Email templates ensure that emails remain consistent across devices, comply with design standards, and render properly in major email clients like Gmail, Outlook, or Apple Mail. They also help:
- Enforce brand consistency
- Save production time
- Reduce design and coding errors
- Improve responsiveness on mobile devices
Common use cases
- Newsletters: Regular updates sent to subscribers
- Promotions: Highlight product launches or sales
- Transactional emails: Send order confirmations, receipts, or alerts
- Event announcements: Share details and invitations
Reusability: A core benefit of email templates
The greatest advantage of an email template is its reusability. Once created, a template can be used again and again across different campaigns. Just update the specific content while maintaining the layout and branding. This makes scaling email marketing fast, consistent, and reliable—especially for teams working on regular mailings.
Blueprints in Mail Designer 365
Mail Designer 365 takes email template design even further with its unique Blueprints feature. A Blueprint acts as a protected master version of a design. When you or a team member opens it, a new draft is created automatically, leaving the original untouched. This means multiple versions can be customized—each tailored to different recipients or campaigns—without overwriting the base design. Want to learn more? Check out our full guide on using Blueprints for email design in teams.
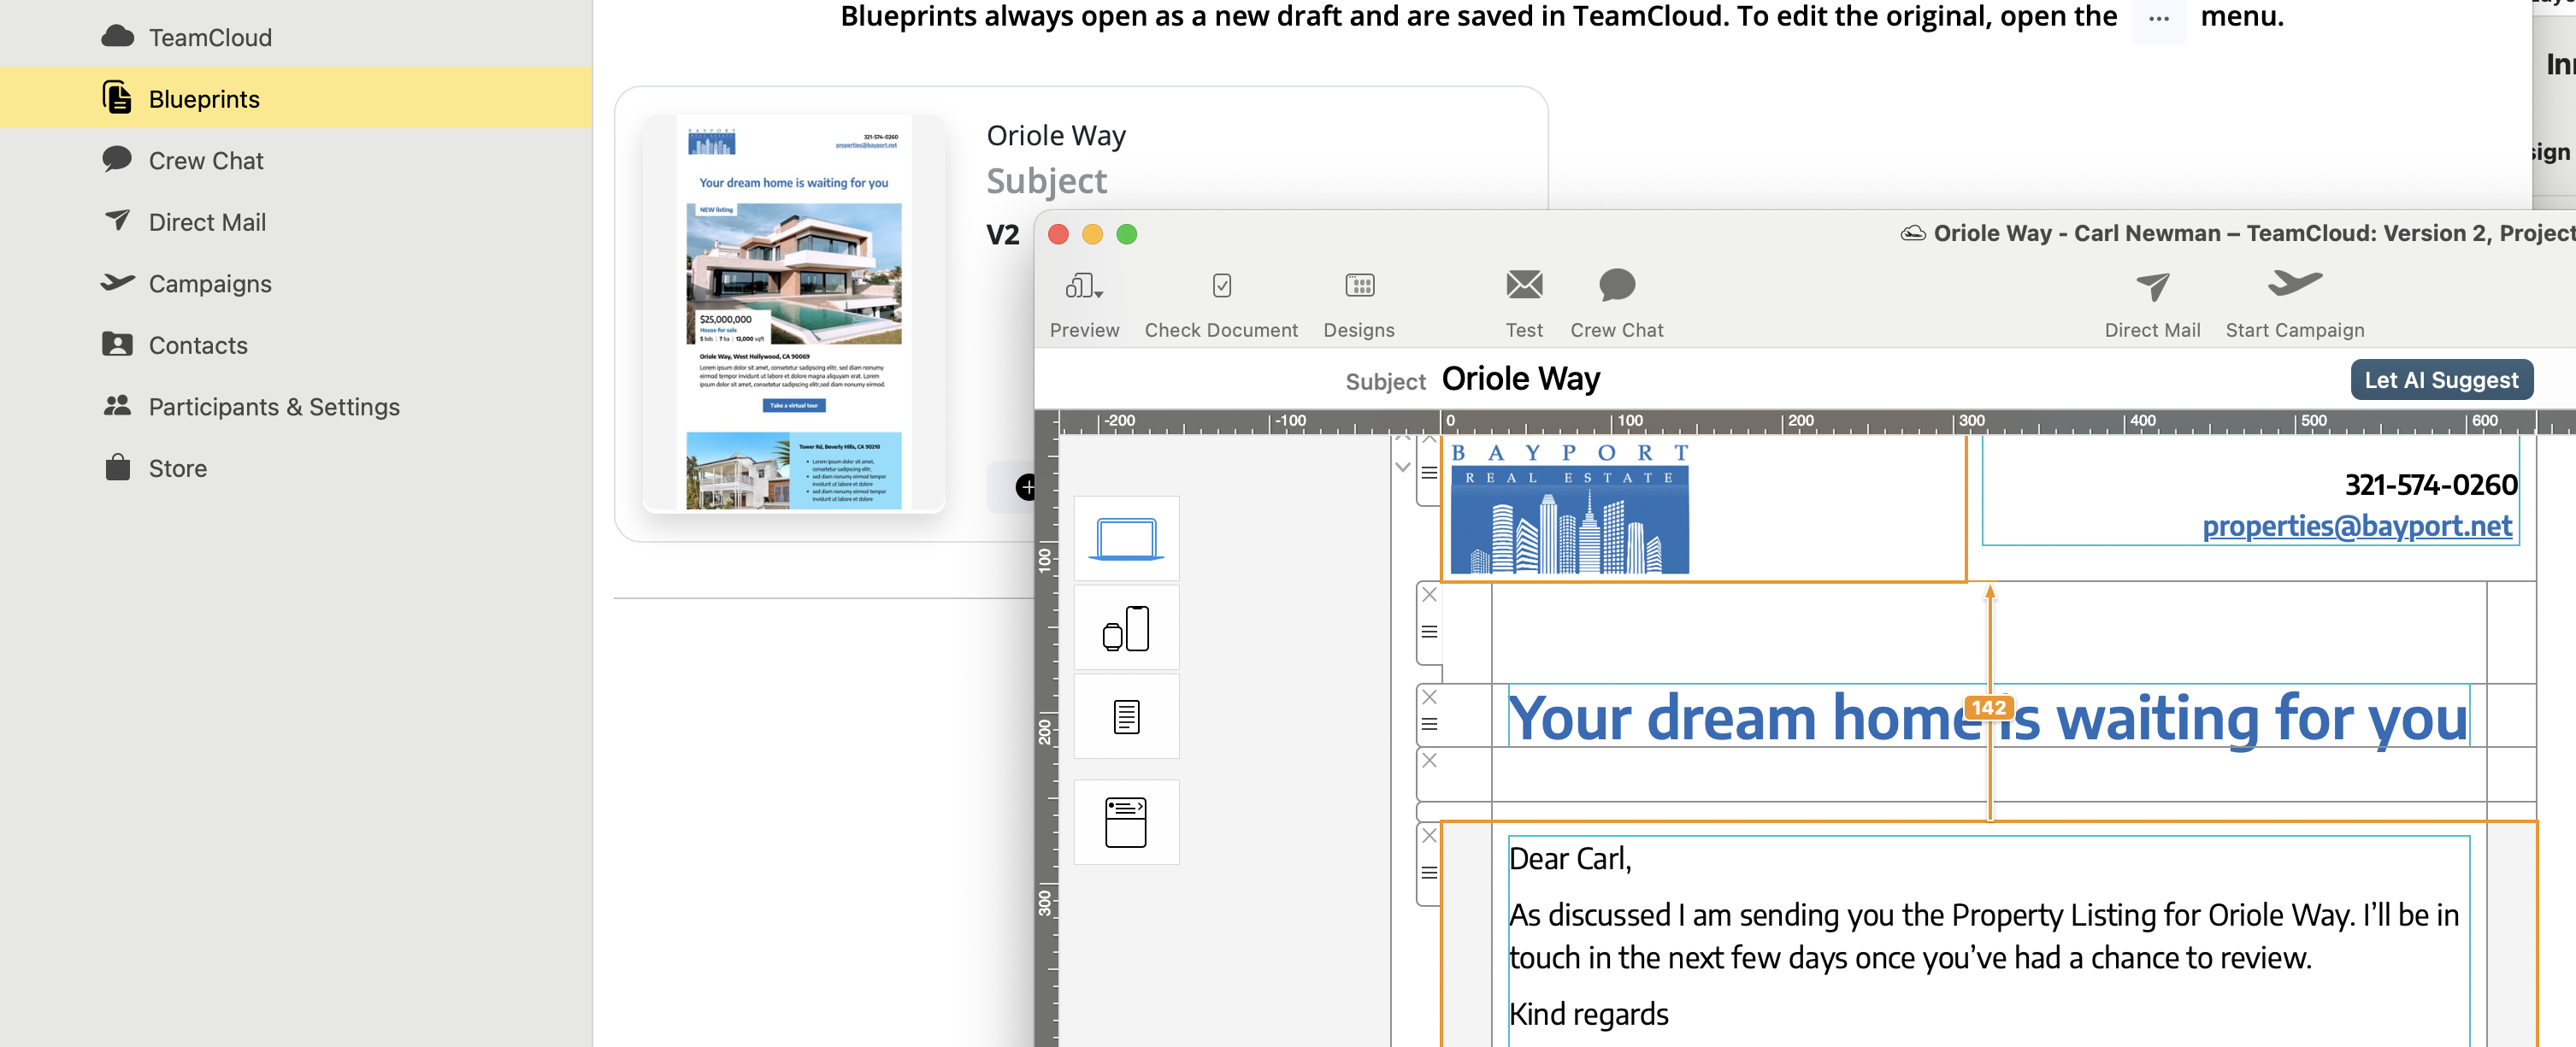
Caption: Easily customize a Blueprint in Mail Designer 365 to create unique versions for each recipient—without ever altering the original design.
This collaborative workflow is perfect for teams: one person creates the base template, while others adapt it to their use case—ensuring quality and consistency across the board.
Want to create reusable, professional email templates on your Mac?
Get started with Mail Designer 365’s Email Template Creator
In a design, click “Crew Chat” in the toolbar to start a discussion with your colleagues — or invite us to help.
Here is how to invite Mail Designer support members to your Crew Chat:
1. Log in at my.maildesigner365.com
2. Choose your project and hit „Settings“, then “Invite participants”
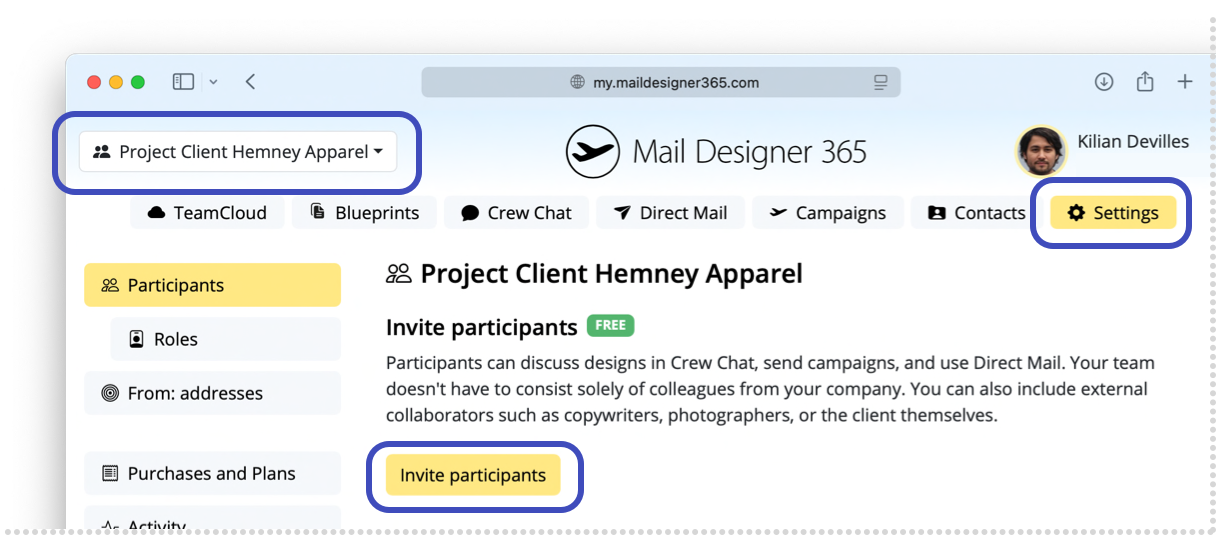
3. Enter our email address: support@equinux.com, then click “Invite”
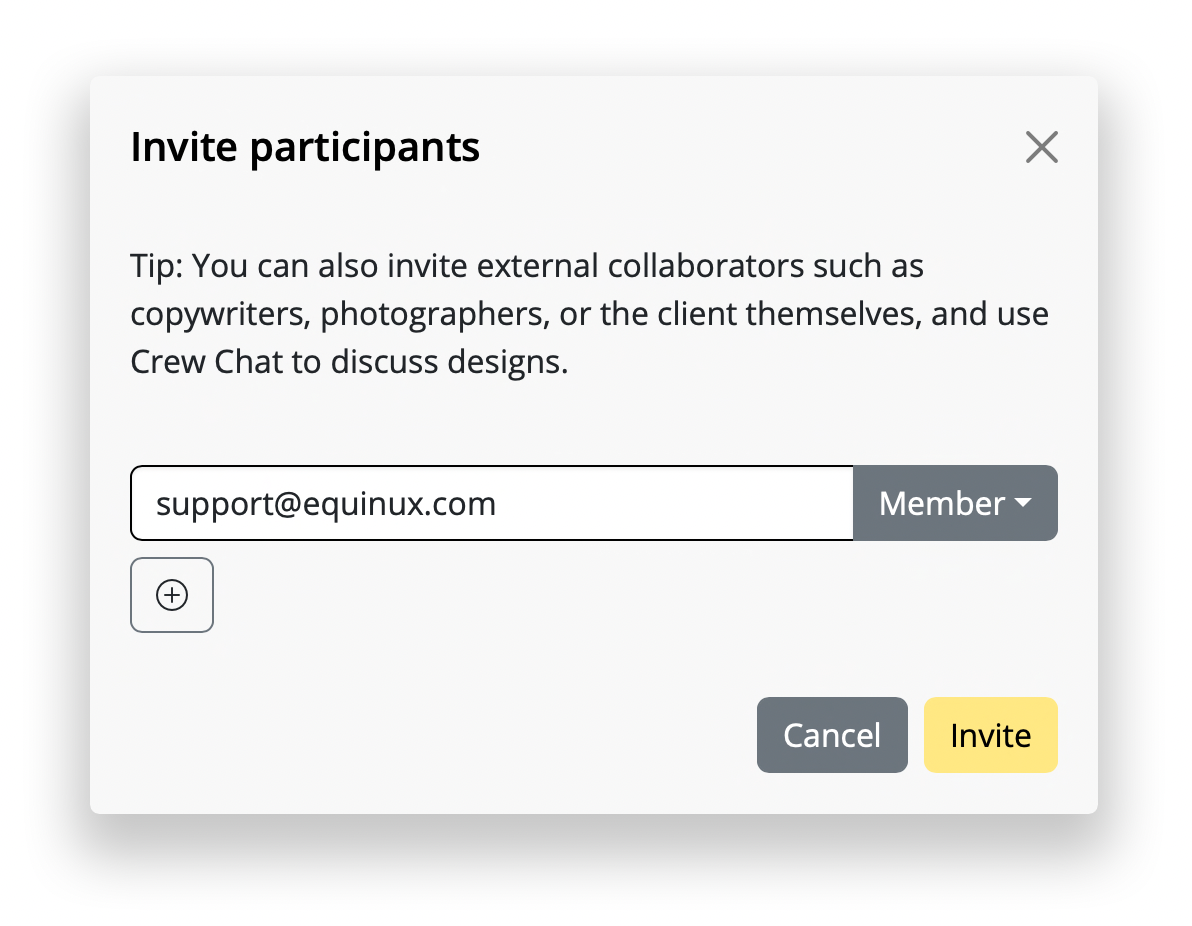
You’ll now see the member “equinux Support” listed under Pending Invitations.
As soon as we’ve joined your project (you'll get notified via email), you can open the design you have questions about (or any design) and click the Crew Chat button in the toolbar.
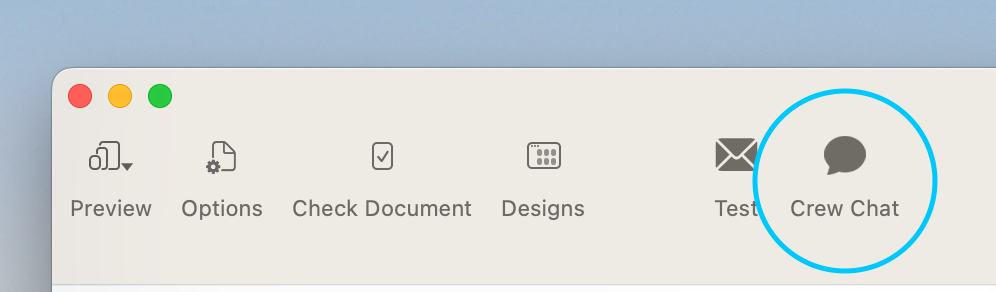
Then click “Invite” in the top right corner.
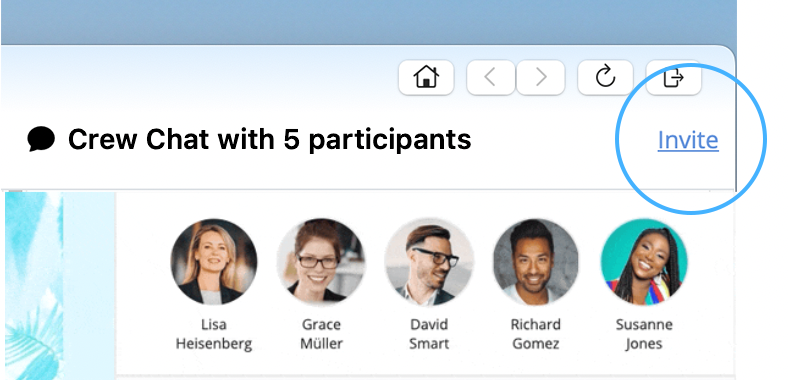
Check the member “support@equinux.com.” and hit Save.
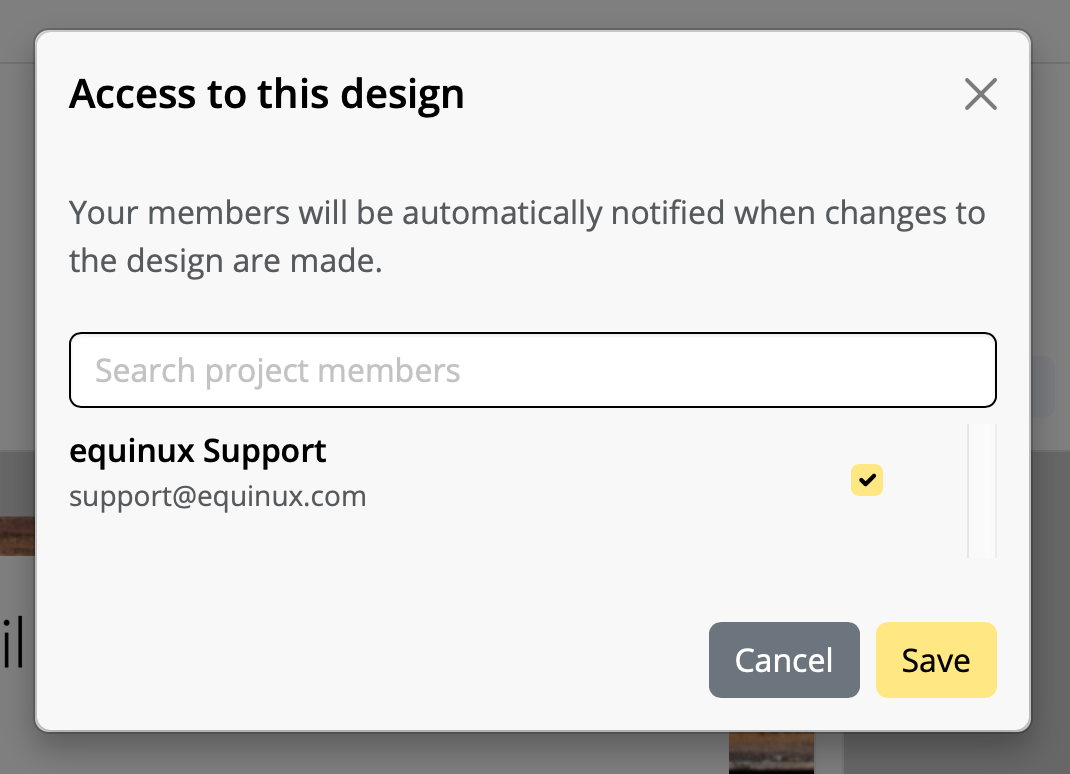
Now, say Hello in Crew Chat, and we’ll be with you shortly.
Please note: We cannot guarantee that your designs will be stored and available for longer than one year with no plan linked to your account.
Renew my plan ...
Why am I seeing this message?
Your previously used PayPal account is no longer authorized for payments. You need to reauthorize PayPal once before you can complete the purchase.
How to reconnect PayPal
- On the plan page under Payment, click Change payment method.
- In the Add payment method dialog, select Add a new payment method.
- Choose PayPal from the dropdown, then click the large PayPal button.
- Sign in to PayPal and confirm the authorization. You will be redirected back to checkout.
- Make sure PayPal is selected, then finish with Buy now.
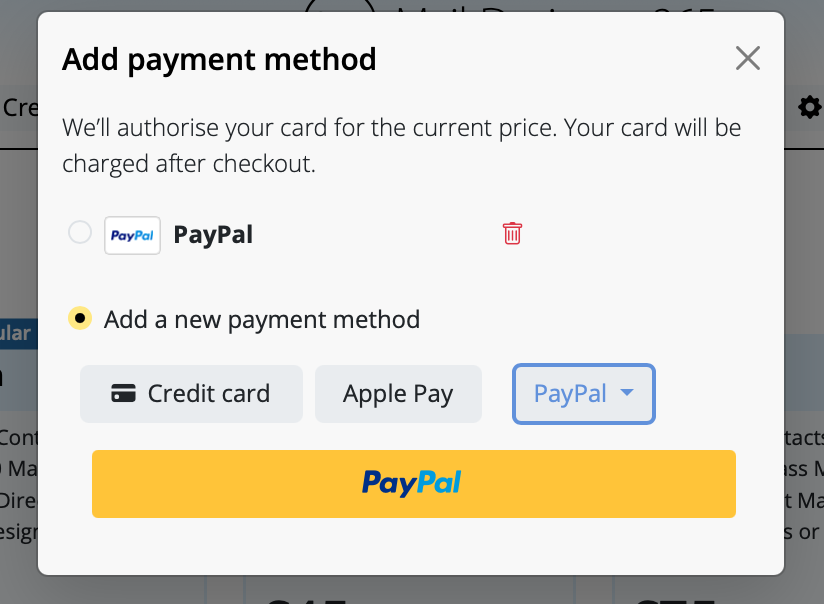
Tips
- If you still see Error during authorization, make sure you selected Add a new payment method instead of the old PayPal entry.
- Alternatively, add a Credit card or use Apple Pay and click Save.
- You can remove the old, unauthorized PayPal entry using the trash icon.